|
|
|
Designing a Table in Design View
|
|
|
|
Starting
a New Table
After you've started Access and created a new database,
do the following to start a new table.
-
Click Tables in the Objects section of the "Database Name: Database"
dialog box.
-
Next, click the New button.
-
In the "New Table" dialog box (see Figure 1, below) click Design
View.
-
Then click on the OK button.
FIGURE 1. Dialog boxes showing
"Tables" choice and "New Table" options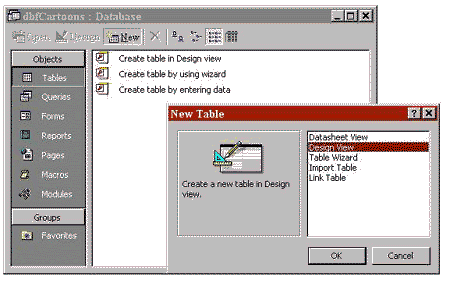 |
Data Types
Before entering data into the fields in the Design View of your new table
you should become familiar with the kinds of data you can store in these
fields. By selecting the proper Data Type for a field you can optimize
its usefulness when you perform queries, sorts and produce reports.
| Data Type |
Description |
| Text |
Text and/or numbers that don't require calculations up to 255
characters |
| Memo |
Any text and/or numbers up to 65,535 characters |
| Number |
Numeric data used in calcuations |
| Date/Time |
Date and time values for years 100 through 9999 |
| Currency |
Currency values used in calculations |
| AutoNumber |
Unique sequential number assigned automatically to each new record |
| Yes/No |
Values can be only Yes or No, True or False, or On or Off |
| OLE Object |
An object such as a spredsheet, document, graphic, etc. |
| Hyperlink |
WWW hyperlink address |
Defining Data Fields
In the Design View window (Figure 2, below), you will enter the name of
each field, the Data Type of that field and a description.
FIGURE 2. Design View window.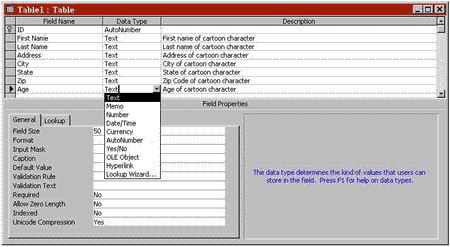 |
-
Click the mouse in the first blank cell in the Field Name column and enter
the desired name for that field.
-
Tap the TAB key
to move the insertion pointer to the Data Type column.
-
The default Data Type is Text. To change the Data Type click on the down-arrow
box in the cell and then click on the desired Data Type from the drop list
menu.
-
Tap the TAB key
again and the insertion pointer moves to the Description column.
-
Enter in any text you want to describe this field.
-
Tap the TAB key
again to repeat this process for the next field. As you create fields notice
the two tabs General and Lookup in the Field Properties portion
of the Design View window. By clicking on the General tab you can customize
the properties of the fields by defining such characteristics as Field
Size, Format, Decimal Places, etc. To modify one of these field properties
click on the property, click on the down arrow box and then click on the
desired value from the drop list menu.
-
When finished defining the fields for the table click on the Save
button in the toolbar (or click File on the menu bar and then click
the Save option in the File drop-down menu).
Now you're ready to enter data into your database. |