|
A query permits you to select records from your database tables that meet
certain conditions or criteria. For example, you may want to produce a
report that contains only those records that have a zip code greater than
90000, or you may want to select those records where the state is California
and the age of the individual is more than 50. These tests or criteria
are specified and applied to the table by creating a query. In effect the
query creates a subset of the table containing only those records and fields
specified in the query.
To create a query click Queries in the Objects section of the
"Database name: Database" dialog box and then click on the New button
(see Figure 1, below).
FIGURE 1. Dialog boxes showing
"Queries" choice and "New Query" options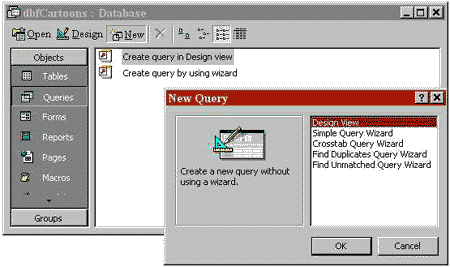 |
In the "New Query" dialog box (see Figure 1, above), click Design
View and then click the OK button. The "Show Table" dialog box
appears (see Figure 2, below). Click on the
Tables tab and then
click on the name of the table containing the data to be queried. Click
the Add button and then click the
Close button.
FIGURE 2. "Show Table" dialog box.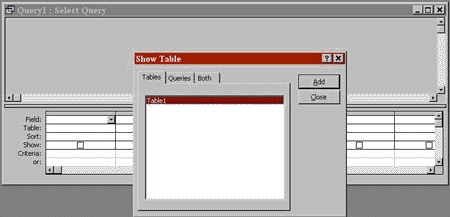 |
-
From within the "Query 1: Select Query" window, click on the first Field
cell. ( A sample "Select Query" window is shown in Figure 4, below).
-
Click the down arrow button to display the drop list of field names.
-
Click on the field name that you want to set criteria for.
-
Click on the Criteria cell and enter the criteria description. Tap the
ENTER
key.
-
Repeat this process for any additional criteria using other fields.
| Note: If more than one field is tested by a criterion the only
records selected will be those that meet the conditions of the first criterion
and any successive criteria. If more than one criterion is defined for
an individual field, those records that meet the first criterion or any
successive criteria will be selected. |
Any reports using a particular query will only display those records
meeting the collective query criteria and will only display those fields
specified in the query. To include fields that are not being tested by
any criteria but need to be part of a report, include that field in the
"Select Query" window by clicking on the next Field cell and click on the
desired field name, and leave the Criteria cell blank. Make sure the check
box in the Show cell is checked.
FIGURE 3. "Select Query" Window
sample.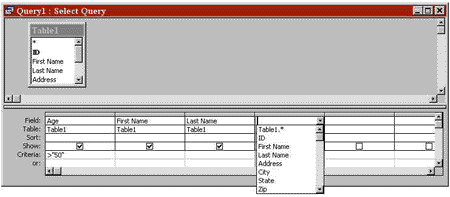 |
FIGURE 5. Sample query results.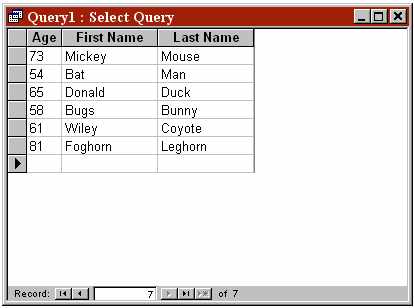 |
Save the query by clicking the Save button on the toolbar
(or by clicking on the File menu item on the menu bar and selecting Save
As). In the Save As dialog box enter the name of the query and click
OK.
(For more information about naming your file, please see the section entitled
"Naming Conventions".)
This query can now be used to produce reports
containing only those records meeting the query criterion.
|