CALIFORNIA STATE UNIVERSITY, NORTHRIDGE
 
Mail Merge Basics:
5

Generating a List (or "Catalog")

 
Use a "Catalog" style main document for lists, reports, address books, or any merge where you don't want a page break after every merged record.


Creating the Main Document in Word

Note: The instructions that follow assume you have already created a data source document in Excel.

First click Tools - Mail Merge to display the Mail Merge Helper dialog box. Then do the following.


Select the Main Document Type

  • In the Mail Merge Helper dialog box, click Create and choose Catalog from the drop-down menu (see Figure 1, right). You'll get a dialog box that asks if you want to use the active window or start a new main document. 
  • If the active window is blank, select Active Window. Otherwise, select New Main Document.
FIGURE 1. "Create Catalog" selection in Mail Merge HelperCreate Form Letters Selection in Mail Merge Helper
 

Open the Data Source

  • Click Get Data and choose Open Data Source from the drop-down menu (as shown in Figure 2, right).
  • For "Files of Type" select MS Excel Worksheets.
  • Locate (in another folder, if necessary) and select the data file you created.
  • When asked if you want to include the entire spreadsheet, click OK.
  • When you get to the dialog box that says "Word found no merge fields…" click the Edit Main Document button.
FIGURE 2. "Get Data - Open Data Source" selection in Mail Merge HelperData Source Selection in Mail Merge Helper
 

Edit the Main Document

  • Format the document as desired (see Catalog Formatting Tips below).
  • Enter the fields for one catalog entry: For each field you want to insert into the document, make sure the insertion point is appropriately located and then select the desired field name from the drop-down Insert Merge Field menu on the Mail Merge Toolbar (as illustrated in Figure 3, right). 
  • When finished, save the document.

  •  
FIGURE 3. Insert Merge Field Menu'Insert Merge Field' Drop-Down Menu
 

Catalog Formatting Tips

  • If you want your merged catalog to be formatted in tabular columns:
    • Be sure to set tabs so that there is a single tab set for the beginning of each column (so that you only tab once to position a merge field). DO NOT simply tab to Word's preset tabs. Otherwise, your columns will not line up properly when the data is merged. (Instructions for setting tabs are included in the "Formatting Features" section of the Beginner's Guide to Word 2000.)
    • If you want to include a title and/or column headings, enter the information in the document header. Otherwise, the title/headings will appear between each merged record. Note, that you may need to change the top margin to accommodate this information. Also, be sure to make the same tab settings in the header as in the body of the document. (Instructions for changing margins, creating headers, and setting tabs are included in the "Formatting Features" section of the Beginner's Guide to Word 2000.)
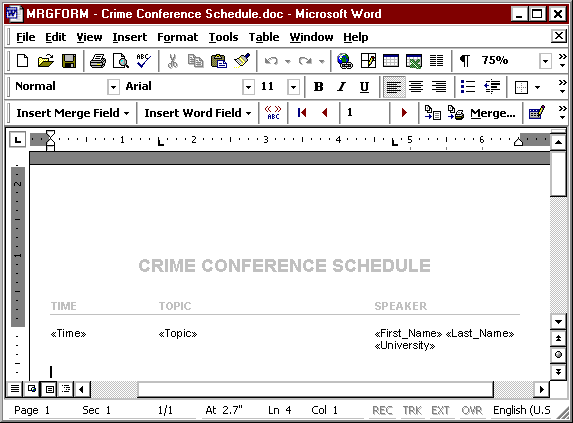
  • If you use a table for formatting your main document:
    • Make sure that you create only the number of table rows necessary for one catalog entry (most likely this will only be one row). Otherwise the extra rows will repeat between each merged record.
    • If you want to include a title and/or table header row, enter that information in the document header. Otherwise, the title and header row will appear between each merged record. Note, that you may need to change the top margin to accommodate this information. (Instructions for changing margins are included in the "Formatting Features" section of the Beginner's Guide to Word 2000. Use Word's Help options to learn more about tables.)
 
An example of a main document for a catalog is shown in Figure 4 (below). The title and column headings are part of the header (as denoted by the grayed text).

FIGURE 4. Main Document ExampleWord Window with Main Document Text and Merge Fields


Merging a Catalog

Note: This step assumes you have already created both a data source file (in Excel) and a main document (in Word).
  1. If it isn't already open, open the main document containing the formatting and merge fields for your catalog.
  2. If the Mail Merge toolbar isn't showing, point at one of the toolbars, right-click your mouse, and select Mail Merge from the pop-up menu that appears.
  3. On the Mail Merge toolbar, click the Merge to New Document button (as illustrated in Figure 5, below).
FIGURE 5. Mail Merge ToolbarMail Merge Toolbar with mouse pointer on Merge to New Document button.
  1. Print your catalog from the document that is created.


Top  | Contents | Data | Form Letters | Mailing Labels | Envelopes | Lists/Catalogs | Select Records | Learn More
Prepared by Gail Said Johnson, User Support Services
March 20, 2001


ITR's technology training guides are the property of California State University, Northridge. They are intended for non-profit educational use only. Please do not use this material without citing the source.