Notes and Suggestions:
-
You might want to bold the header row (or change the font color) to make
the field names stand out.
-
Use the "Freeze Panes" feature to make sure you can always see your field
names and the major identifying field(s) for each record (such as first
and last name). Click in a cell immediately below the row to be frozen
and immediately to the right of the last column to be frozen (cell C2 in
Figure 1, above), then go to the Window menu and select Freeze
Panes. A solid horizontal line and a solid vertical line indicate which
rows and columns will always be visible (Row 1 and Columns A and B in Figure
1). This means that as you scroll to the right to fill in data or scroll
down as you add records, you will always be able to tell what record and
field you're working on (see Figure 2, below).
FIGURE 2. Sample Excel Window Illustrating
Frozen Panes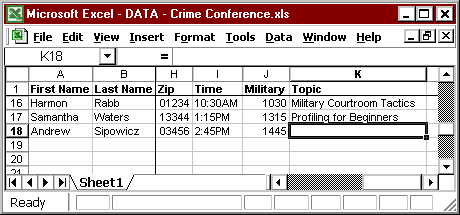 |
| |
-
If you want leading zeros to show in your data (as in zip code), do the
following:
-
Click on the column letter for the column that will contain the numerical
data to highlight that column.
-
From the Format menu choose Cells.
-
Make sure the Number tab is on top, then choose Custom from
the "Category:" list.
-
Choose 0 (zero) from the "Type:" list, then add zeros until the
desired number of digits is reached (such five zeros 00000 for a zip
code field).
-
When finished, click OK.
Sorting
the Excel Data
To sort your Excel data file, click in any cell in the worksheet, then,
from the Data menu, choose Sort. In the dialog box that appears,
make the following selections (see Figure 3, below), then click OK.
| My list has... |
-
Make sure Header row is selected (so the field names don't get sorted
with the data).
|
| Sort by... |
-
Choose from the drop-down list of field names (if you forget to click "Header
row" you'll see column labels instead such as Column A).
-
Choose Ascending or Descending
|
| Then by... |
-
Use either or both of these additional sorting selections to specify up
to three levels of sorting (you might want to "Sort by" Last Name and "Then
by" First Name, for example).
|
FIGURE 3. Sort Dialog Box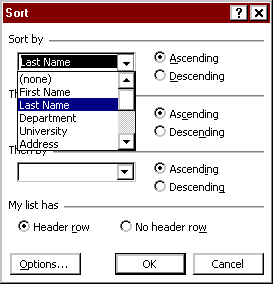 |
| |
|
