CALIFORNIA STATE UNIVERSITY, NORTHRIDGE
 
Mail Merge Basics:
4

Generating Individually Addressed Envelopes

There are three steps to any mail merge project. Step 1 is to create a data document — as described in the "Creating and Sorting a Data Source Document" section. Steps 2 and 3 for generating individually addressed envelopes are outlined in this document.


Creating the Main Document in Word

Note: The instructions that follow assume you have already created a data source document in Excel.

First click Tools - Mail Merge to display the Mail Merge Helper dialog box. Then do the following.


Select the Main Document Type

  • In the Mail Merge Helper dialog box, click Create and choose Envelopes from the drop-down menu (see Figure 1, right). You'll get a dialog box that asks if you want to use the active window or start a new main document. 
  • If the active window is blank, select Active Window. Otherwise, select New Main Document.
FIGURE 1. "Create Envelopes" selection in Mail Merge HelperCreate Envelopes Selection in Mail Merge Helper
 

Open the Data Source

  • Click Get Data and choose Open Data Source from the drop-down menu (as shown in Figure 2, right).
  • For "Files of Type" select MS Excel Worksheets.
  • Locate (in another folder, if necessary) and select the data file you created.
  • When asked if you want to include the entire spreadsheet, click OK.
  • When you get to the dialog box that says "Word found no merge fields…" click the Edit Main Document button to display the Label Options dialog box.
FIGURE 2. "Get Data - Open Data Source" selection in Mail Merge HelperData Source Selection in Mail Merge Helper
 

Choose Envelope Options

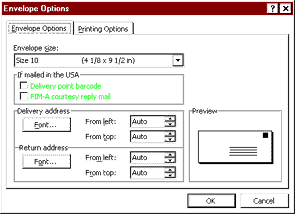
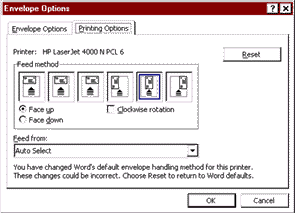
  • Make appropriate selections in the Envelope Options dialog box using both the Envelope Options and Printing Options tabs.
  • In the examples in Figures 3 and 4 (below), the envelope size selected is Size 10; the feed method is centered and face up.
  • When finished, click OK.
 
FIGURE 4. Envelope Options TabEnvelope Options dialog box FIGURE 5. Printing Options TabPrinting Options tab
 

Format the Envelope Address

  • Create a sample envelope address by placing/choosing desired fields from the Insert Merge Field drop-down menu (as illustrated in Figure 6, right).
  • Click OK when finished.
FIGURE 6. Insert Merge Field MenuEnvelope Address dialog box
 
An example of a main document for generating individually addressed envelopes is shown in Figure 7 (below).

FIGURE 7. Main Document Example
Mail Merge Main Envelopes Document


Merging Envelopes

When you finish creating the main document, you'll return to the Mail Merge Helper dialog box. 
  1. Click the Merge button.
  2. Take a look at the selections in the Merge dialog box that appears and make changes, if desired. Normally it is a good idea to merge to a new document before printing (i.e., don't change that setting). If you make no changes, all records will be merged to a new document and there will be no blank lines where data fields are empty.
  3. Click the Merge button when finished. In a few moments, your merged envelopes will appear in a new document window.
  4. Save the newly created document, if desired, and print your envelopes from this document.
Note: One of the reasons for using the merge feature is so that you can update the data file as needed and easily generate accurate labels at any time. Therefore, if you do save the merged envelopes document, it is a good idea to delete that document after printing the envelopes.


Saving the Main Document and Merging Again Later

As noted above, one of the reasons for using the merge feature is so that you can update the data file as needed and easily generate accurate labels at any time. Therefore, be sure to save your main document. Then, when you want to merge your envelopes as some later date, do the following.
  1. Open the main document containing the merge codes for your envelopes.
  2. If the Mail Merge toolbar isn't showing, point at one of the toolbars, right-click your mouse, and select Mail Merge from the pop-up menu that appears.
  3. On the Mail Merge toolbar, click the Merge to New Document button (as illustrated in Figure 8, below).
 
FIGURE 8. Mail Merge ToolbarMail Merge Toolbar with mouse pointer on Merge to New Document button
  1. Print your envelopes from the document that is created.
Helpful Hint: You can use the same main document to generate envelopes for different mailing lists (i.e., data source documents) if you use the same field names for each data source document you create. Just be sure to select the correct data source before merging the envelopes. That is, do the following.
  1. Open your main document.
  2. Choose Tools - Mail Merge.
  3. In the Mail Merge Helper dialog box, click the Get Data button and choose Open Data Source.
  4. Locate and select the desired data source file (e.g., a Microsoft Excel worksheet).
  5. Then go ahead with the merge.
 

Top  | Contents | Data | Form Letters | Mailing Labels | Envelopes | Lists/Catalogs | Select Records | Learn More
Prepared by Gail Said Johnson, User Support Services
March 20, 2001


ITR's technology training guides are the property of California State University, Northridge. They are intended for non-profit educational use only. Please do not use this material without citing the source.