Saving Files
Microsoft Word automatically saves all your files as Word documents in
a particular location (default folder). This section describes how you
can save a document to a floppy disk and how you can save a file as something
other than a Word document (as an earlier version of Word or as a WordPerfect
document, for example).
| Note: Instructions for saving a Word document file without specifying
a location (i.e., saving to the default location) are described in the
"Saving a Document" section of "Bare
Bones Basics". |
Saving a File to a Floppy Disk
Do the following in order to save a file to a floppy disk.
-
Make sure the file you want to save is open on your computer screen.
-
If you want to keep a file on your computer's hard disk as well as saving
it to a floppy disk, save the file as you normally would before continuing.
-
Place a formatted disk in the floppy disk drive.
-
Click File on the Menu Bar and choose (click) Save As.
-
In the "Save As" dialog box, click in the "Save in:" menu box or on the
arrow to the right of the menu box to see the hierarchy of disk drives
and folders on your computer. (See Figure 1, below.)
-
To save a file on the A drive, click "3 1/2 inch floppy (A:)" [if you have
a B drive and want to save the file there, click "3 1/2 inch floppy (B:)"].
-
Make sure you also give the file a name, and then click the Save
button.
FIGURE 1. "Save As" Dialog
Box Showing Storage Location Hierarchy |
| |
Notes:
-
Once you have selected the A (or B) drive for saving a file, that drive
will remain selected until you exit Word. If you want to save a file to
the default location (such as the Personal folder on the C drive), choose
the appropriate location from the "Save in:" list in the "Save As" dialog
box.
-
On some campus computers, the default location for saving a document is
the "3 1/2 inch floppy (A:)" disk drive (in a student computer workroom,
for example). If "3 1/2 inch floppy (A:)" is the "Save in:" area at the
top of the "Save As" dialog box, all you have to do is make sure you insert
a formatted disk into the disk drive and name the document before saving.
-
If "3 1/2 inch floppy (A:)" is the drive specified and you don't have a
disk in that drive, you'll get an error message telling you the "Selected
floppy disk drive is not in use" and to "Check to make sure a floppy disk
is inserted."
|
Saving a File as Something Other Than a Word 2000
Document
When you are working in Word, the program assumes you want to save what
you are working on as a Word document (and most of the time you do!), so
that is the file type displayed in the "Save as type:" area at the bottom
of the "Save As" dialog box (see Figure 2, below). Sometimes, though, you
may want to save your document in some other format. If you use Word 97
or 2000 on campus and use an earlier version of Word or some other word
processor at home, for example, you may need to save a file in a different
format so that it will open properly in your other word processor.
To save a document as something other than a Word document, do the following.
Preparatory Steps:
-
Make sure the file you want to save is open on your computer screen.
-
If you want to save the file as a Word 2000 file as well as some other
file type, save the file as you normally would before continuing or save
to floppy disk (see instructions above).
-
If you want to save the file to a floppy disk (and it's likely that you
do since you probably want to transport the file to another computer),
place a formatted disk in the floppy disk drive.
File-Saving Procedure:
-
Click File on the Menu Bar and choose (click) Save As.
-
In the "Save As" dialog box, click in the "Save as type:" menu box or on
the arrow to the right of the menu box to see a list of the file types
you can choose from (see Figure 2, below).
-
Use the scroll bar (if necessary) to find the file type you want (such
as Word 6.0/95, Word 5.1 for Macintosh, or WordPerfect 5.1), and click
the file type to select it. If you don't find the word processor you want,
choose Rich Text Format.
-
If you're saving to a floppy disk, be sure to make the appropriate choice
from the "Save in:" menu [e.g., "3 1/2 inch floppy (A:)"].
-
Type a file name in the "File name:" text box. The appropriate extension
will for the file type chosen will be associated with the file automatically
(even if you don't see it!). If you're saving to a DOS or Windows 3.1 file
type (such as Word 6.0 for Windows) be sure to restrict the length of the
file name to a maximum of eight characters (with no spaces).
-
When you are finished, click the Save button to complete the "save
as" procedure.
FIGURE 2. "Save As" Dialog
Box with File Types List Displayed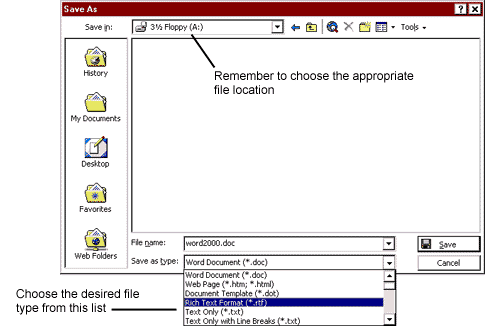 |
| |
|