CALIFORNIA STATE UNIVERSITY, NORTHRIDGE
 
Beginner's Guide to Word 2000:
2

Bare-Bones Basics

When you use Word 2000, at the very least you will want to type some text, correct any typing errors you make, add or delete text, save what you have typed, and print out a copy of your masterpiece. You'll probably also want to reopen a saved document to make additions or changes to it, and eventually you'll want to exit Word. This section is devoted to these bare-bones basics. Spelling and grammar check are also covered as these are visible, ongoing, automatic features of the program.


Creating a Document

Once you have started Word, in order to create a document all you have to do is start typing when the document window appears on the screen. The text will begin at the top left corner of the page.
 
Note: Word also has a "click and type" feature that allows you to start typing anywhere on the page. Double-click where you want to begin typing and Word will do the appropriate formatting for you — center the text, or set a tab, for example. To find out more about "click and type" use Microsoft Word Help (as described in "How to Learn More".

The large blank area is like a clean sheet of typing paper that has been rolled into a typewriter. As you type, the text will appear on the screen (in the window). When you reach the end of a line (the right margin) the text will automatically continue, or “wrap”, to the next line. You need press the ENTER key only at the end of a paragraph or at the end of a line that is shorter than full width of the page.

After the window fills with text, the beginning of the document will start to disappear off the top of the document editing portion of the screen one line at a time as you type. When a page is filled, a new page will begin automatically. In Normal View a dotted line indicates where there will be a page break in your printed document.


Basic Editing Features

Correcting Errors

"Erasing" Mistakes as You Type. To correct an error immediately after it is typed, tap the BACKSPACE key (located at the top righthand side of the main keyboard). Tapping BACKSPACE "erases" mistakes one character at a time to the left of the insertion point. When you have "erased" the incorrect character(s), type the correct character(s) and continue entering text.

Deleting Text. To delete a character (or characters) at some location other than the current insertion point, first move the I-Beam pointer to the desired location and click the primary mouse button once. Use the BACKSPACE key to delete to the left of the insertion point (i.e., backward); use the DELETE key (on the keypad between the main keyboard and the numeric keypad) to delete to the right of the insertion point (i.e., forward).

To delete a section of text — several words, a sentence, or a paragraph, for example — do the following:

  1. Move the I-Beam pointer to the beginning of the text to be deleted.
  2. Click and hold down the primary mouse button.
  3. Drag the mouse to the right (and possibly down, depending on the amount of text to be deleted) until the text you want to delete is highlighted (e.g., white in a black background).
  4. Release the mouse button.
  5. Tap the DELETE key.
The highlighted text will disappear.

Undo button Restoring a Deletion. If you delete something by mistake, you can reverse what you just did by clicking the Undo button on the Standard Toolbar (see illustration, left.)
 
"Undo" Notes:
  • The Undo feature will reverse the last change you made to your document. If the last change was a deletion, that is what will be reversed (undone). If the last thing you did was add a sentence to your document and you choose Undo, the sentence you just typed will be removed.
  • To reverse an Undo, click the Redo button.

Adding Text

If you decide you want to insert more text somewhere — because, perhaps, you left out a word, do the following:
  1. Move the I-Beam pointer to the position where you want to add the text and click once.
  2. Type whatever it is you want to add. The text you add will be inserted and the text following it will reformat to fit the margins.
  3. To continue working on your document, move the I-Beam to the end of the document, click once, and begin typing.

Moving Text

 
Cut-Copy-Paste buttons Three buttons on the Standard Toolbar can be used to move text around in your document. These are the Cut (scissors), Copy (two sheets of paper), and Paste (sheet of paper and clipboard) buttons (see illustration, above left).
 
To move a section of text, do the following:
  1. Highlight (select) the text to be cut or copied by clicking and dragging the I-beam pointer from the beginning to the end of the text selection (i.e., across and/or down). 
  2. Click the appropriate button for action you wish to perform: 
    • Click Cut, if you wish to delete the text from its current location and paste it somewhere else, or 
    • Click Copy, if you wish to leave the text where it is and also paste a copy somewhere else. 
  3. Move the insertion point to (i.e., click the I-beam pointer at) the location where you want the pasted text to begin. 
  4. Click the Paste button to place the text in the new (or additional) location.
Note: If you cut or copy two or more items, Word's Collect and Paste feature is initiated. Normally, a floating Clipboard toolbar displays automatically when you cut or copy two or more items, but if it doesn’t, you can display it by clicking View on the Menu Bar and selecting Toolbars then Clipboard. From the Clipboard toolbar you choose items to paste (all at once or individually). 
 

Correcting Spelling and Grammatical Errors

Word provides ongoing spelling and grammar checking. It also makes automatic corrections of some perceived errors (AutoCorrect).

AutoCorrect. The AutoCorrect feature makes corrections to various spelling errors as defined in the program. These include correcting some common "typos" (such as "teh" to "the") and capitalizing the first letter of a sentence.

AutoCorrect Options. You can control how AutoCorrect operates (or disable it altogether) by clicking Tools on the Menu Bar and selecting AutoCorrect. In the dialog box that appears, and starting with the AutoCorrect tab, make any changes desired (adding or deleting check marks in selections boxes).
 
Note: There is also a feature called AutoFormat that modifies formatting — changing straight quotes ("...") to "smart quotes" (“...”) and a double hyphen (--) to an em dash (—), for example. AutoFormat options can be set in the AutoCorrect dialog box (as described above).

Spell Check. A red wavy line under a word indicates a possible spelling mistake. When you see a red wavy line under a word, you can respond in one of three ways:

  • You can ignore it (if you're sure you haven't made a mistake);
  • You can correct the mistake; or
  • You can see what Word suggests (and correct the error) by doing the following.
    1. Click somewhere in the potentially misspelled word.
    2. Click the secondary (e.g., right) mouse button to display a popup shortcut menu. 
    3. If you see the correct spelling on the pop-up menu, simply click the appropriate selection to replace the incorrectly spelled word — and you're done. 
Spell Check Notes: 
  • If a word is spelled correctly and you prefer not to see the wavy red line, choose Ignore All from the spell check pop-up menu.
  • To add a correctly spelled word to Word's dictionary, choose Add.
  • The menu also includes a Spelling option. If you choose that option, a dialog box will be displayed in which you can make choices.

A misspelled word and spell check pop-up menu are shown in Figure 1 (below).  

FIGURE 1. Spell Check Illustration (misspelled word and pop-up menu)

Spell Check illustration

 
Grammar. A green wavy line under a word section of text indicates a potential grammatical error. When you see a green wavy line under a word or section of text, you can respond in one of three ways:
  • You can ignore it (if you're sure you haven't made a mistake);
  • You can correct the mistake; or
  • You can see what Word suggests (and correct the error) by doing the following.
    1. Click somewhere in the potentially grammatically incorrect word or phrase.
    2. Click the secondary (e.g., right) mouse button to display a pop-up shortcut menu. 
    3. The shortcut menu may include alternate suggestions (see Figure 2, below). If you want to correct the grammar as suggested, simply click the alternate wording — and you're done.
 
FIGURE 2. Grammar Check Illustration (grammatical error and pop-up menu)

Grammar Check illustration

 
Grammar Check Notes: 
  • If you're happy with the grammatical structure of your sentence and you prefer not to see the wavy green line, choose Ignore from the grammar pop-up menu.
  • The Grammar selection on the pop-up menu provides a dialog box containing additional options.
  • The About this Sentence menu selection provides a "Office Assistant" bubble that describes the grammatical structure of the sentence and suggests alternative ways of writing similar sentences. For example, for sentences written in passive voice (such as the sentence in Figure 2, above), the Office Assistant suggests that an active verb creates a livelier, more persuasive sentence than a passive verb does.

Spelling and Grammar Options. You can set options for spelling and grammar checking by clicking Tools on the Menu Bar and selecting Options. In the dialog box that appears, select the Spelling & Grammar tab, then make the changes desired (adding or deleting check marks in selections boxes).


Saving a Document

It is a good idea to save a document frequently, particularly before printing it, to safeguard against losing your work.

Saving a Document for the First Time

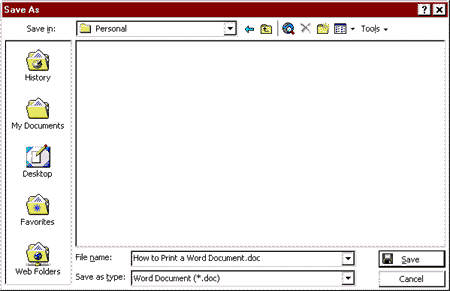
Save button To save a document, click the Save button on the Standard Toolbar (see illustration, left). The first time you save a document a dialog box will appear as shown in Figure 3, below. 
 
FIGURE 3. "Save As" Dialog Box'Save As' Dialog Box
 
When you save any document for the first time, Word suggests a file name for you in the "File name:" text box that corresponds to the first heading or sentence in your document (up to 255 characters). If you like that name, simply click the Save button to save the file in the default (or last used) folder on your computer ("Personal" in Figure 3, above). 

If you want to give the file a different name, replace the suggested file name with the name you want to give your document (up to 255 characters, spaces allowed), then click the Save button (or tap the ENTER key). 
 
Document Naming Notes:
  • To remove the suggested name all you have to do is start typing. The highlight (i.e., colored bar highlighting the suggested name) and the name will disappear as soon as you start to type. If you inadvertently remove the highlight — by clicking in the typing area without actually typing anything, you will have to highlight or delete the suggested name before typing the name you want to give your document.
  • The name of a document may contain 1-255 characters, including spaces.
  • The name of a document may not contain the following characters:
    • |  \  <  >  ?  "  :
  • The extension .doc will be associated with the file name to identify it as a Word document; however, you will not see the extension unless the Windows operating system has been set to show extensions.
  • When you save a document it will be stored in the default folder, such as "Personal", unless otherwise specified. For additional information, see "Saving Files" in the "File Management" section (saving a document to a floppy disk, for example).

Saving a Previously Saved Document

If you have already saved your document at least once, when you click the Save button, Word will automatically save your modifications under the same file name you previously gave the document (and in the same folder). No dialog box will appear. The modified version will replace the previous version of the document.


Printing a Document

Save button To print the document currently on your screen you can click the Print button on the Standard Toolbar — a picture of a printer (see illustration, above left). The entire document will be printed.
 
If you want to print only a part of a document, do the following:
  1. Click File on the Menu Bar. A list of menu options will drop down.
  2. Choose (click) Print... to display the Print dialog box (as shown in Figure 4, below).
  3. Make the selection desired. For example, to print only the current page (i.e., the page where the insertion point is located), click Current Page. Note that the default selection is All.
  4. When you are ready to print, click the OK button (or tap the ENTER key).
 
FIGURE 4. "Print" Dialog Box'Print' Dialog Box


Closing a Document Window

When you have finished working on a particular document but want to continue working in Word (on some other document), you should close the current document window and, if appropriate, save your document.
 
Document Window Note: Although you may have more than one document window open at the same time, it is recommended that you work on one document at a time until you become comfortable using Windows

To close a document window and continue working in Word, do the following:

  1. Click File on the Menu Bar. A list of menu options will drop down.
  2. Choose (click) Close to close the currently displayed document.
    • If you have already saved all modifications to the document, the document will be closed immediately; that is, without confirmation.
    • If you have made changes to the document since you last saved it, you will see a dialog box such as the one shown in Figure 5, below.
 
FIGURE 5. Save-and-Close Dialog BoxSave-and-Close Dialog Box
 
      • To save changes before closing the document, click the Yes button.
      • If, for some reason, you don't want to save the changes, click the No button. 
      • To cancel the request to close the document (i.e., to continue working on it), click the Cancel button. 
'New Blank Document' button Note: When you close your document, the editing area and many Word features will disappear from view (only the File and Help items will remain on the Menu Bar, for example). To start a new document (and thereby get the editing screen back), click the New Blank Document button on the Standard Toolbar (a sheet of paper with a downturned corner; see illustration, above left) to display a new working window. 


Opening an Existing Document

It is likely that you will want to work on a document, close and save it, and then open it again later to add more material or edit what you've already typed. There are two ways to open a document in Word.

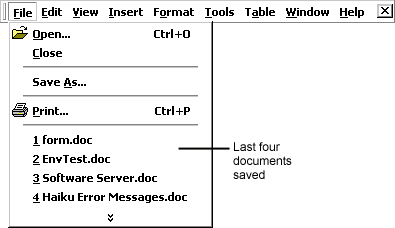
If the document you want to open is one of the last four documents you worked on, you can simply click File on the Menu Bar and choose the document desired from the list near the bottom of the drop-down menu (see Figure 6, below).
  

FIGURE 6. File Menu with Most Recently Accessed Files ListedFile menu with most recently accessed files listed
 
Open button To open any document, you can do the following: 
  1. Click the Open button on the Standard Toolbar (see illustration, above left). 
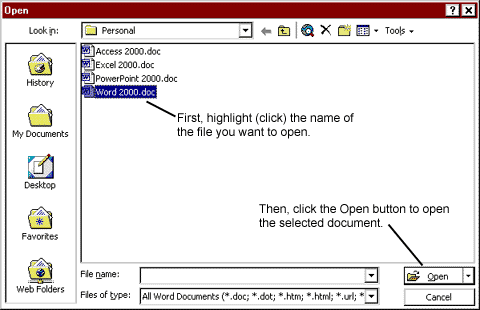
  2. In the Open dialog box that appears, you'll see a list of documents (see Figure 7, below). Look for the document name desired, then click that file name to highlight it and click the Open button. 
 
 
QuickTip: You can double-click the document name to open a document.

 
FIGURE 7. "Open" Dialog Box'Open' dialog box
 
Notes:
  • If there are more documents than fit the space provided, you may have to use the horizontal scroll bar to find the document you want.
  • If the file is not listed, you may need to change drive in order to find it — from drive C to drive A, for example, if the file is stored on a floppy disk.


Ending a Word Session

When you are ready to stop working in Word, you can exit the program in one of the following ways:
  • Click File on the Menu Bar and choose (click) Exit.
  • Click the Word Close button (i.e., the control button with a X on it).
  • Use the Windows shortcut key — ALT+F4.
Notes:
  • If you have more than one document open, close each document separately. When the last document is closed, you'll exit the program.
  • If you try to close a document that has not been saved since you last made changes to it, you'll see a dialog box asking if you want to save the changes. This is the same dialog box you get when you close a document (see Figure 7, above). If the dialog box appears, do one of the following: 
    • To save changes before closing the document, click the Yes button.
    • If, for some reason, you don't want to save the changes, click the No button. 
    • To cancel the request to close the document (i.e., to continue working on it), click the Cancel button. 
 

Top  |  Contents  |  Start  |  Basics  |  Formatting  |  File Management  |  Learn More  |  Glossary  | Features Table
Prepared by Gail Said Johnson, User Support Services
March 20, 2001


ITR's technology training guides are the property of California State University, Northridge. They are intended for non-profit educational use only. Please do not use this material without citing the source.