| Note: If you paste text from a text editor (rather than a word
processor), each line may end in a hard return, thus identifying
every line as a paragraph for formatting purposes. |
Using a Paragraph Style
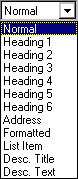 |
The Paragraph Style menu lists a number of styles, each
of which has particular size, appearance, and spacing attributes. The Normal
paragraph style is the default i.e., the one you see if you haven't selected
anything else.
Heading Styles You might use a heading style for a major or
minor heading on your Web page. Every heading style is boldface followed
by extra line spacing (between the heading text and the next paragraph).
The largest of the heading styles is Heading 1 (see Figure
5, below); the smallest, Heading 6. |
|
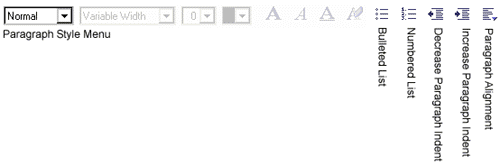
Using a List Style
 |
Bulleted List Use the bulleted list style to place
a bullet in front of each item in a list. |
 |
Numbered List Use the numbered list style to number items
in a list. (Note that no numbers will appear on the Composer screen; rather,
each number will be indicated by a number sign (#). |
|
Alignment Options
 |
Increase Paragraph Indent Use the Increase Paragraph
Indent style to indent a paragraph. |
 |
Decrease Paragraph Indent Use the Decrease Paragraph Indent
style to move a paragraph's indent to the left. |
 |
Paragraph Alignment Use the Paragraph Alignment menu to choose
the alignment for a paragraph. The choices are left (the default), centered
or right aligned. |
|
How to Format
Text (Characters)
Select (highlight) the text you want to format and then select the desired
character format style from the Formatting Toolbar, as shown in Figure
2, below.
FIGURE 2. Composition Toolbar
with Character Formatting Tools Labeled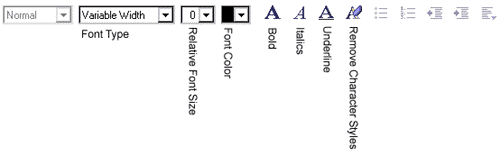
| Design Tip: Use character formats sparingly to highlight,
not to overwhelm. |
Font Types
 |
The Font Type menu lists the generic "variable width" and
"fixed width" options as well as all the fonts installed on your computer.
The best choice for your Web pages is the default Variable Width
option. By staying with this choice, you can be sure that all graphical
browsers will be able to display your page. If you choose one of the specific
font styles listed, you can't be sure that someone who views your page
will have the same font installed on his or her computer. |
|
Relative Font Size Options
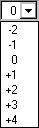 |
If you made the suggested change in Composer Preferences (see
"How to Set Composer Preferences",
in the Bare Bone Basics section), your font size choices will
be those shown to the left of this paragraph. The default
0 setting is equal to whatever screen display font you are
using 12-point Times New Roman, if you're using the Netscape
default. The other choices represent smaller (-) and larger
(+) sizes relative to the size screen display font. |
|
Other Character Formats
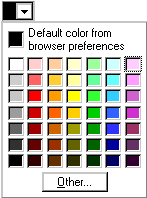 |
Font Color Use the Font Color drop-down grid to choose a color
for a selected section of text (to make a heading stand out, perhaps). |
 |
Bold Use the Bold feature to display a selected
section of text in boldface type. |
 |
Italics Use the Italics feature to display a selected section
of text in italics type. |
 |
Underline Use the Underline feature to underline a selected
section of text.
| Note: Underline is not normally a good choice as it might be
confused with linked text. Typographically it's a bad choice, too, as it
is generally just a typewriter substitute for italics.] |
|
 |
Remove All Styles Use this feature to remove all character
styles from a selected section of text. |
|
Using a Horizontal
Line to Separate Sections of a Page
 |
Position the insertion point where you want to place a
horizontal line on your Web page and click the "Insert Horizontal Line"
icon on the Composition Toolbar. |
| |
|
By default, the inserted line will be two pixels high with 3-D shading
extending all the way across the screen. You can modify the look of the
line by double-clicking the line and making changes in the "Horizontal
Line Properties" dialog box (see Figure 3, below). You can specify the
height (in pixels), the width (as a percentage of the width of the browser
window or in pixels), the alignment (left, center, or right), and the shading
(3-D or not). You can also specify whether or not you want these new settings
to become the default horizontal line settings.
FIGURE
3. "Horizontal Line Properties" Dialog Box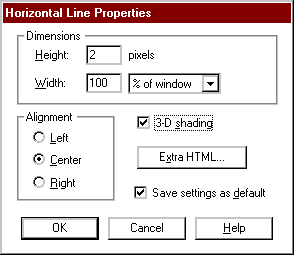 |
| Note: An alignment setting will be noticeable
on your Web page only if the width setting is less than 100%. |
|
|