A master page sets the standard look and feel of an entire presentation. By adding your own logo, special clip art, the date, and/or page numbers, you can customize your presentation to suit your needs. Whatever you change or add to a master page will affect the entire format of that particular thing. For example, whatever you place or change on a slide master will show up on every slide; whatever you place on a handout master will be on every handout page; whatever you place on the outline master will be on every outline page; and so on Masters are available from the View menu at the top of the screen. Choose Master, then choose the type of master you want to customize Slide Master, Title Master, Handout Master, or Notes Master. Each of these is discussed below. Slide Master
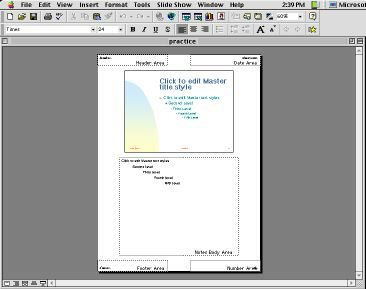
As an example of usage, say you have created a 25-slide PowerPoint presentation for use here at the university and you want to include the Cal State Northridge trademark on every slide. Rather than having to add the trademark image separately on 25 slides, you only need to add it in one place on the Slide Master. To change the font style and size for all slides in a presentation, click the the item on the master slide you want to modify (such as "Click to edit Master title style" or "Second Level" see illustration above). Then, from the Format menu, choose Font. Make any changes desired (font, size, and/or color), then click OK. Your changes will show up on the master slide. You can also change the size and position of any of the text boxes on the slide. Click a text box to display a border with small white squares ("handles") on the edges. Click and drag a "handle" to resize the box. By clicking on the gray border line you can move the text box to another location on the slide. See "Positioning or Resizing a Text Box or Image" in Part 3: Creating Slides - New Layouts. In the "Master text styles" box you can promote/demote each level
of bulleted text or add new levels. Click the item to be changed to a higher
level (promoted) or lower level (demoted), then click the Promote
or Demote button on the Formatting Toolbar. You can also change
the bullet style on each level. Click on the line that you want to change,
then from the Format menu, select Bullet. You can select
from several sets of symbols, change the color of the bullet, and readjust
its size.
To add the date to your slide master first click outside of any
of the boxes to de-select them. From the View menu, choose Header
and Footer. In the dialog box that appears, click the box next to Date
and time to select it. Also select either Update automatically
(to always display the current day's date) or Fixed (to display the date
you enter in the box provided). When finished, click the Apply to All
button to place the date on all your slides. (If you want to include the
date only on the slide that is on screen when you make the selection, choose
Apply
rather than Apply to All.)
Title MasterThe Title Master controls the format and placement of the title slide and any other slide you designate as a title slide such as a selection opener. Additions here will not show up in your slide presentation.There are two masters for every presentation a slide master and a title master. The Slide Master controls the formatting on all slides. When you change any formating on the Slide Master, such as when you increase the font size, the same change is made to the Title Master. If you modify the layout of the title master, the slides you have designated as the title slides also change.
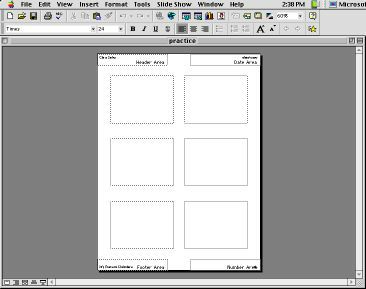
The Handout Master can also be customized with logos, copyright, etc.
What you put onto the Handout Master will only show up when the handouts
are printed. Additions here will not show up in your slide presentation.
When you do print, you will have three options to choose from: 2, 3 or
6 slides per page.
Notes Master
|
|||||||||||