
Beginner's Guide to HTML
PART 2
Creating an HTML File
HTML stands for HyperText Markup Language. It consists of various codes which are added to the text of a document to specify how you'd like that document to look when viewed using a Web browser (such as Netscape). The precise way the document looks is determined by the browser used and the setups specified by its user, however.
Most HTML codes are used in pairs consisting of a "begin" code and an "end" code. The codes "surround" the text to be formatted. For example, in front of each heading is a "begin heading" code and immediately after the heading text is an "end heading" code. Each code is contained within angle brackets. End codes contain a forward slash as a prefix. For example, the codes for a level one heading are <H1> at the beginning of the heading and </H1> at the end.
The codes you choose to use are a matter of choice to some extent and there are a lot of choices. Only the most basic layout codes are discussed in this handout. In addition, since the essence of the Web is its linking capability, basic linking codes are included.
Before You Begin
Before you begin to create your home page it is a good idea to think about how the material you want to "publish" can be best organized. If you'll be including a lot of your own material, rather than creating one long document it may be preferable to create a hierarchy of shorter documents linked to a "main" page and possibly to each other. If you'll only be including links to other sources, perhaps one document of your own is sufficient. No matter how you decide to organize your material, it is a good idea to name your main (or only) document index.html (see Part 3: Saving and Viewing Your HTML Document).
Next, read through this entire section on creating an HTML file before you start so as get a feel for what you'll be doing. Then create your first home page. Start with something simple. You can always embellish later on.
Open a Text Editor and Get Started
An HTML file is nothing more than a text-only file with a special filename extension (.html). You can use a text editor such as Notepad (in Windows), SimpleText (on a Macintosh), or pico (in your CSUN network account) to create your Web page (HTML) files. If you create your files directly in your network account (using pico), you avoid having to transfer the files into your account, but you can't check your work (i.e., make sure your page is readable and your links work) without allowing anyone who has access to the Web to see your file and, perhaps, your mistakes.
This documentation assumes you will use a desktop text editor (such as Notepad or SimpleText) to create your files.
- Getting Started with Notepad (Windows): In Windows, click Start on the Taskbar and choose Accessories, then Notepad.
- Getting Started with SimpleText (Macintosh): On a Macintosh, double-click the SimpleText icon to open a text file. If you are not sure where the SimpleText application is, you can use Find File to locate it: Click Find File under the File Menu, and, in the dialog box that appears, type in the search string. When the search locates SimpleText, you can double-click the listed application to launch it.
Coding Your File
Required Codes
Include the following codes (tags) in each of your Web documents.
- <HTML>your-entire-document</HTML>
Type the begin HTML code at the very beginning of your coded document and the end code at the very end.
<HEAD>header-information</HEAD>
- The information included between the begin and end "head" codes is information about the document. For a beginner this will simply be the title of the document (see below).
<TITLE>document-title</TITLE>
- Include a short title for your document between the begin and end title codes. This is the title which will appear in the title bar of the browser window when someone views the document.
<BODY>all-document-text</BODY>
- Type the begin body code immediately below the end "head" code; type the end body code before the end HTML code at the end of the document. Between the begin and end "body" codes, type the text of your document. The body of the document is the part that the Web browser displays.
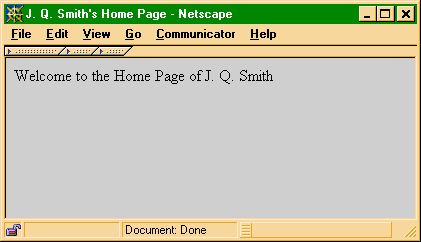
|
|
|---|
| <HTML> <HEAD> <TITLE>J. Q. Smith's Home Page</title> </HEAD> <BODY> Welcome to the Home Page of J. Q. Smith </BODY> </HTML> |
|
Notice that the "title" is in the Title Bar (not on the page itself). |
 |
There are a couple of ways to code a document very quickly, albeit not very interestingly. You can insert paragraph tags to separate paragraphs (with no other formatting) or you can use the "preformat" tag for an "as is" display of your document text.
- <P>paragraph</P>
- Include a begin paragraph tag at the beginning of each new paragraph. If you do not insert paragraph tags, the text of your document will appear as one long paragraph when viewed in Netscape (or some other Web browser). Include an end paragraph tag </P> at the end of each paragraph.
<PRE>preformatted-text</PRE>
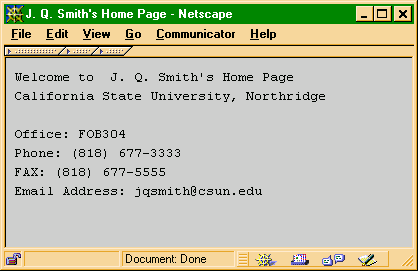
- There is one tag which can be used which eliminates the need for paragraph codes and that's the preformat tag. For any section of text which begins with <pre> and ends with </pre> (and this could be your entire document) the spacing (both horizontal and vertical) will remain exactly as entered. Normally, preformatted text will be displayed in a fixed pitch font (such as Courier) so you may want to use 12-point Courier when typing the text in your word processor (or text editor) and specify left and right margins of .5 (so that the information will fill the window when displayed). As a beginner, the preformat tag is a good one to use if you want to include tabulated information in your document.
|
|
|---|
| <BODY> <PRE> Welcome to J. Q. Smith's Home Page California State University, Northridge Office: FOB304 |
|
|
 |
Other Formatting Tags
Breaks. In addition to the paragraph break tag (described under "Quick Formatting" above), there are two other tags commonly used to break or separate lines of text.
- <BR>
Use the line BReak tag when you want to start a new line of text on the very next line that is, without the blank line that separates paragraphs.
<HR>
-
Use the Horizontal Rule tag to insert a horizontal line and separate sections of your document.
Headings. Each document will probably have at least one main heading and possibly other lower-level headings. There are six levels of headings which can be specified. For each heading in your document, choose the level desired and type the begin and end codes and the beginning and end of the heading text.
<H1>heading-text</H1>
For your most important heading(s) use the level one heading codes.
<H2>heading-text</H2>
Use the level two heading codes for second-level headings.
<H3>heading-text</H3>
<H4>heading-text</H4>
<H5>heading-text</H5>
<H6>heading-text</H6>
Use heading levels three through six as desired. Note that though these are referred to as "heading" tags, text formatted as <H4></H4> through <H6></H6> will display in a smaller font size than your unformatted text.
|
|
|---|
| <H1>Welcome to J. Q. Smith's
Home Page</H1> <HR> <P> During the week I hang my hat at California State University, Northridge. My office, phone, fax and email address are shown below: </P> <P> Office: FOB304 <br>Phone: (818) 677-3333 <br>FAX: (818) 677-5555 <br>Email Address: jqsmith@csun.edu </P> |
|
|
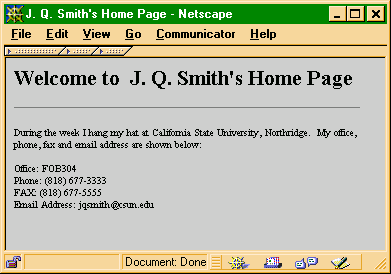 |
Lists. An easy-to-read way of organizing and linking information is to display items in a list. There are HTML codes for several types of lists. Two are mentioned below. For each type of list there are begin and end list codes as well as codes to designate each item in the list.
- <OL>
<LI>list-item
<LI>list-item
</OL>
Ordered List: Use <OL>...</OL> tags to create a numbered list. Do not type any numbers as the list item codes <LI> will be converted to consecutive numbers when displayed in Netscape (or some other Web browser).
<UL>
<LI>list-item
<LI>list-item
</UL>
Unordered List: Use <UL>...</UL> tags to create a bulleted list. Do not include any bullets as the list item codes. Each <LI> will be converted to a solid bullet when displayed in Netscape (or some other Web browser).
|
|
|---|
| <P> Weekends often find me involved in one (or more!) of the following: </P> <UL> <LI>Skydiving <LI>Horse Racing <LI>Water Polo </UL> |
|
|
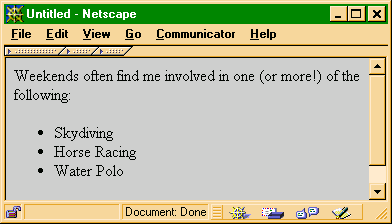 |
Links. The essence of Web browsing is following all those links you find on the Web pages you read, and it's quite likely that you'll want your home page to link to other documents another of your own documents, to a document somewhere else at the University (such as the Cal State Northridge home page), or to a document located somewhere else in the world. It is also possible to link to different locations within the same document. Each link requires an anchor and a HyperText REFerence to the location to of the linked page.
- <A
HREF = "location-address">link-text</A>
To link to another location either on or off campus reference the full address of that location within the quotation marks. Include the link text between the begin and end codes. To link to another of your own documents (located in the same folder) you need reference the file name only.
-
- <A HREF = "MAILTO:email-address">link-text</A>
|
|
|---|
| <P> During the week I hang my hat at <A HREF = "http://www.csun.edu">California State University, Northridge</A>. My office, phone, fax and email address are shown below: </P> |
|
Note that when you point to the link, the location appears in the status bar at the bottom of the window. |
 |
If you would like readers to be able to contact you via email you can add a link which includes your email address. Place your full email address e.g., jack.b.nimble@csun.edu immediately after MAILTO: in the Hypertext REFerence anchor. Between the begin and end codes type the email address again (or, as you see on many Web pages, your name).
Coding
Sample
A sample HTML-coded document is included in the appendix.
August 14, 2003
Prepared by Gail Said Johnson, User Support Services
ITR's technology training guides are the property of California State University, Northridge. They are intended for non-profit educational use only. Please do not use this material without citing the source.