
PART 2
Formatting Your Web Page
- How to Format a Paragraph
- How to Format Text (Characters)
- Using a Horizontal Line to Separate Sections of a Page
- Specifying Page Colors
- Sample Formatted Page
How to Format a Paragraph
To format an entire paragraph, click somewhere in the paragraph and then select (click) the desired paragraph format, list format, or alignment option from the Formatting Toolbar, as shown in Figure 1, below.FIGURE 1. Composition Toolbar
with Paragraph Formatting Tools Emphasized
![]()
Note: If you paste text from a text editor (rather than a word processor), each line may end in a hard return, thus identifying every line as a paragraph for formatting purposes.
Paragraph Formats
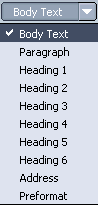 |
The Paragraph Style menu (illustrated left) lists a number of styles, each of which has particular size, appearance, and spacing attributes. The Body Text paragraph style is the default — i.e., the one you see if you haven't selected anything else. You might use a heading style for a major or minor heading on your Web page. Every heading style is boldface followed by extra line spacing (between the heading text and the next paragraph). The largest of the heading styles is Heading 1 (see Figure 5, below); the smallest, Heading 6. |
List Formats
| Apply or remove bulleted list. Use the bulleted list button to place a bullet in front of each item in a list (or to remove a bullet). | |
| Apply or remove numbered List. Use the numbered list button to number items in a list (or to remove a number). |
Alignment Options
| Indent Text (move right). Use the Indent Text button to indent a paragraph. | |
| Outdent Text (move left). Use the Outdent Text button to move a paragraph's indent to the left. | |
| Align Left. Left alignment is the default paragraph alignment. | |
| Align Center. Use the Align Center button to center a paragraph. | |
| Align Right. Use the Align Right button to right justify a paragraph. | |
| Align Justified. Use the Align Justified button to both left and right justify a paragraph. |
How to Format Text (Characters)
Select (highlight) the text you want to format and then select the desired character format style from the Formatting Toolbar, as shown in Figure 2, below.FIGURE 2. Composition Toolbar
with Character Formatting Tools Emphasized
![]()
The standard Bold (B), Italics (I), and Underline (U) buttons are available.
Note: Underline is not normally a good choice as it might be confused with linked text. Typographically it's a bad choice, too, as it is generally just a typewriter substitute for italics.
There are two buttons that allow you to increase (+a) or decrease (-a) the size of a selection section of text. Each time you click one these two buttons, the selected text gets bigger or smaller (until the maximum or minimum is reached).
| A color choice button (illustrated left) lets you to select a color for selected text (the black square) or the page background (the white square). A floating color palette will appear from which you can choose the desired color. |
Design Tip: Use character formats sparingly — to highlight, not to overwhelm.
Using a Horizontal Line to Separate Sections of a Page
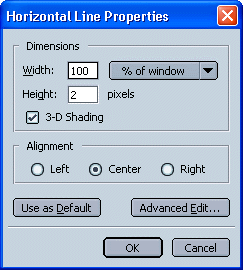
Choose "Horizontal Line" from the Insert Menu. By default, the inserted line will be two pixels high with 3-D shading extending all the way across the screen. You can modify the look of the line by double-clicking the line and making changes in the "Horizontal Line Properties" dialog box (see Figure 3, below). You can specify the height (in pixels), the width (as a percentage of the width of the browser window or in pixels), the alignment (left, center, or right), and the shading (3-D or not). You can also specify whether or not you want these new settings to become the default horizontal line settings.FIGURE 3. "Horizontal Line Properties" Dialog Box
Note: An alignment setting will be noticeable on your Web page only if the width setting is less than 100%.
Specifying Page Colors
If you don't specify colors, the colors displayed when someone views your Web page will be the browser colors selected by that person (or the default display colors if the person has made no selections).
You can specify a background color for a page along with complementary colors for text and links on that page (see "Linking Other Locations to Your Web Page") by clicking:
Format | Page Colors and Background
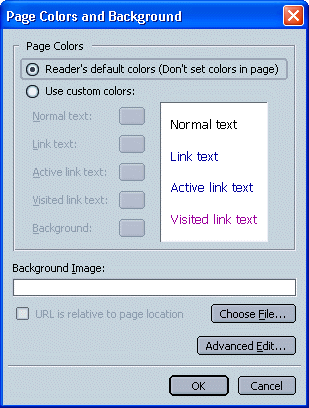
In the Page Colors and Background dialog box (see Figure 4, below), first click the "Use custom colors:" radio button, and then make desired selections for your page. You can make individual selections for Normal Text (i.e., all text except linked text or selected text for which you've chosen a color from the Text Color palette), Link Text, Active Link Text, Followed Link Text, and Background.
FIGURE 4. "Colors and Background" Dialog Box
Sample Formatted Page
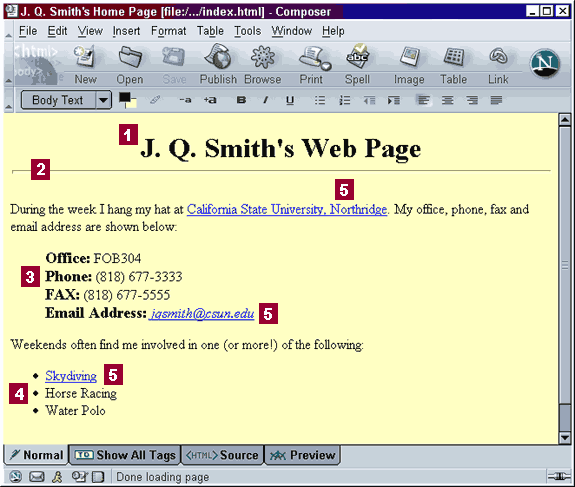
The formatting features described above are shown in Figure 5 (below). Illustrated (and labeled) are:- Paragraph Formatting:
- Text Formatting:
- Horizontal Line [2]
-
[1] Heading
1 with centered Alignment
[3] Increase Indent
[4] Bullet List
-
[3] Font
Size (increased using the +a button)
In addition, there are links on the page (labeled [5]). The next section of this guide gives instructions for including links in your Web pages.
FIGURE 5. Sample Formatted
Page
August 14, 2003
Updated (from Version 4) by Chris Sales, User Support Services
ITR's technology training guides are the property of California State University, Northridge. They are intended for non-profit educational use only. Please do not use this material without citing the source.