CALIFORNIA STATE UNIVERSITY, NORTHRIDGE
 
Using Netscape Composer 4 to:

Format a Web Page Using Tables
(Instruction by Example)

For greater control over the layout of a Web page you might want to use the Tables feature. The possibilities range from displaying a simple grid (for a calendar or spreadsheet, for example) to nesting tables within tables (for a resume or newsletter, perhaps). In addition, you can assign a background color to all or part of a table (such as a row or a cell), and you can include an image in a table cell. All of these possibilities are addressed by example in this document.
 
Note: The screen images included in this document are taken from the Windows version of Netscape Composer (version 4.7). Macintosh screens may differ slightly.


Creating a Simple Grid

To create a simple grid containing gridlines (as in the calendar shown in Table 1, below), follow the instructions outlined.
  
TABLE 1. Calendar Grid for March 2001
SUN
MON
TUE
WED
THU
FRI
SAT
       
1
2
3
4
5
6
7
8
9
10
11
12
13
14
15
16
17
18
19
20
21
22
23
24
25
26
27
28
29
30
31

Setting Table Properties

  1. Click on the page where you want the table to begin.
  2. Click the Insert Table button on the Composition Toolbar.
  3. Set properties in the "New Table Properties" (Windows) or "Insert Table" (Macinosh) dialog box that appears (see default settings in Figure 1, below). For the calendar table show above the following settings were entered:
    • Number of rows: 6
    • Number of columns: 7
    • Table Alignment: Center
    • Table width: 300 pixels [the table width can be measured as a percentage of the window or in pixels (72 pixels = 1 inch)]
  4. Click the OK (Windows) or Insert (Macintosh) button when finished.
Note: The alignment of the text within the calendar was set by hightlighting all the text and choosing Right Alignment (using the Alignment button on the Formatting Toolbar).
  
FIGURE 1. "New Table Properties" Dialog Box with Default Settings'New Table Properties' Dialog Box


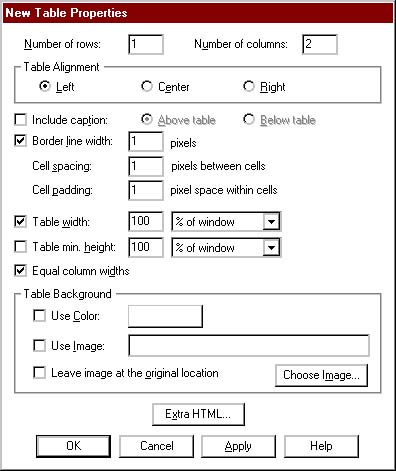
Play with the settings until you get the look you want. For example, change border line (10 pixels), cell spacing (5 pixels), and background color as follows to get the modified calendar format shown in Table 2 (below). 
 

TABLE 2. Revised Calendar Grid for March 2001
SUN
MON
TUE
WED
THU
FRI
SAT
       
1
2
3
4
5
6
7
8
9
10
11
12
13
14
15
16
17
18
19
20
21
22
23
24
25
26
27
28
20
30
31

Setting Row Properties

Using the Row tab in the Table Properties dialog box, you can make settings that affect a particular row in your table (see Figure 2, below). This includes horizontal and vertical alignment, a background color, and even a background image. 
  
FIGURE 2. Row Properties: Default SettingsRow Properties Dialog Box


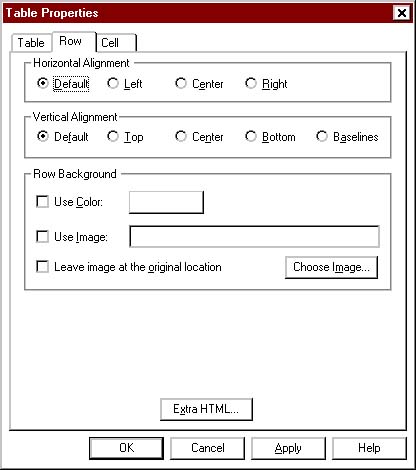
To set row properties, do the following:

  1. Click somewhere in the row.
  2. Access the context-sensitive pop-up menu as follows:
    • On a Windows computer, click the right mouse button.
    • On a Macintosh, hold down the mouse button until the menu appears (about one second).
  3. Click Table Properties (Windows) or Table Info (Macintosh) to get to the dialog box.
  4. Click the Row tab.
  5. Change settings as desired.
  6. Click the OK button when finished.

Setting Cell Properties

Using the Cell tab in the Table Properties dialog box, you can make settings that affect a particular cell in your table (see Figure 3, below). This includes horizontal and vertical alignment, a background color, and even a background image. [Author's Note: In my experience the "Cell spans" feature does not work properly, so I do not recommend using it.] 
  
FIGURE 3. Cell Properties: Default SettingsCell Properties Dialog Box


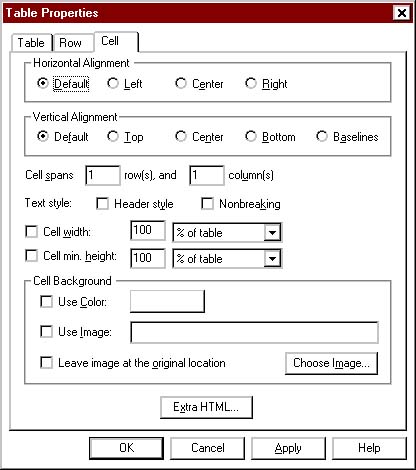
To set cell properties, do the following:

  1. Click somewhere in the row.
  2. Access the context-sensitive pop-up menu as follows:
    • On a Windows computer, click the right mouse button.
    • On a Macintosh, hold down the mouse button until the menu appears (about one second).
  3. Click Table Properties (Windows) or Table Info (Macintosh) to get to the dialog box.
  4. Click the Cell tab.
  5. Change settings as desired.
  6. Click the OK button when finished.


Using Borderless Tables for Page Layout

One way to gain some control over the layout of your Web page is to place the content within a table (or tables) and "hide" the border lines. This document, for example, is made up of a series of tables. The top (and bottom) information is contained in a two-column, centered table that is 600 pixels wide. The main body is in a one-column, centered table that is 500 pixels wide. There are also nested tables (see Advanced Formatting Using Nested Tables, below).

To create a borderless table, follow the steps for creating a table (above), making sure to set the border line width to 0. In Composer, dashed lines identify where the table is. When you preview (or publish) the page, no borders will appear. The table will simply serve as the structure holding the material on your page.

The following information is contained in a two-column, borderless table. Figure 4 (below) shows the Composer view of the same table. Table, row, and cell properties follow.

 
Present: Adam Adams, Carol Carroll, Lloyd Lloyd, Martin Martin, and Robert Roberts.
Absent: Samuel Samuels and Thomas Thomas.
Approval of Minutes: The minutes of the last meeting were approved as submitted.
Old Business: Etc.
 
FIGURE 4. Composer View of a Borderless TableComposer view of a borderless table
 
Table Properties (for table shown in Figure 4):
  • Number of columns: 2
  • Table Alignment: Center
  • Border line width: 0 pixels
  • Cell spacing: 10 pixels between cells
  • Table width: 500 pixels
Row Properties (set for each row separately):
  • Vertical Alignment: Top
Cell Properties (set in top left cell only):
  • Cell width: 30% of table


Inserting an Image in a Table Cell

To include an image in a table cell, simply click in the cell, click the Image button on the Composition Toolbar, and choose the desired image (and set properties) just as you would if you were inserting an image elsewhere on your page. See Using Netscape Composer to Add an Image to a Web Page for details. See the table layout in the section entitled Advanced Formatting Using Nested Tables (below) for examples of images included in a table.


Adding/Inserting a Row or Column to a Table

To add or insert a row or column, do the following. An added row will be inserted immediately below the row where your insertion point is located. An added column will be inserted to the right of the column where your insertion point is located.
  1. Click in the row immediately above where you want the row to be inserted, or in the column immediately to the left of where you want the column to be inserted.
  2. Access the context-sensitive pop-up menu as follows:
    • On a Windows computer, click the right mouse button.
    • On a Macintosh, hold down the mouse button until the menu appears (about one second).
  3. Click Insert on the pop-up menu, and click Row (to add a row) or Column (to add a column).
 
QuickStep: To add a row at the end of a table, you can click in the rightmost column of the last row and tap the Tab key.


Deleting a Row or Column — or an Entire Table

To delete a row or column (or even an entire table), do the following.
  1. Click in the table, row, or column you want to delete.
  2. Access the context-sensitive pop-up menu as follows:
    • On a Windows computer, click the right mouse button.
    • On a Macintosh, hold down the mouse button until the menu appears (about one second).
  3. Click Delete on the pop-up menu, and click Row (to delete a row), Column (to delete a column), or Table (to delete an entire table).


Advanced Formatting Using Nested Tables

The document you're reading includes tables within tables. The main body of information is contained in a centered table that is 525 pixels wide. The calendars shown previously are tables within the main table. 

Shown below in Table 3 is a more complicated nesting of tables. Within a 500-pixel-wide table is a three-columned table. In the middle column of that table is the calendar table. In addition, some clip art has been added (see Inserting an Image in a Table Cell, above).


TABLE 3. Three-Column, Borderless Table Containing Images and a Nested Table (Calendar) Grid
Shamrock
March 2001
SUN
MON
TUE
WED
THU
FRI
SAT
       
1
2
3
4
5
6
7
8
9
10
11
12
13
14
15
16
17
18
19
20
21
22
23
24
25
26
27
28
29
30
31
Shamrock

Shamrock GIF files downloaded from http://kidsdomain.com/holiday/patrick/clip.html

 
The Composer view of the nested tables displayed above is shown in Figure 5 (below). A list of table and cell property settings follow (i.e., changes to default settings). Note that except for the calendar grid, the tables used are for formatting purposes only, not to display a table (i.e., gridlines are not displayed).
  
FIGURE 5. Composer View of Nested Tables (showing grid lines)Composer view of nested tables
 

Main Table Properties:

  • Number of columns: 1
  • Table alignment: Center
  • Border line width: 0 pixels
  • Cell spacing: 0 pixels between cells
  • Cell padding: 0 pixels within cells
  • Table width: 500 pixels

Three-Column Inside Table:

  • Number of columns: 3
  • Border line width: 0 pixels
  • Cell spacing: 0 pixels between cells
  • Cell padding: 0 pixels within cells
  • Equal column widths: [check mark removed]
  • Cell Properties:
    • Left Cell — Vertical Alignment: Top
    • Center Cell — Horizonal Alignment: Center
    • Right Cell — Horizontal Alignment: Right; Vertical Alignment: Bottom

Calendar Table:

  • Border line width: 10 pixels
  • Cell spacing: 5 pixels
  • Background color: [chosen from color grid]
  

Prepared by Gail Said Johnson, User Support Services

Revised March 22, 2001