Provided below are basic instructions for adding an image to a Web page.
For additional information refer to the Netscape Help feature as described
in the How to Learn More section of this document.
|
 dd
an Image to a Web Page
dd
an Image to a Web Page| Note: The screen images included in this document are taken from the Windows version of Netscape Composer (version 4.7). Macintosh screens may differ slightly. |
Image Files
The two file formats most commonly used (and recognized!) on the Web are
GIF (.gif) and JPEG (.jpg). Generally speaking, GIF files are most suitable
for black & white images, line drawings, or other images containing
a maximum of 256 colors. JPEG files are best for photographs (the file
size is smaller and there is full-color support i.e., 16.7 million colors).
You can create images using a graphics program, scan images, use photos
taken with a digital camera, buy clipart images, or download royalty-free
clip art from various Web sites (see below). Once you have an image
file saved in either GIF or JPEG format you can include it on your Web
page.
Locating and Downloading Royalty-Free Image Files
There are websites from which you can obtain royalty-free graphic images clipart, buttons, icons, and more. You can use your favorite search engine to find "free clipart" or "free images" or "free graphics".
For example, the decorative letter A at the beginning of this document is a GIF file downloaded from Leo's Icon Archive http://www.silverpoint.com/leo/lia/. The wide-eyed cat is from Animals Clip Art section of ArtClipArt http://www.artclipart.com. (Both images were downloaded in April 2001.)
Once you find an image you want to use, copy (download) it, and then publish the image along with the page itself to your account on CSUN's Web server.
To download an image file from a website, do the following (see also Drag 'n' Drop Image Insertion, below).
- Go to the site from which you wish to download an image file.
- When you find an image you want to copy, position the mouse pointer over the image.
- Access the context-sensitive pop-up menu as follows:
- On a Windows computer, click the right mouse button.
- On a Macintosh, hold down the mouse button until the menu appears (about one second).
- Choose Save Image As... (Windows) or Save this image as... (Macintosh).
- In the "Save As" dialog box, choose the folder where you want to save the file. For the purposes of these instructions, this should be the same folder where you save your Web page (HTML) files.
- Click the Save button to save the file.
Inserting an Image on a Web Page
For the purposes of these instructions, make sure the image file you want
to use is saved in the same folder as the Web page where it will appear.
Then follow the instructions below to insert an image and provide alternate
text that describes the image.
Instructions
- Click the Image button on the Composition Toolbar to get to the "Image Properties" dialog box (see Figure 1, below).
FIGURE 1. "Image
Properties" Dialog Box.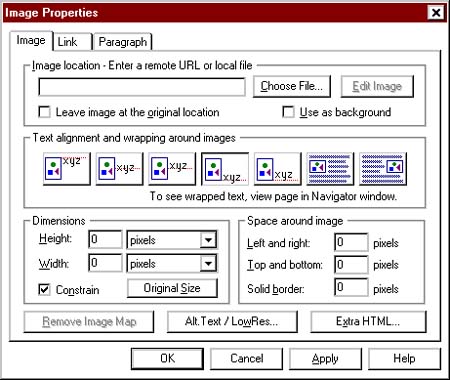 |
- Click the Choose File button to get to the "Choose Image File" dialog box (see Figure 2, below).
FIGURE 2. "Choose
Image File" Dialog Box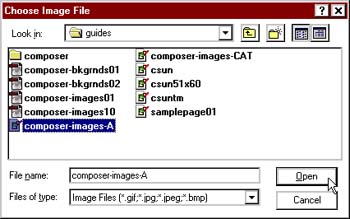 |
- Locate and highlight the name of the file you want to insert, then click the Open button. You'll return to the "Image Properties" dialog box and the name of the file chosen will appear in the "Image location" text box.
- Next, enter a text description of the image as follows (see also "A Note About Alternative Text", below):
- On a Windows computer: Click the Alt.Text/LowRes button toward the bottom of the "Image Properties" dialog box (see Figure 4, below). In the "Alternate text" text box, type a word or phrase that describes the image (as shown in Figure 3, above), then click the OK button to return to the "Image Properties" dialog box.
- On a Macintosh, click in the "Text" box in the "Alternative Representations" section of the dialog box and type a word or phrase that describes the image.
FIGURE 3. "Alternate
Image Properties" Dialog Box: Alternate Text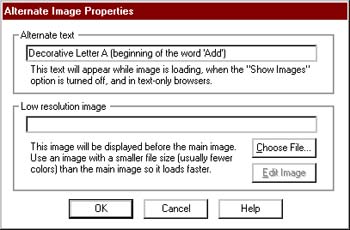 |
- If desired, you can further modify image properties as described under "Other Image Property Settings", below.
- When finished, click the OK button.
- Save the file and Preview the page in order to see how the image will look on the published page.
A Note About Alternate Text
When your Web page is published, viewers will see the descriptive text when they position the mouse pointer over the image (see Figure 4, below). The main reason to use alternate text, however, is so that screen reading software (used by the visually impaired) can "read" the image. Without the alternate text someone who uses such software will have no idea what the picture is.FIGURE 4. Partial
Web Page Showing Alternate Text for the Decorative Letter A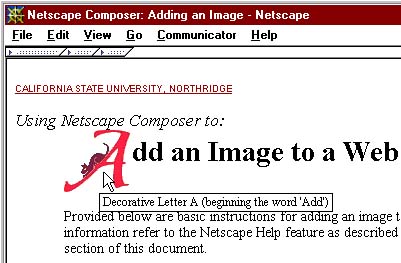 |
See "How to Make Your Web Pages ADA Compliant" http://www.csun.edu/itr/guides/webpageaccess.html
for more suggestions on making your pages accessible to all who read
them.
Other Image Property Settings
Additional property settings you might want to make while you're in the "Image Properties" dialog box are described below. If you leave the dialog box and want to get back there, simply double-click the image whose properties you want to modify.Text alignment and wrapping around images Try the different options (using the alignment buttons) to see how they look. The default is "bottom" alignment with no wrapping. Save and preview the page in order to see the result of your selection. [Macintosh note: Just above the "Space Around Image" section of the dialog box there's a "wrapped text" popup menu. Click to view the choices and make your selection.]
Space around image Here is where you can specify a border for your image and/or space between the image and the text. The settings are measured in pixels. There are 72 pixels in one inch.
Dimensions (Not normally recommended) You can change the dimensions of your image here, but it's usually better to size an image using a graphics program of some kind and then only to reduce the size (which will also reduce the size of the file). If you reduce the size in this dialog box, you won't also reduce the file size. The smaller the file, the faster the image will load when someone views your page. [Note: If you resize a graphic using a graphics program and don't see the modification in your Composer document, exit all components of Netscape and reopen the program to continue.]
Edit Image If you've specified and external image editor in the General panel of Composer Preferences, you can click this button to edit your image (possibly to size it!). If you haven't specified an editor, you'll be prompted to choose one. [Note: If you modify a graphic and don't see the modification in your Composer document, exit all components of Netscape and reopen the program to continue.]
Extra HTML If an image attribute you want use isn't available in the dialog box and you know the HTML code for that attribute you can use this feature to add it.
How to Learn More
You can use Netscape's Help feature to find additional information about
working with images. The following steps will get you to the section about
inserting images on a Web page.
- From the Menu Bar click Help.
- Choose Help Contents.
- In the dialog box that appears, click Index.
- In the "Look for:" text box type images and tap the ENTER key.
- In the list that appears in the left column, click images.
- Click Inserting an Image.