Absence Management Business Guide for Self-Reporters
Absence Management Business Guide for Self-Reporters
The Absence Management Business Process Guide for Self Reporters covers the overall Absence Management business process used in employee self service. It describes the pages and fields used to enter and review Absences in the Absence Management module.
The following (optional) icons may be used to draw attention to information in this guide:
![]()

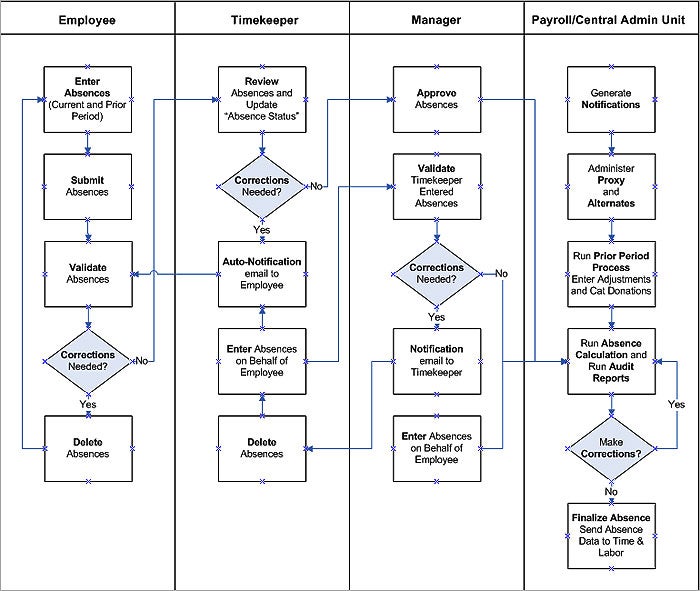
The following diagram outlines the overall Absence Management business process for each of the Absence Management roles; Employee, Timekeeper, Manager, and Payroll/Central Administrative Unit.
Each of the functions in the Absence Management process is accomplished using a specific “role”:
Employee Role
Timekeeper Role
Manager/Approver Role
Payroll/Central Administrative Unit Role
The function of the roles and the recommended Absence Management overall business process, depicted in the previous diagram, is as follows:
Timekeepers: Timekeepers review Absences entered by employees for accuracy and manage absence activities by reviewing and auditing absence transactions. Timekeepers may use the Timekeeper Absence Review page to mark Absence transactions with the appropriate review status to indicate whether the transaction is correct or require further action. Employees are automatically notified via email when a Timekeeper marks their transaction as incorrect. The „review‟ process is optional and may be performed as part of the Approver‟s review and approval step.
Timekeepers may enter Absences for employees who are not self reporters and for those who cannot enter their own Absences. Timekeeper initiated absence transactions will generate an email notification to employees who are self reporters.
Managers/Approvers: Managers/Approvers review and approve absences for their employees. Managers may also enter Absences on an employee‟s behalf in the event that the employee or Timekeeper is unable to enter the Absence(s). Absences entered by Approvers are automatically submitted with an approved status. Manager initiated absence transactions will generate email notifications to employees who are self reporters.
Payroll/Central Administrative Unit: generates Absence Management self service notifications to their campus populations, enters Catastrophic Donations, runs the prior period process, enters adjustments, executes and finalizes the Absence Management calculation, and audits all Absences.
The following types of absence validations occur on the absence entry page.
1. Absences with Balance Validation: The balance validation checks the current Absence transaction against the most recent finalized Absence balance and any pending Absence transactions entered in the „allowable‟ period. This includes any late absences enter for the three previous months, the current month, and one future month. If the employee does not have sufficient balances to cover the usage, an error will generate indicating that the absence entered exceeds the available balance. Employees are not allowed to use more time than available.
2. Absences that Generate Online Messages: Absence transactions that require additional documentation to be submitted by the employee will trigger an online message specifying that documentation is required.
3. Absences that Require Comments: Certain Absence transactions require supporting information to be entered at the time of submission. If the transaction requires such information, the “Add Comments” link will appear in red to indicate that a comment is required. If a comment is not entered with the transaction, an error will generate indicating that the absence entered requires an entry in the "Comments" field.
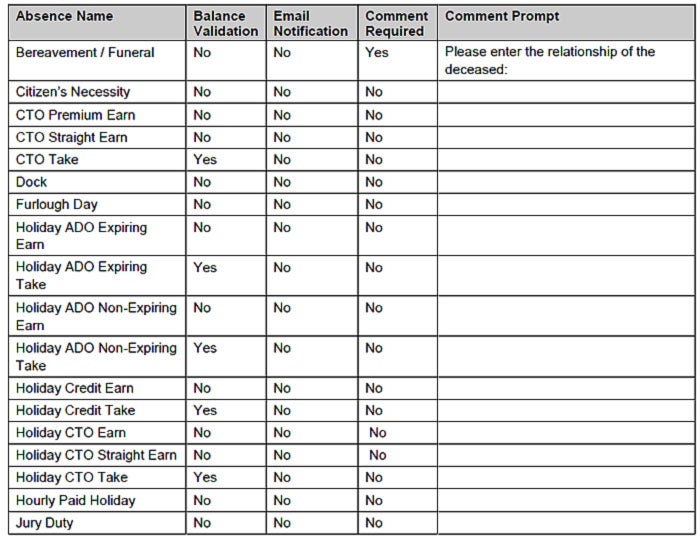
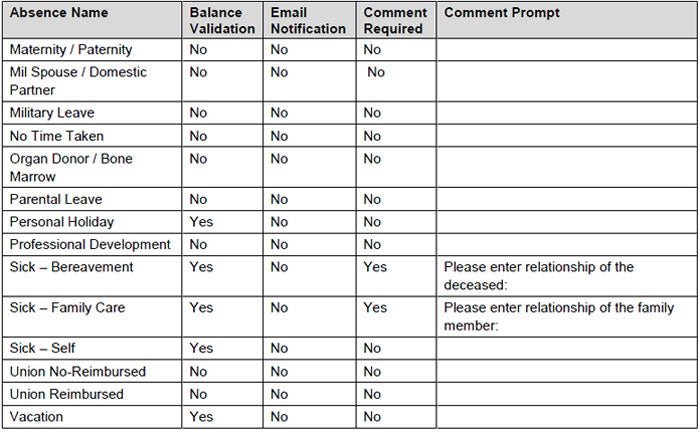
NOTE: The Absence Table below lists Absence elements delivered in Self Service and the validations, notifications, and rules associated with each. The availability of each element is based on the employee‟s Absence Management eligibility group. Eligibility groups are based on the collective bargaining agreements.
ABSENCE TABLE:
On a monthly basis, employees are responsible for absence reporting, including confirmation, if applicable, that no absences were taken. The employee can also perform delete and re-entry functions for Absence transactions that require correction. Employees who are self reporters are notified via email when absences are marked “Needs Correction” and when Absences are entered on their behalf by a Timekeeper or Approver.
The “Report and View Absences” page is used to enter and review Absences. The “Report and View Absences” page and its functionality are detailed below.
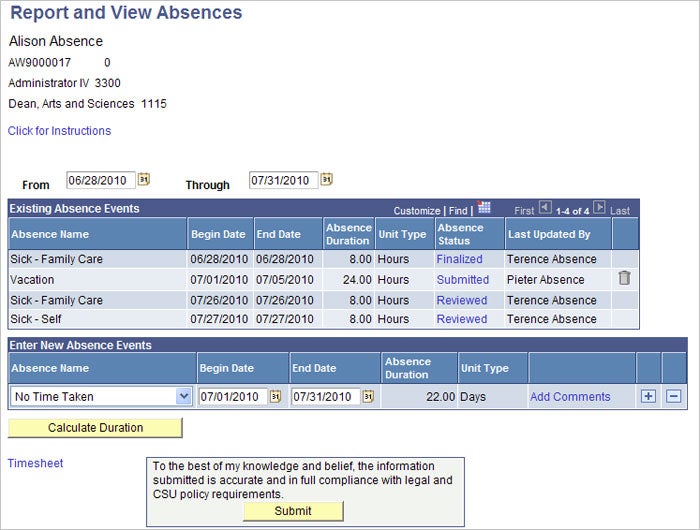
The data fields that are displayed include:
The default date range is the current „open‟ Absence period. Changing either the “From” or “Through” date automatically updates the range of dates displayed in the “Existing Absence Events” grid. The “From” and “Through” dates are also automatically updated when a new Absence event is entered in the “Enter New Absence Events” section. For example, if the current period is October, and an Absence is entered for the August Absence period, the “From” date will automatically change to the first day in the August period.
The “Existing Absence Events” grid on the top frame of the “Report and View Absences” page displays a list of the employee‟s Absences based on the “From” and “Through” dates.
ABSENCE NAME: The type of Absence reported
BEGIN DATE: Begin Date of the Absence
END DATE: End date of the Absence
ABSENCE DURATION: Duration of the Absence (in hours or days depending on the type of Absence)
UNIT TYPE: Displays the units for the Absence (hours or days)
ABSENCE STATUS: Statuses displayed are:
Last Updated By: The person who entered the most recent update to the absence transaction.
Enter New Absence Events Grid: The default date range is the current „open‟ Absence period and the default Absence displayed is “No Time Taken”. The Absence begin and end dates are based on the Payroll period begin and end dates.
Timesheet Link: The “Timesheet” link is displayed on the “Report and View Absences” page to toggle to the Time & Labor Timesheet page.
To access the absence entry page, go to myNorthridge portal and locate the HR/Employee - Time & Attendance Portal Pagelet. Select the “Enter and View Absences” link.

The “Report and View Absences” page will appear.
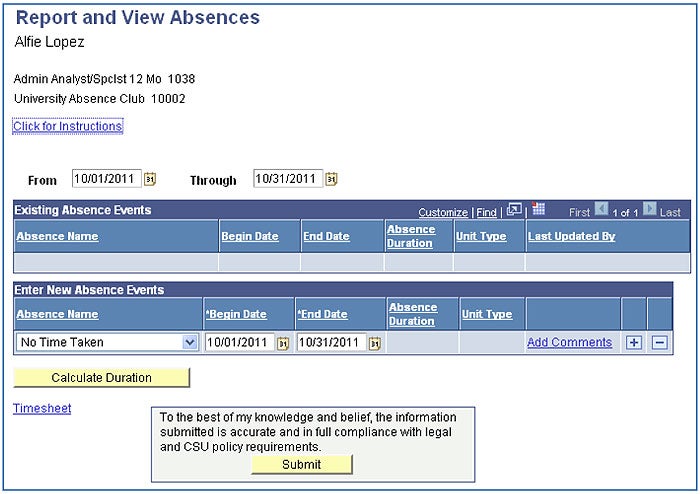
Use the “Enter New Absence Events” section of the absence entry page to enter new absence transactions. To complete the Absence entry, select the absence type, dates, and enter hours (if applicable) and click the “Calculate Duration” button to calculate the “Absence Duration” for the Absence(s). Verify that the results are correct and click the “Submit” button to certify and complete the submission. Absences are validated by the system upon submission.
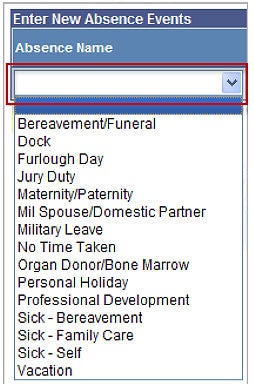
1. ABSENCE NAME: The “Absence Name” field defaults to “No Time Taken”. To submit “No Time Taken”, verify that the Begin and End Dates reflect the first and last day of the appropriate pay period and submit the transaction. To report absences other than “No Time Taken”, select the applicable “Absence Name” from the drop-down.
The “Absence Name” selection will only include absence elements that are applicable to the employee and available via Self Service. Changing the “Absence Name” in the drop-down updates the “Begin Date” and “End Date” fields to the first day of the current Absence period, displays related balance for the Absence selected and, if applicable, triggers the display of the “Partial Days” and “Hours per Day” fields.
2. ABSENCE DATES: Absence dates may be changed as needed, with some restrictions. Absences may be entered for the current Absence period, one Absence period in the future, and three consecutive previous Absence periods. For example, if the current period is October, Absences may be entered from the first day of the July Absence period to the last day of the November period.
To enter an absence for one day, use the same date in the Begin Date and End Date fields. To report absences for a range of dates, enter the date range.
3. BALANCE DISPLAY: If the Absence has a related balance, i.e. vacation or sick, the balance will displayed.
4. PARTIAL DAYS: The Partial Days field is used to indicate an absence duration that is less than a full day. For example, a non-exempt employee is taking two hours of sick time to go to a dentist appointment. If the Absence being reported is for a partial day, select “Partial Hours” enter the number of hours in the “Hours per Day” field.
5. COMMENTS LINK: Use the comment field to enter any applicable comments pertaining to the absence. Certain absence transactions require a comment to be entered, in those cases, the “Add Comments” link will be highlighted in red. Click the “Add Comments” link to go to the comments entry page and enter the requested comment. After entering the comment, select the “Save Comments” button.
6. ADDING & DELETING ROWS: Multiple absence transactions can be entered and submitted per session. To add additional rows in the “Enter New Absence Events” grid, use the + or – icon as appropriate.
7. SUBMIT AN ABSENCE: To complete the Absence entry, use the “Calculate Duration” button to calculate the “Absence Duration” for the Absence entered. Verify the result and select “Submit” to complete the submission.
8. ABSENCE VALIDATION: Multiple levels of system validations are executed on the absence entry page. Absences are validated by the system when the Absence is selected from the drop-down, when the duration is calculated, and upon submission.
1. To access the absence entry page, go to myNorthridge portal and locate the HR/Employee - Time & Attendance Portal Pagelet and select “Enter and View Absences”.

2. On the absence entry page, go to the “Enter New Absence Event” section.
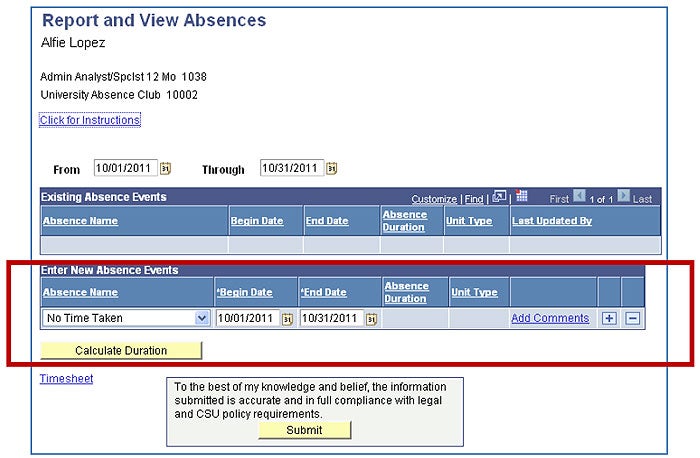
3. From the “Absence Name” field, select the applicable absence type.
4. After selecting an absence type, additional fields will display as applicable. For example, the selection of “Vacation” will display the vacation balance and the “Partial Days” field.

5. Enter the absence “Begin Date” and “End Date” dates. If applicable, select “Partial Hours” in the “Partial Days” field to report partial hours. Select the “Calculate Duration” button and validate the result.

6. Use the “Add Comments” link to enter any comments. The “Add Comments” link will be highlighted in red if an absence requires an entry in the comments field.

7. Click the “Add Comments” link to open the comment box. Enter the required information and click the “Save Comments” button to return to the entry page.
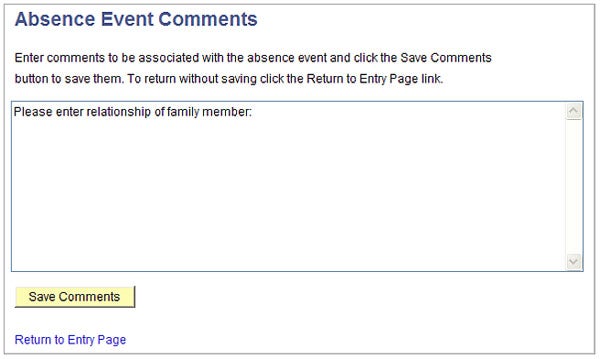
8. The comments hyperlink will change from “Add Comment” to “Edit Comments”. Comments may be edited until the Absence is submitted.

9. Click the “Submit” button to save the transaction. The Absence is validated by the system and the “Submit Confirmation” is displayed. Select the “OK” button to return to the entry page.

10. Absence(s) that have been submitted will display in the “Existing Absence Events” grid. The initial status of absences submitted by employees will show “Submitted”. Absences that are in a status of “Submitted” or “Needs Correction” can be deleted by the employee.
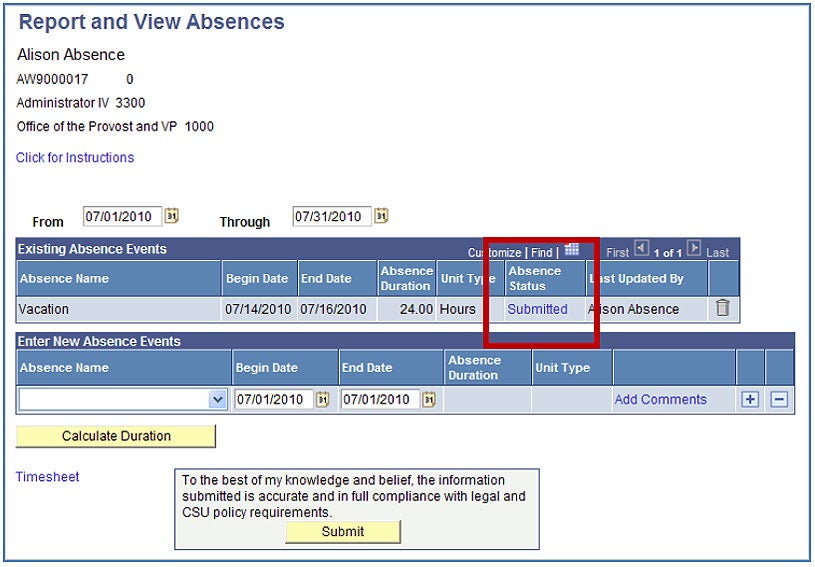
11. To enter additional absences, use the “+” icon to add row(s). Multiple absences may be entered and then submitted or the submission may occur for every transaction individually.
12. Select an Absence Name and complete the remaining fields using the same steps as previously indicated. Use the “-“ icon to delete row(s) that are entered in error but not yet submitted.

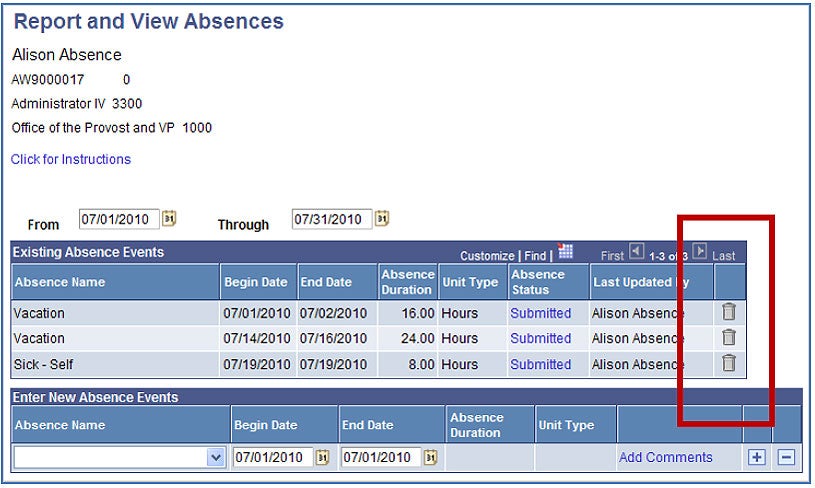
13. To delete Absences that are in “Submitted” or “Needs Correction” status, select the “Trash” icon next to the Absence to be deleted in the “Existing Absence Events” grid.
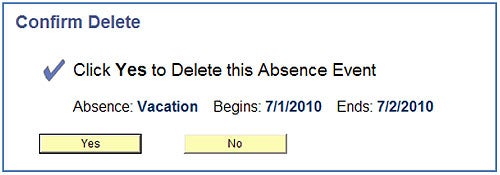
14. A confirmation will page display the details of the Absence to be deleted. Select “Yes” to confirm the deletion or “No” to return to the entry page without deleting the Absence.
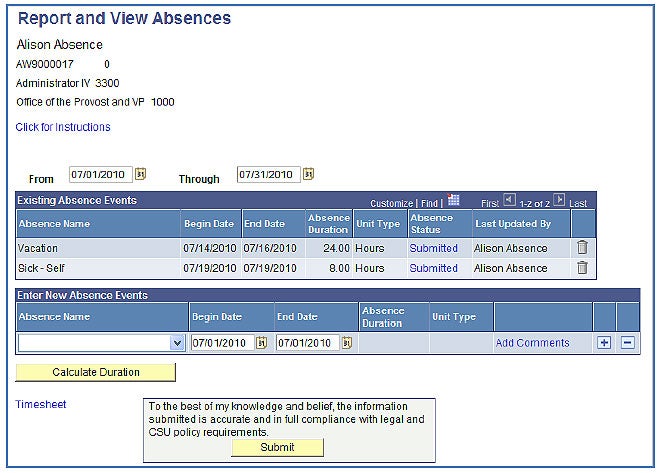
15. The employee is returned to the entry page to validate the submission.
Email notifications are sent to Self Reporters when Timekeepers or Approvers enter or delete an absence on their behalf. An email is also generated when the employee‟s transaction is marked “Needs Correction”.
SAMPLE EMAILS:

The “Employee Balance Inquiry” page is used by employees to view absence balances. Information about functionality is detailed below.
1. To access the page, go to myNorthridge portal and locate the HR/Employee - Time & Attendance portal pagelet. Select the “View Absence Balances” link.

2. The Employee Balance Inquiry page will appear.
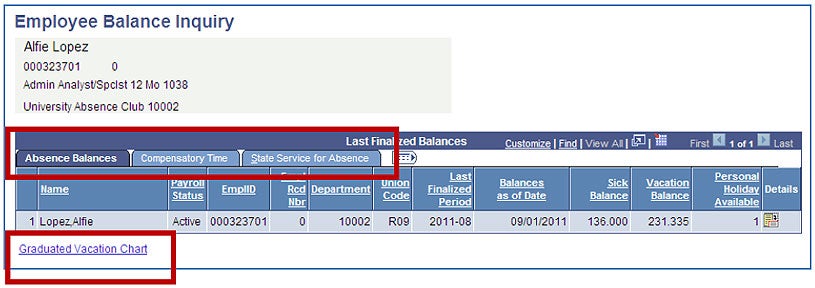
3. Display of Employee Data
The employee‟s name is displayed on top of the page. Information is separated into three different tabs.
Absence Balances. This tab contains sick, vacation, and personal holiday balances as of the last accrual date.
Compensatory Time. This tab contains compensatory time balances (e.g. CTO, Excess, Holiday Credit, Holiday CTO, Additional Day Off, etc.).
State Service for Absence. This tab contains state service balances.
4. “Graduated Vacation Chart”. This chart displays a summary of accrual rates and maximums by bargaining and administrative units.
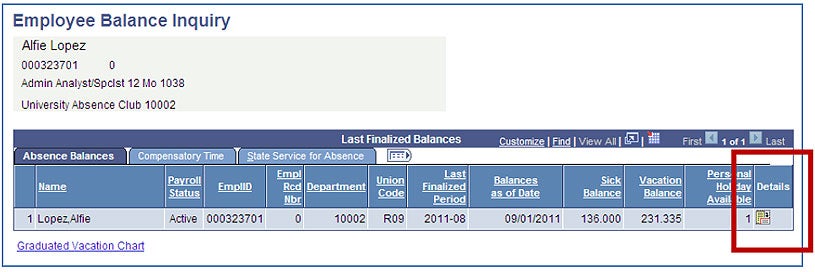
5. View Details:
The Details link provides additional detailed information about current absence activities and absence history.
Note that several tabs will appear across the top. Select the tab that contains the information that is needed.
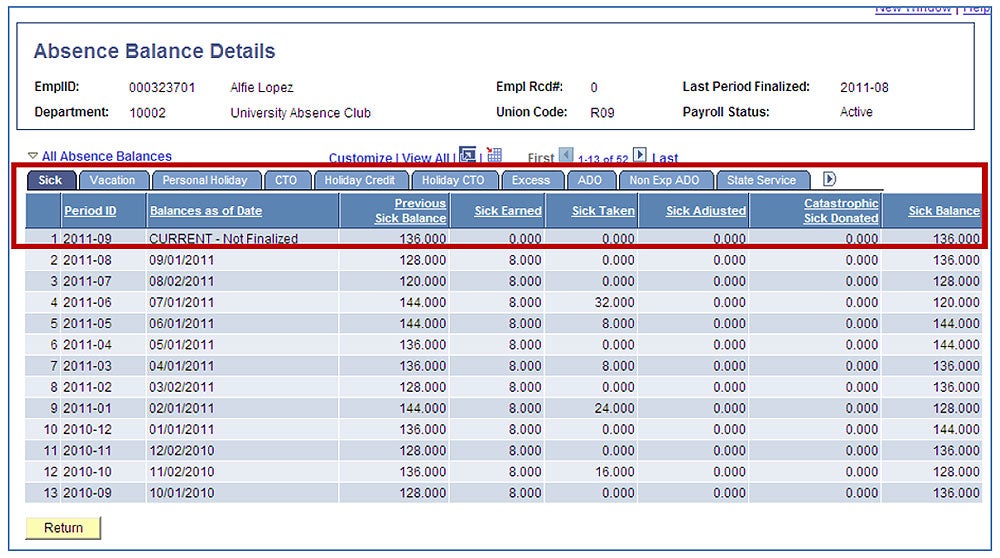
Explanation of Fields: