This is a tutorial only. No login is required.
INTRODUCTION
You can browse the CSUN Schedule of Classes at www.csun.edu/class-search at any time. No login is required.
Class Search allows students, faculty, staff and guests to:
- Search not only by Subject and Course Number, but also by Instruction Mode, Days of Week and Additional Category (e.g., GE courses, community-based service learning, fully-online, low- or zero-cost materials, etc.).
- Search for open classes only
- View assigned textbooks
- View the class final exam schedule
Class Search has three main parts:
- Search page to enter your selection criteria
- Course Results page to view courses matching your criteria
- Class Details page to view specific section requirements and class notes
Step 1
Ways to access Class Search from the CSUN home page (www.csun.edu):
- As a guest: Go to www.csun.edu/class-search. No login is required.
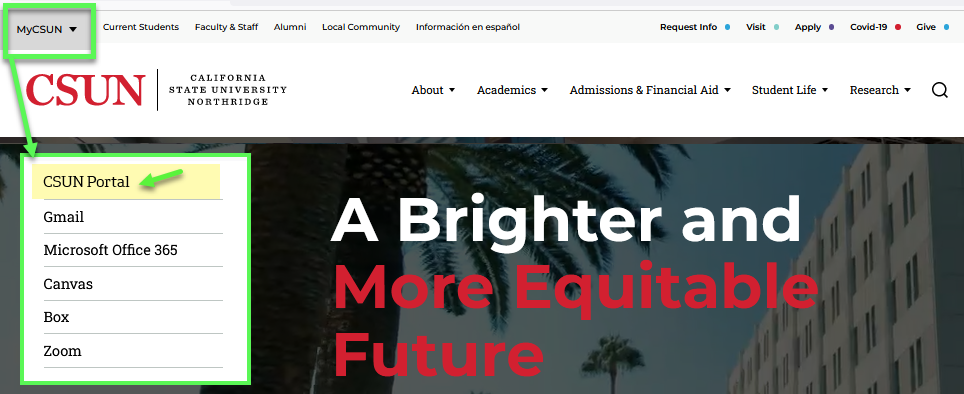
- With a CSUN account: From the CSUN home page, open the MyCSUN menu, select the CSUN Portal link, and log in with your CSUN user ID and password.
Step 1a
If you have logged in to the CSUN Portal:
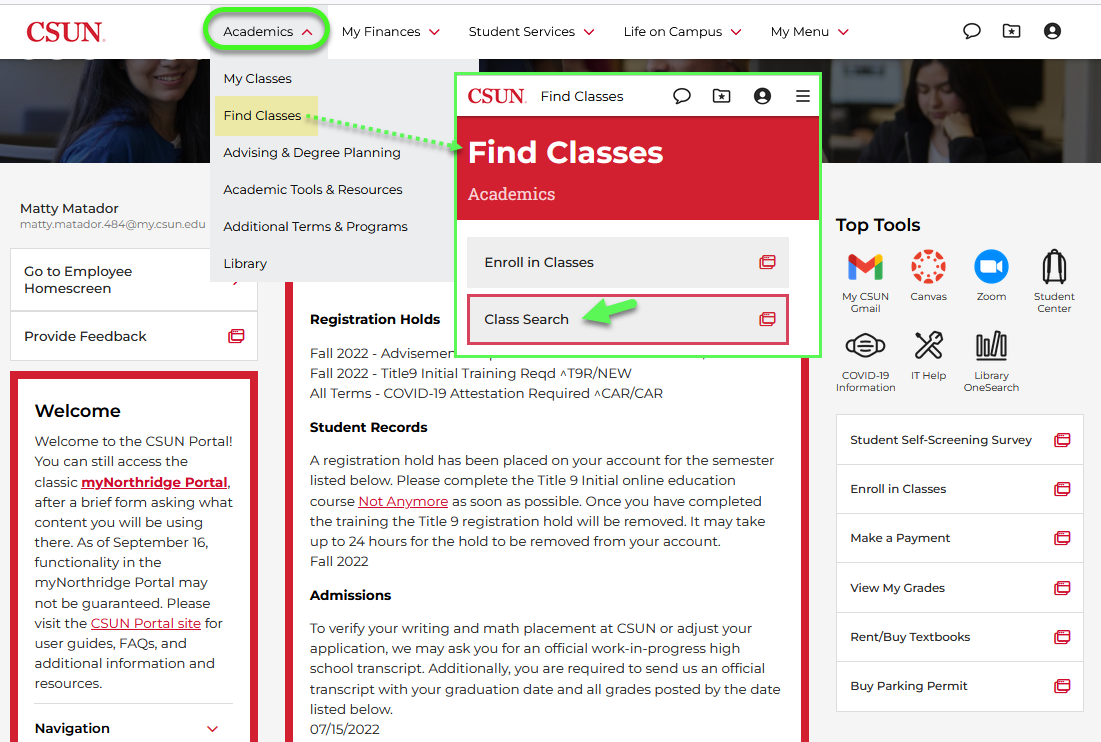
- Students: On the portal home screen, select the Academics menu in the top navigation, choose Find Classes and then Class Search.
- Faculty or Staff: In the Student Admin menu in the top navigation, select Class Search (not shown).
Step 2
The Class Search page displays several drop-down menus and checkboxes to filter by:
- Term
- Session
- Subject/Department
- Course Number (#)
- Instruction Mode
- Include Days of Week
- Additional Category
- Show Open Classes Only (checkbox). By default, the box is unchecked to list all classes — open, closed and cancelled. You'll need to view closed (full) classes to wait list for them.
- Expand All Class Sections for Course List < 50 (checkbox). The box is checked by default. Uncheck it to collapse the Course List rows.
Once you've selected the filters, select the Search button. To start over, select Reset.

Step 3
[Please note: This Class Search How-To Guide is under review. The steps are being updated, but they still help.]
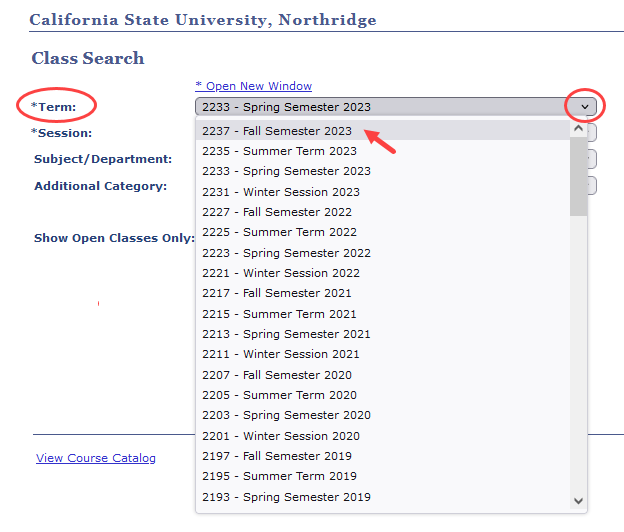
From the required *Term drop-down menu, select a term.
You can view a tentative Schedule of Classes several months before registration begins.
Step 4
From the required *Session menu, select a session type:
- Select Regular to view courses for matriculated CSUN students and non-matriculated Open University students.
- Select Tseng College - Credit Courses to view credit courses in degree and certificate programs offered through extension and summer courses.
- Select Tseng College - Non Credit Courses to view extension courses available for Continuing Education units or no credit.

Step 5
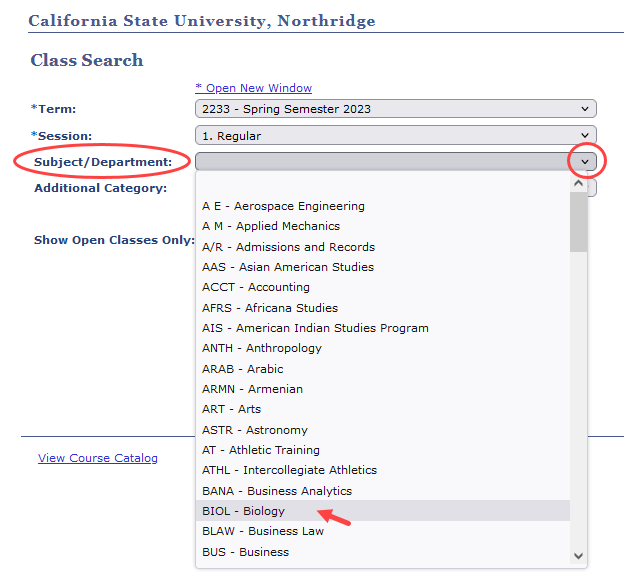
Choose a subject from the Subject/Department menu to view all courses offered by a department for the selected term and session type.
With the menu open, type the first letter of the subject to jump to it quickly. For example, type "K" to jump to "KIN - Kinesiology."
Step 6
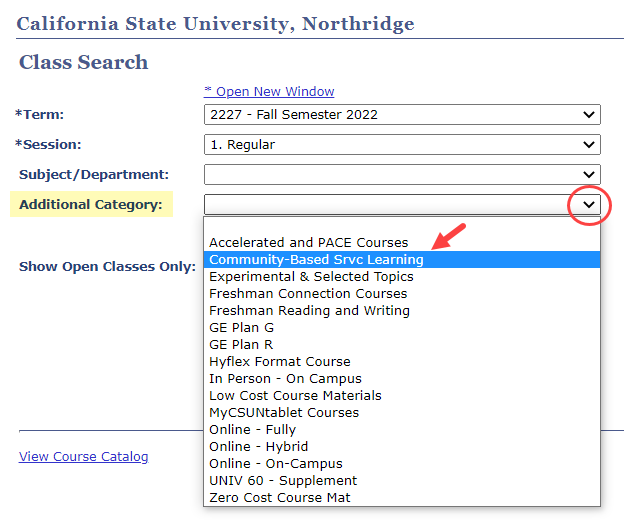
You can further narrow your search by selecting an Additional Category:
- Accelerated and PACE Courses
- Community-Based Srvc Learning (Service Learning)
- Experimental & Selected Topics
- Freshman Connection Courses
- Freshman Reading and Writing
- GE Plan E
- GE Plan R
- Hyflex (choice: online/on campus)
- In Person - On Campus (classes held on campus)
- Low Cost Course Materials
- MyCSUNtablet Courses
- Online - Fully
- Online - Hybrid
- Online - On-Campus
- UNIV 60 - Supplement (Supplemental Instruction)
- Zero Cost Course Mat (Materials)
Online Courses - Find course type details at online course designations and in the next step below.
![]() To view courses in all departments for an Additional Category, leave the Subject/Department field blank.
To view courses in all departments for an Additional Category, leave the Subject/Department field blank.
Step 6a
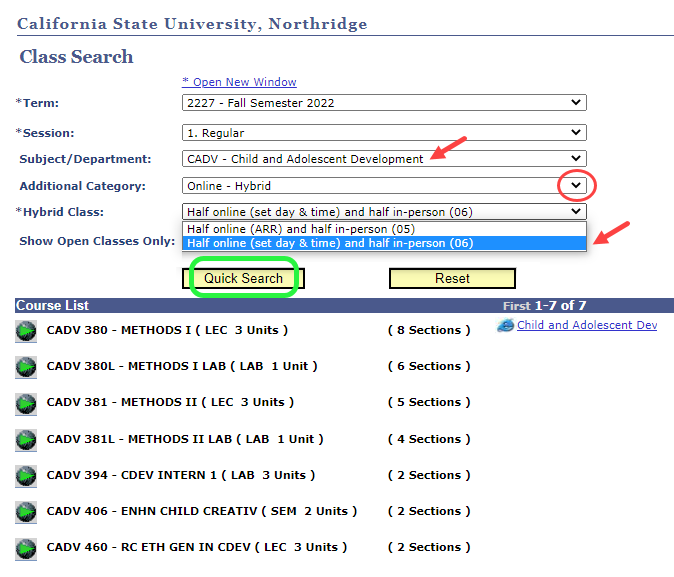
To search for online course types, first select the Subject. Then, from the Additional Category menu, select one of the options listed below. You can further filter your search for classes that do or do not have set, scheduled times to meet online. In other words, online meetings can be:
- Asynchronous — There are no set, scheduled meeting times to attend online. Class Search shows this type of online instruction as "ARR" (arranged).
- Synchronous — Online meetings have set days and times; students must attend online at the scheduled times.
Class Search offers the following online course types and filters:
- Hyflex Format Course - Students have the option to attend class sessions on campus or online. The class has a combined on-campus and online meeting during the scheduled time.
- In Person - On Campus: Classes that meet on campus ALL of the time (in person) or approximately HALF of the time (online hybrid).
- Online - Fully (OF): Instruction is 100% online. There are no on-campus meetings. Further filter by classes that are:
- All Online – No set meeting day or time (01): asynchronous
- All Online – Set meeting days and time (02): synchronous
- Online - Hybrid (OH): About 50% of class meetings are held on campus. Further filter by:
- Half online (ARR) and half in-person (05): The online half of the class has no set meeting days or times.
- Half online (set day & time) and half in-person (06): Students must attend the online half of the class at scheduled times.
- Online - On-Campus (OC): Most meetings are online, with some meetings on campus (fewer than half). Further filter by:
- Mainly Online no set time, & some ARR on-campus meetings (03): Most instruction is online with no scheduled times (asynchronous).
- Mainly Online set day & time, & some ARR on-campus meetings (04): Students must attend online at the scheduled times (synchronous).
NOTE: On-campus meetings for OC classes are ARR (arranged) because they do not meet regularly or because students can coordinate individual lab hours with the professor. Look for the set face-to-face meeting days and times under Class Detail in Class Search, or ask your professor.
Example: The image below shows fall 2022 Child and Adolescent Development classes that are online hybrids (OH) — offered half online and half in person — for which the online half is synchronous; it meets online at set days and times, and students are expected to attend online at the scheduled times.
Step 7
To view only those class sections that are available for enrollment, select the Show Open Classes Only checkbox.
By default, Class Search displays all scheduled sections: open, closed (full) and canceled classes. You will need to view closed classes in order to wait list for them.
Next...
- Select Quick Search to view results.
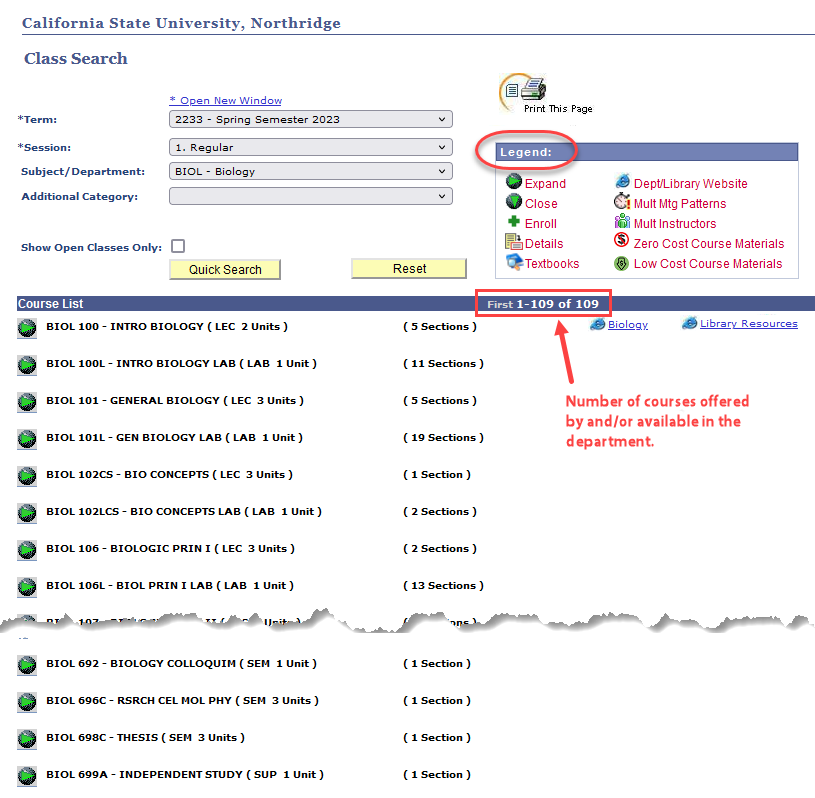
- The search results will display in the Course List, all courses for the subject and your search criteria in numeric order from 100 to 600 (to 700 for doctoral programs).
![]() A Legend explains icons, features and navigation. You’ll also find the total number of courses the department offers, the number of sections offered for each course, a link to the department website and a link to library resources for the subject.
A Legend explains icons, features and navigation. You’ll also find the total number of courses the department offers, the number of sections offered for each course, a link to the department website and a link to library resources for the subject.
Step 8
Select the Expand icon to view the Class Section List for a single course.
The Class Section List features will display in a table with these column headings:
- Detail Icon
- Session
- Section Number
- Online Course Type
- Textbooks (icon)
- Low or Zero Cost Course Materials (icons)
- Class Number
- Regular Seats Available
- Enrollment Status
- Component Type (lecture, activity, lab)
- Location (links to campus map)
- Meeting Days
- Meeting Time
- Instructor (links to instructor webpage)
- Consent (when a permission number is required to add)
![]() To sort a column, select its heading.
To sort a column, select its heading.
Select the Detail icon or row for each section to view details for each class section.

Step 9
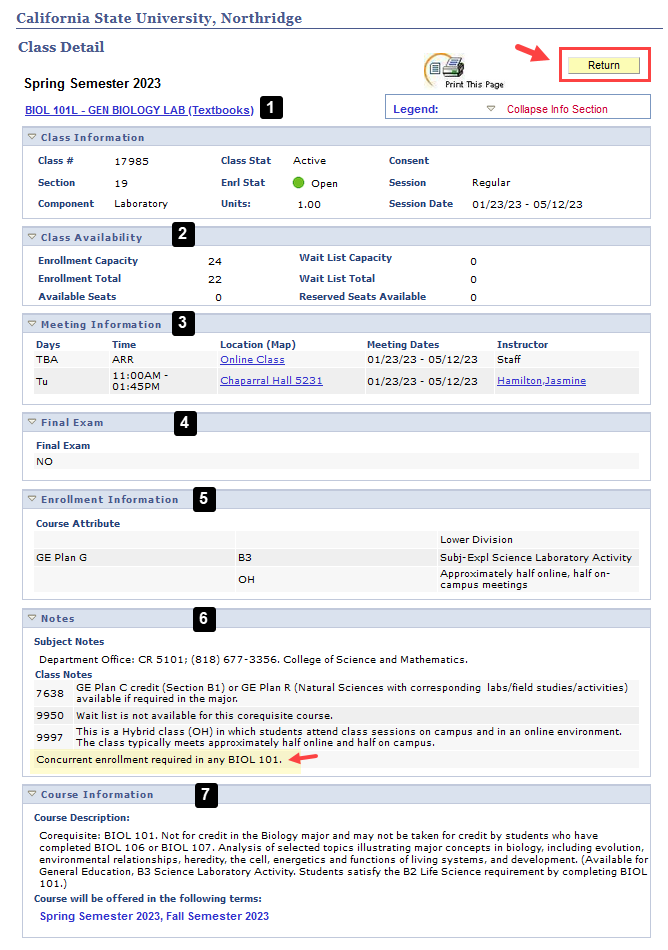
The Class Detail page displays for the class section you selected.
Class Detail features include:
- Textbooks (link) - Note: Low or Zero Cost Course Materials will be noted here.
- Class Availability
- Meeting Information
- Final Exam schedule
- Enrollment Information (e.g., BE Plan and other attributes)
- Notes*
- Course Information*
![]() *Always check the Notes and Course Information for class requirements and special instructions. For example, you may need to enroll concurrently in both a lecture and a matching lab (i.e., corequisite courses).
*Always check the Notes and Course Information for class requirements and special instructions. For example, you may need to enroll concurrently in both a lecture and a matching lab (i.e., corequisite courses).
- To return to the previous page, select the Return button.
- To begin a new search and clear all fields on the previous page, select the Reset button (see Step 8).
·
