INTRODUCTION
This is a tutorial only. No login is required.
If you're new to Registration Planner, please see the Registration Planner guide.
Stay right here for an overview of Registration Planner advanced tips including:
- Advanced Filters
- Class Padding
- Conflict Detection
- Corequiste Courses
- Favorites
- Import Courses from DPR/Planner
- Lock Courses
- Search by Section Attribute
- Validate Schedule - New!
Registration Planner Advanced Features
Registration Planner makes it easy to create your preferred class schedule each semester. You can enter break times for work or other activities, compare schedule options and save favorites. Once you have determined your final schedule, you can send it directly to the enrollment shopping cart.
By using Registration Planner, you also help CSUN predict course demand. It's mobile-firendly, too, through the CSUN Mobile App.
Advanced Filters
Registration Planner can generate over 1,000 schedules for the courses you want. You don’t have to check each possibility, though. You can "bulk edit" the sections of each course using Advanced Filters:
- Filter class sections by instructor, attribute (e.g., fully online), or both.
- Exclude individual sections (e.g., based on start time).
Save your filters to make Registration Planner generate only those schedules that match your criteria.
On the home page under Courses, select the Options link next to the course you want to filter.
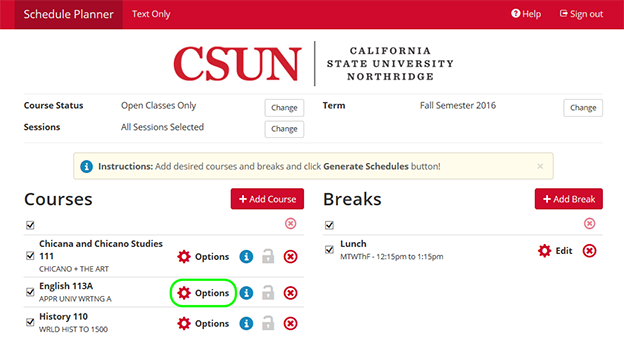
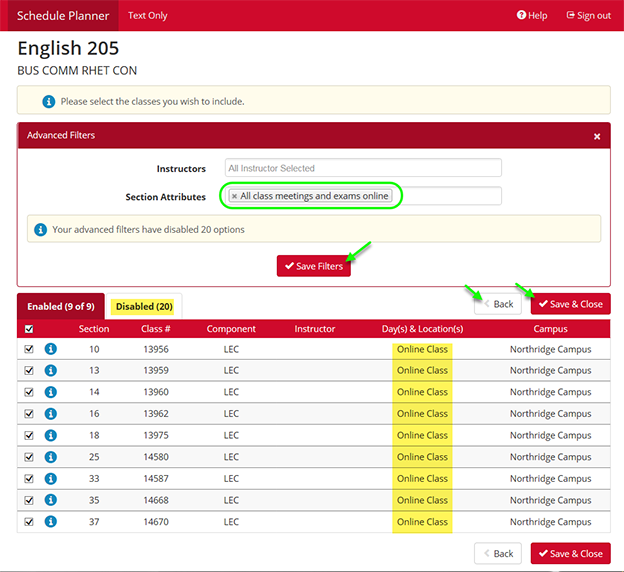
All class sections for the selected course display. In this case, sections are listed on two tabs: Enabled and Disabled (open and closed). Only the enabled sections will be included when Registration Planner generates schedules. You can control this.
Tips:
- "Open Classes Only" is the Registration Planner default. You can opt to include "Open & Closed Classes with Waitlist Open" on the home page.
- Click the blue "information" icon next to each section to view full details, prerequisites, class notes, whether permission/consent is required, etc.
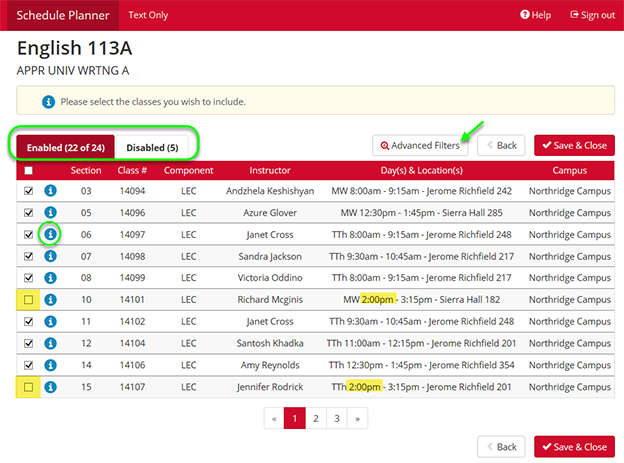
To filter individual sections, uncheck the ones you want to exclude, for example, those starting after 2:00 pm.
To further filter your choices, select the Advanced Filters button.
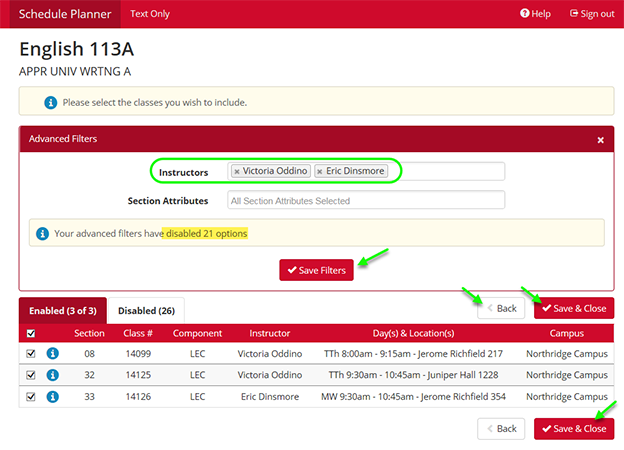
The Advanced Filters screen displays. Use the drop-down menu to select one or more instructors of your choice, or simply type in the first few letters of his/her name. The class sections will filter instantly to the chosen instructors.
Note that this instructor filter has moved 21 of the 29 sections to the "Disabled" tab. Additional sections of this class are disabled because they are closed.
- To remove the instructor filters, click the "x" next to the name.
- To return to the home page without saving, click Back.
- To generate schedules using this instructor filter, select Save Filters.
To generate schedules with only fully online sections of a course, select "All class meetings and exams online" from the Section Attributes box.
With this fully online filter, all face-to-face and hybrid sections of the course are moved to the Disabled tab.
To generate only fully online sections of this course, select Save Filters and then Save & Close.
Class Padding
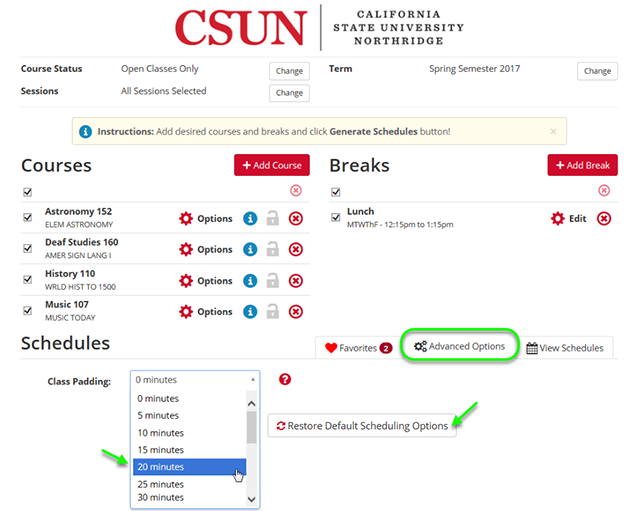
Use class padding to ensure a minimum time interval to travel or study between the classes in your schedule.
On the home page below "Breaks," select the Advanced Options tab. The Class Padding drop-down menu displays. Select a padding value between zero and 90 minutes.
- To remove padding, click the Restore Default Scheduling Options button.
- To continue, select View Schedules.
Conflict Detection
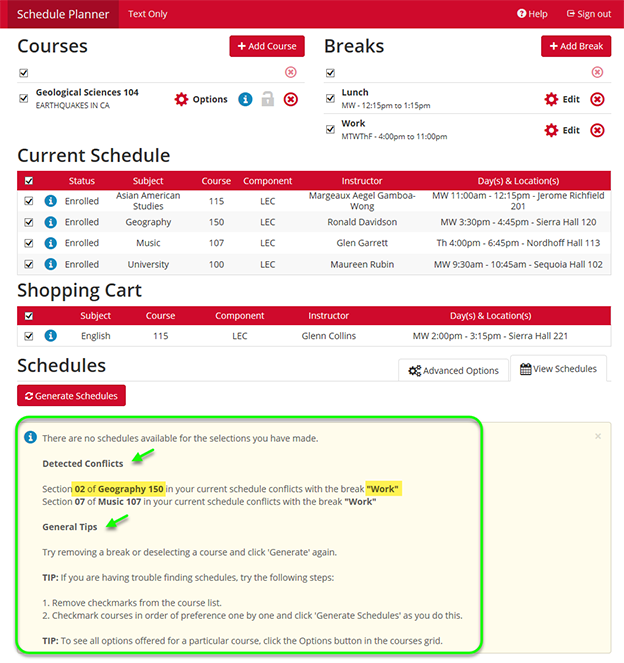
When time conflicts occur between your courses and breaks, no schedules will be generated. Instead, Registration Planner identifies the conflicts for you and provides tips to resolve them in a "Schedules" alert message.
Note: When you start a new Registration Planner session:
- Recheck the Breaks checkbox (defaults to unchecked in a new session) if desired.
- Registration Planner updates and displays your current schedule of enrolled classes and any classes pending in your cart. When you generate new schedules, conflicts may result. However, you'll have the option to exclude any conflicting courses by unchecking them.
Corequisite Courses
New! Registration Planner has a Validate button that checks for missing enrollment requirements before you send a desired schedule to your enrollment shopping cart. Read more in this guide at Validate.
Corequisites are classes that have to be taken together, often a lecture and a lab. For example, MATH 150A requires concurrent enrollment in MATH 150AL.
Sometimes you can enroll in any section of a corequisite course. Other times, you must enroll in a SPECIFIC corequisite section identified by its 2-digit section number and 5-digit class number.
It is the student’s responsibility to add a course with its correct corequisite. To find out if a course has a corequisite, check the Class Notes in Registration Planner or Class Search. If needed, check with your academic advisor.
The following steps demonstrate the best practice for adding courses that have specific corequisites. MATH 150A is the example.
Step 1 | Find Corequisite Information
- Click the +Add Course button to add a course and its corequisite (see Registration Planner Guide, Step 8).
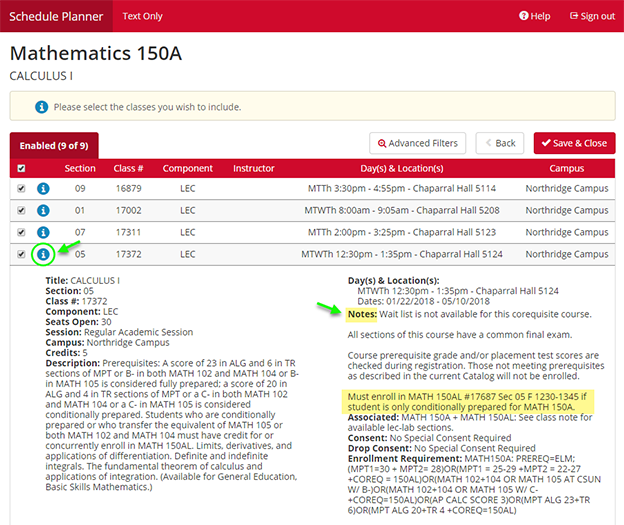
- In the example below, MATH 150A and its corequisite MATH 150AL have been added. Click the Options link for the lecture course (not the corequisite lab).

- The list of MATH 150A lecture sections displays. Review class times and choose the section that best fits your schedule.
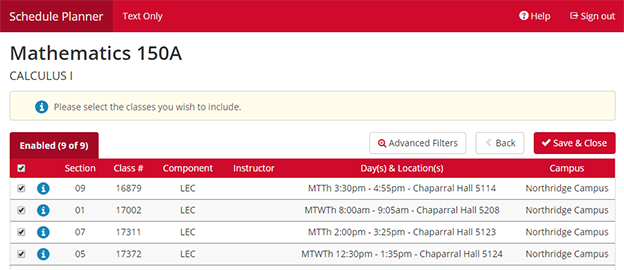
- Click the blue “i” information icon to reveal the Section Details of your desired class (section 05 below).
- Look for the Notes heading and write down the corequisite lab class that goes with the MATH 150A lecture you selected.
- In this example, the note reads: "Must enroll in MATH 150AL #17687 sec 05 F 1230-1345 if student is only conditionally prepared for MATH 150A."
Step 2 | Select the Lecture Section
Once you have chosen a lecture section, deselect all the courses by clicking the check box (on/off toggle) in the red header row. (When the class section list has multiple pages, Registration Planner will prompt you to “Uncheck All” or “Uncheck This Page”. Select Uncheck All.)
- Next, RE-SELECT your desired class section by checking the box to its left.
- Click the Save & Close button.
Registration Planner will automatically return to the home page.

Step 3 | Select the Corequisite Lab
On the Registration Planner home page, click the Options link next to the corequisite lab course (i.e., MATH 150AL).
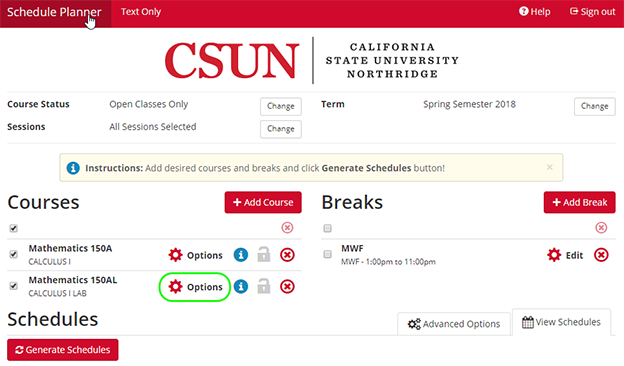
The list of MATH 150AL class sections displays.
- Deselect all of the courses by checking the box (on/off toggle) in the red header row. (When the section list has multiple pages, Registration Planner will prompt “Uncheck All” or “Uncheck This Page”. Select Uncheck All.)
- RE-SELECT your desired corequisite lab section that you wrote down earlier. In the example below, MATH 150AL #17687 sec 05 is selected.
- Click Save & Close.

Registration Planner will now create schedules using only the specific lecture and lab class sections you've selected.
- Add any other courses that you plan to take.
- Click Generate Schedule.
Favorites
Registration Planner lets you name, save and compare favorite schedules. You can save a variety of favorites that have different courses and breaks.
Note: If your currently enrolled classes or shopping cart change, the updates will not be reflected in your favorites.
To save a favorite schedule:
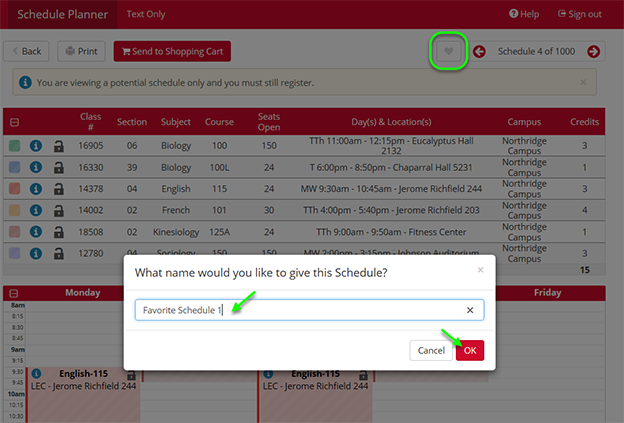
- Select its View link from the list of generated schedules.
- On the view schedule screen, click the heart icon at the top right.
- Name the schedule in the pop-up window and click OK.
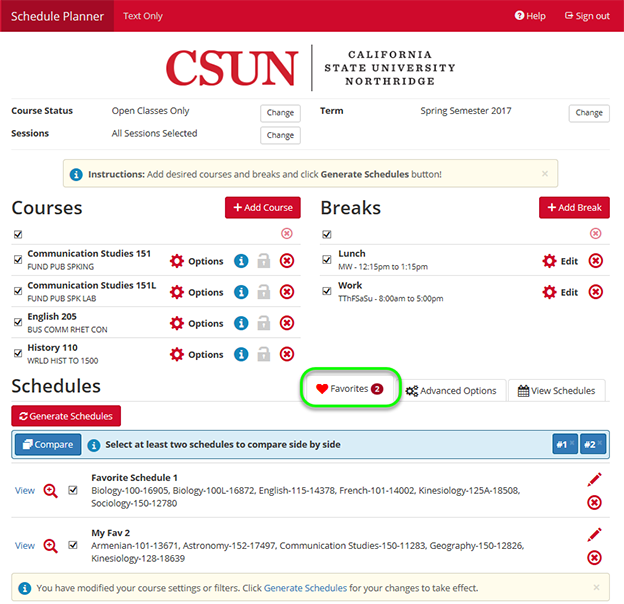
Back on the home page, select the Favorites tab to access your saved schedules. Use the icons for each schedule as follows:
- Pencil - Rename the schedule.
- (X) - Delete the schedule.
- Magnifying glass - View a schedule thumbnail.
- Check box - Compare favorite schedules.
- View link - Return to the schedule detail view and send it to your cart to finish enrolling as soon as registration opens.
Import Courses from DPR/Planner
When you create a plan in DPR/Planner (see Degree Progress Report and Planner Guide, "Planner" Steps 1–7), Registration Planner lets you import your planned courses to generate schedules.
Example: If you plan courses for the Spring 2019 semester in DPR/Planner, you can import those courses to Registration Planner as soon as Spring 2019 "opens" in Registration Planner.
Step 1 | Import Classes
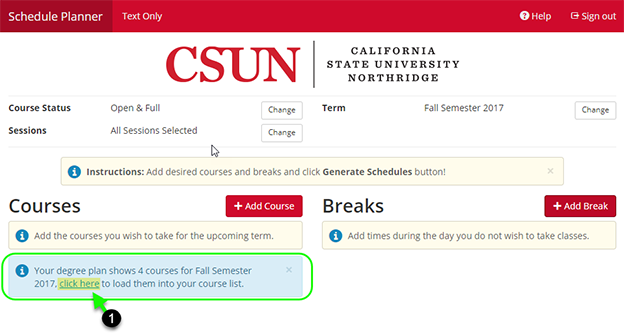
When you've made a DPR plan, the Registration Planner home page will display a blue information box to indicate that your planned courses are ready to import. (The box displays only when the Registration Planner course list is empty.)
- Select the "Click Here" link in the blue information box to load the planned courses.
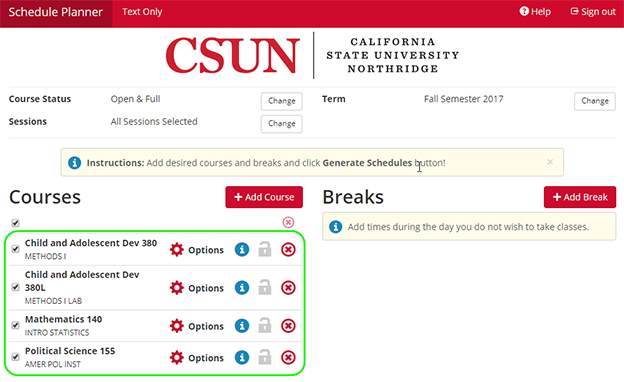
- Your planned courses appear in the course list, replacing the blue information box.
- NOTE: Courses NOT in the Schedule of Classes for your target term will NOT import.
Continue to generate schedules as shown in the Registration Planner Guide.
Step 2 | Refresh Courses (re-import)
If you revise your DPR plan or accidentally delete a planned course from Registration Planner, you can reload the imported courses.
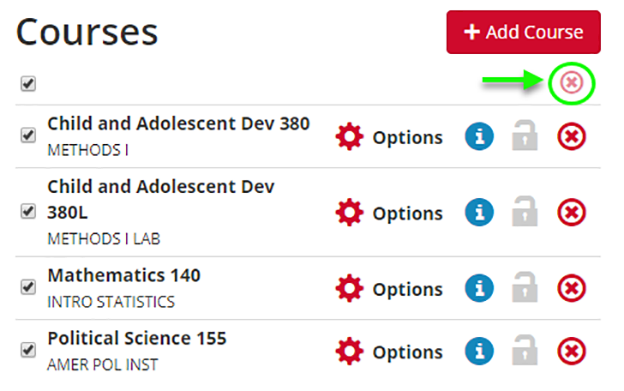
- First, delete all of the courses in Registration Planner by clicking the top red X immediately below the +Add Courses button.
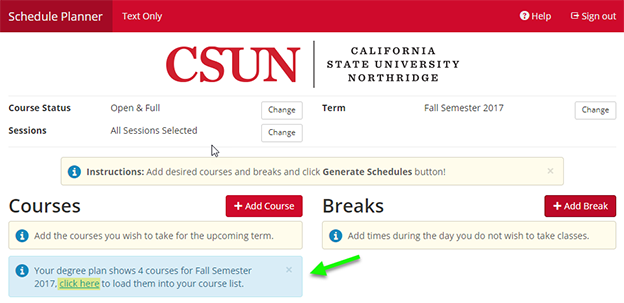
- Once the courses are deleted, the blue information box will reappear on the Registration Planner home page.
Lock Courses
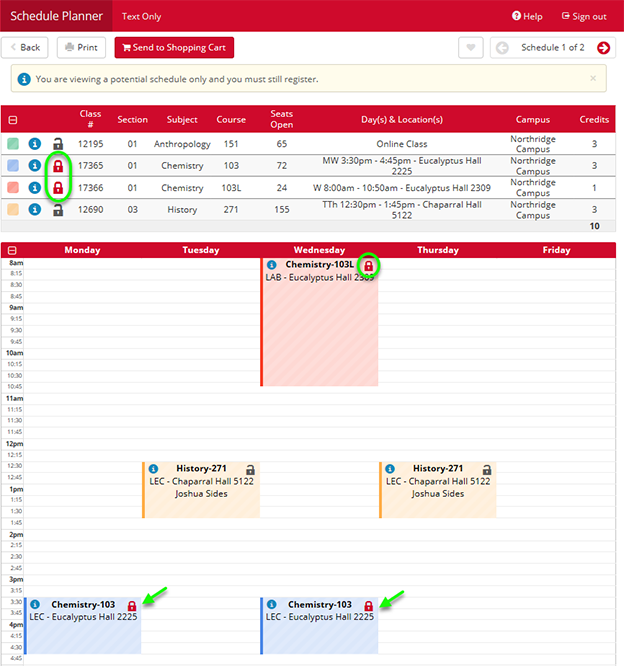
If only one section of a course works for you, you can "lock" the section in Registration Planner to generate all possible schedules around it. For example, you might want to lock in a prerequisite course like CHEM 103/L lecture and lab.
Note: Locking a course will reduce the number of possible schedule results. Be flexible when possible.
To lock in a course, select the View link for a schedule you like. On the View Schedule page, click the lock icon next to the course. If few sections are available, lock both the lecture and the lab sections if any.
To unlock the course, select the red “locked” icon.
Search by Section Attribute
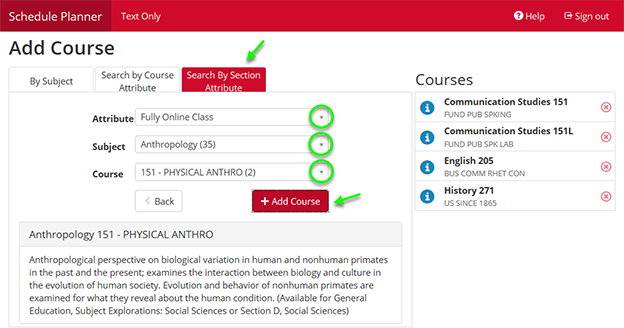
When adding courses to generate schedules in Registration Planner, you can look them up by Subject, Course Attribute or Section Attribute. Searching by course or section attributes will yield the same results at this time. However, only using Search by Section Attribute will automatically fill in the advanced filter for Course Options.
From the Add Course page, click the Search by Section Attribute tab to find courses by group, such as:
- Accelerated format
- General Education category
- Learning mode (fully online, hybrid, or mostly online with a few on-campus meetings)
Once you’ve selected an Attribute and a Subject, you can quickly find a course that matches your criteria. Select Add Course.
The example below limits the search to only fully online Anthropology courses, and ANTH 151 was selected.
Back on the home page under Courses, click the Options link for ANTH 151.

On the Advanced Filters screen, the section attribute that you previously selected (i.e., "fully online class") automatically displays in the Section Attributes field. The fully online section of the course displays on the Enabled tab, and the not-fully-online section displays on the Disabled tab.
To remove the section attribute filter, click the "x" next to its name.
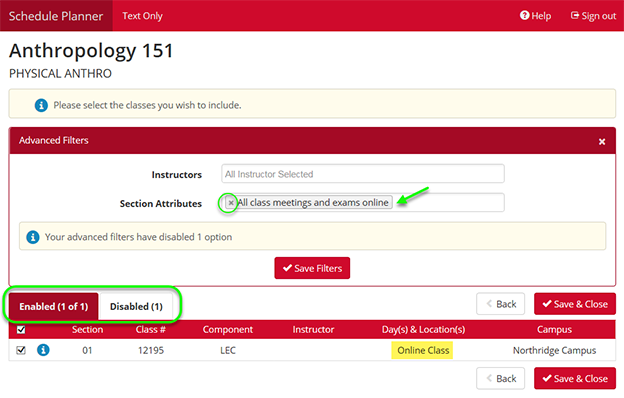
The face-to-face section displays on the Disabled tab, as shown below:

Validate Schedule - New!
The Validate button in Registration Planner lets you preview and resolve any enrollment errors before sending a final schedule to your cart. Validation checks for problems such as:
- Missing course prerequisites and co-requisites
- Exceeding maximum unit load
- Time conflicts with your enrolled classes and those in your cart
- Repeated courses - Registration Planner reads your course history.
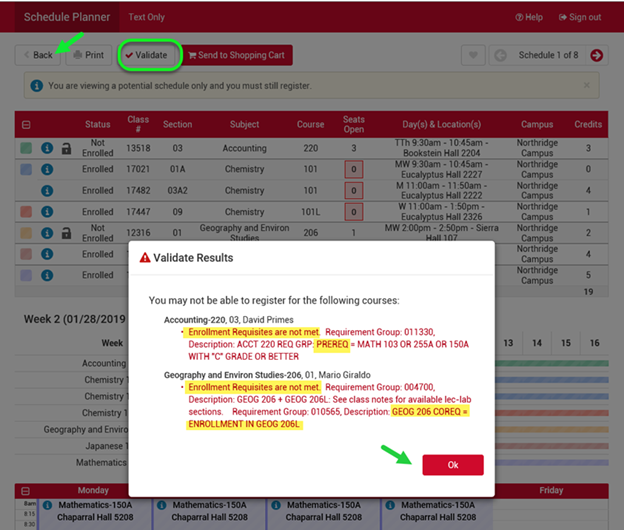
Before sending a possible schedule to your cart, select the Validate button at the top left of the “View Schedule” page. The Validate Results pop-up window confirms success or lists errors. The following images illustrate possible errors.
Course Requisites
In the image below, two errors were found:
- ACCT 220, section 03: The student is missing the prerequisite Math course.
- GEOG 206, section 01: The student selected the lecture course but forgot the co-requisite lab.
To fix the errors, click OK to close the pop-up. Then select the Back button to return to Registration Planner home.
Back at Registration Planner home, do the following:
- Click the red “X” to remove ACCT 220 from your desired course list. (Note: If you are currently enrolled in the prerequisite Math class and expect to pass it with a “C” or better, you can keep ACCT 220 and send it to your cart. Consult with an advisor.)
- Return to Add Course to select the co-requisite GEOG 206L lab.
- Click Generate Schedules and choose one to view.
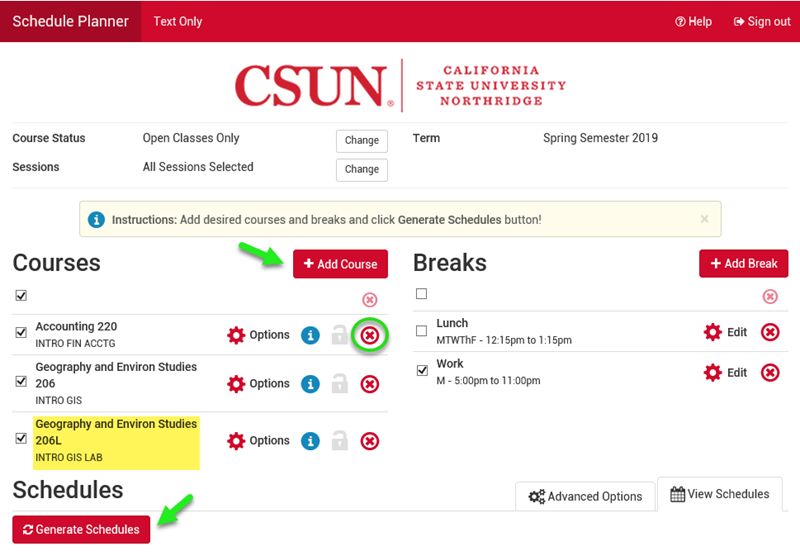
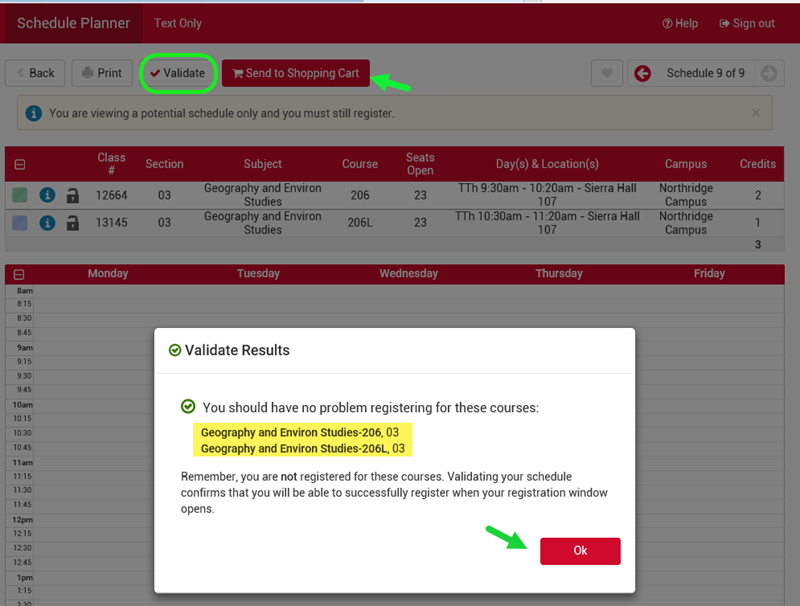
On the View Schedules page, click Validate. Et voila! You’ve fixed the course requisite errors! The Validate Results pop-up now reads: “You should have no problem registering for these courses: Geography and Environ Studies 206 and 206L.”
You still need to finish enrolling! Click the Send to Shopping Cart button to proceed.
Maximum Unit Load
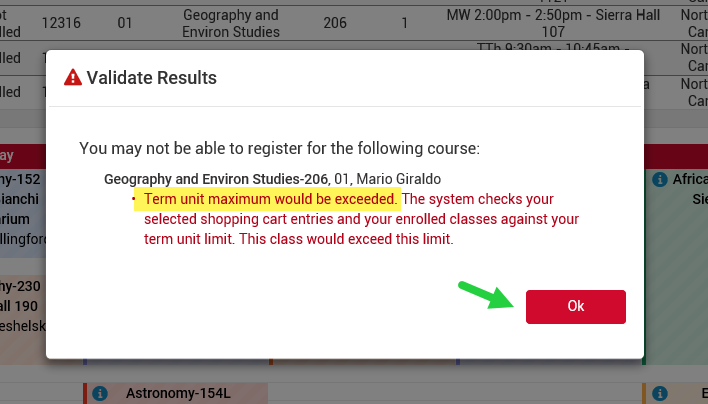
If you generate schedules that exceed the unit limit, the Validate Results message will state “Term unit maximum would be exceeded.”
Note: Validation always counts the units in your enrolled courses (if any) and any classes in your shopping cart.
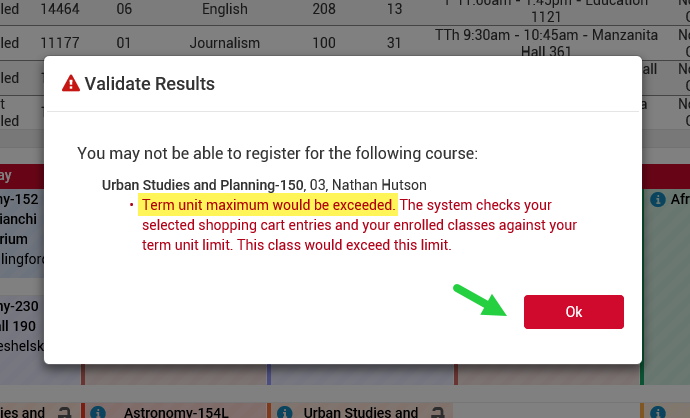
You can resolve the unit-limit error by selecting classes in Registration Planner to stay below the maximum load. To choose classes, use the Degree Planning Tools and meet with your advisor.
To try out different schedule scenarios and unit loads, you can experiment in Registration Planner with dropping a class from your current schedule and/or your cart. Don’t actually drop the class! It might be hard to add back. Talk with an advisor first.
To hypothetically drop a class from your current schedule (or cart) in Registration Planner only:
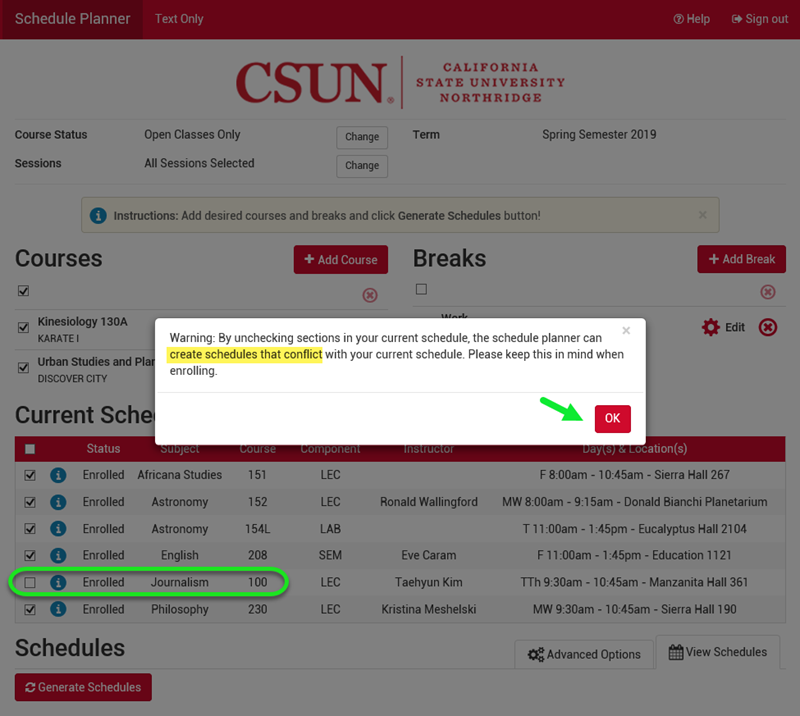
- On the Registration Planner home page, uncheck Journalism 100 from your Current Schedule list.
- A warning pop-up displays, reminding you that Registration Planner can create schedules that conflict with your current schedule. Keep this in mind when enrolling! Click OK.
- Click Generate Schedules.
Time Conflicts
Time conflicts occur when any of your desired classes in Registration Planner meet at the same time as classes in your current schedule and/or those in your shopping cart. Even if you uncheck one or more of your enrolled classes on the Registration home page, the Validate Results pop-up will report a time conflict. Keep this in mind when enrolling.
To fix a time conflict, check your current schedule to identify the overlap. In this case, enrolled PHIL 230 (14342) conflicts with the desired URBS 150 (12106), both of which meet on MW at 9:30 am.
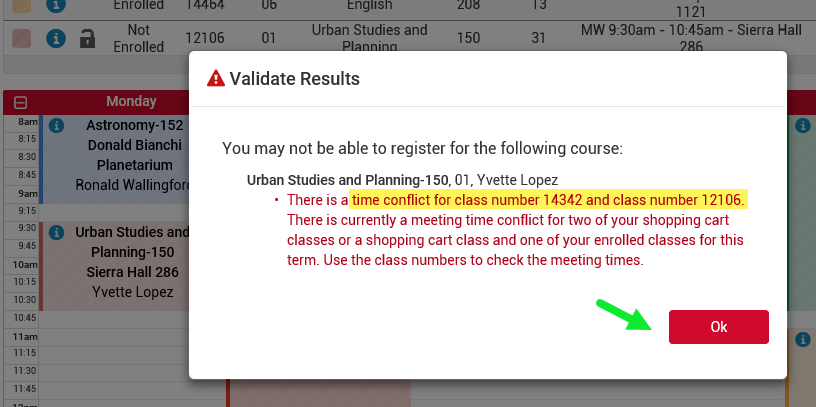
To find an URBS 150 class that fits into your current schedule, take these steps:
- Go back to Registration Planner home. Click the Options icon for URBS 150.
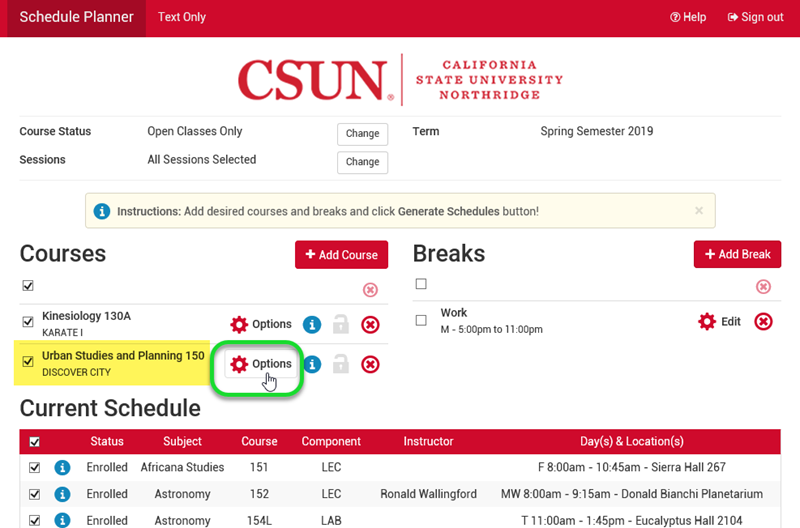
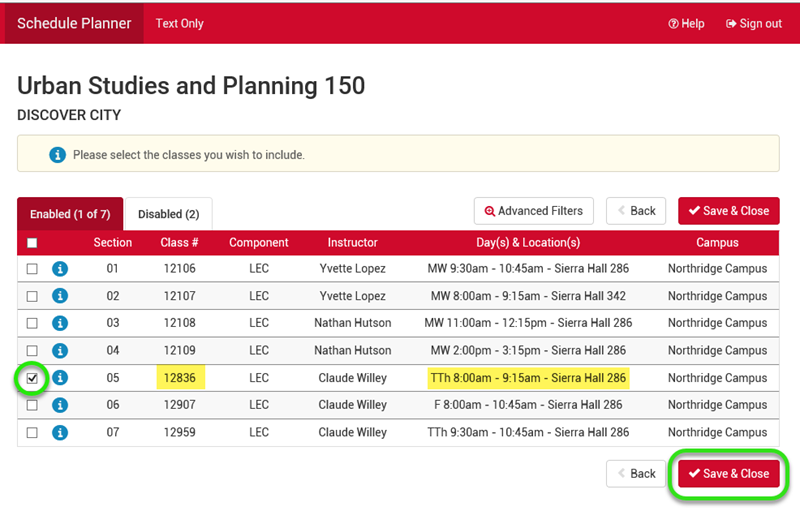
- Select the section that fits into your current schedule and click Save & Close.
- Generate new schedules and select one. The View Schedule page shows the new URBS 150 section you selected and your currently enrolled classes without JOUR 100. Click Validate again.
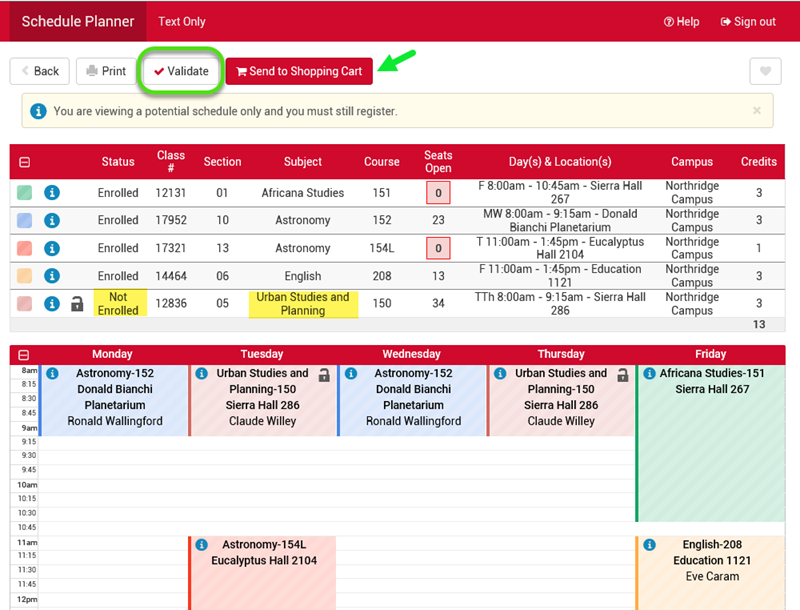
- The Validate Results window reports the “term unit limit exceeded” error because Registration Planner is reading your current schedule; however, there are no more time conflicts. You should carefully consider whether or not to drop Journalism 100 from your real schedule. Consult your advisor for guidance.

Multiple Errors
If the same class section results in multiple errors, the Validate pop-up might display only one error at a time. So keep validating after each fix to clear errors before sending a schedule to your cart.
In the image below, the Geography 206 lecture, section 01, is missing its co-requisite lab and exceeds the maximum unit limit, but validation only reports the unit-limit error. Adjust your unit load in Registration Planner and validate again to detect any other errors.
It might be impossible to eliminate all errors. Keep this in mind when enrolling and consult with an academic advisor when in doubt.
 Additional Help
You might also find these resources useful:
- Registration FAQs
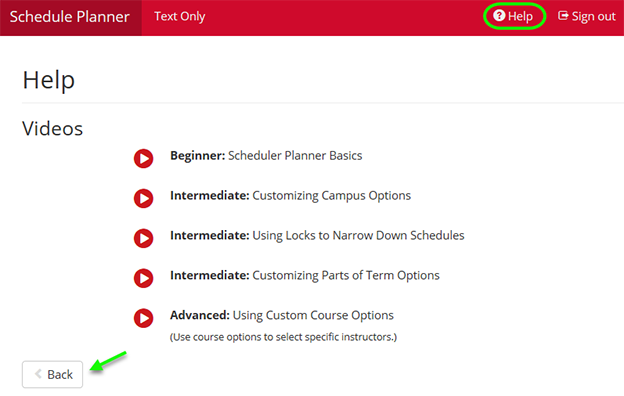
- From any screen in Registration Planner, select Help to view instructional videos.
