Letter
1. Make sure to save and back up your work often.
2.
As soon as you open up a page, you will want to go and save this document
(if using the U-drive, please remember to save your file in the 'public_html'
folder).
To download from the Internet, complete the following...
In this section, you will learn how do download
or copy pictures. Just about every image or picture that you see on the
Web is downloadable. Keep in mind when you download an image, you will want
to save the image where you will be able to locate when needed.
1. Open up a browser, either Internet Explorer, Netscape, etc. So that we
will download the same image, lets all go to college of education Web site
(www.csun.edu/coe) and download the torch.
|
Step 1
When using a Mac, press and keep the "ctrl" keystroke down which is located near the spacebar and place your cursor on the picture of the torch and press the mouse once and a menu will appear. |
Step 2
Once the menu appears, choose the "Save image as or Download Image to Disk." and you will now want to navigate and save this in the correct location. |
Hint: Hollow Grab Bars
When using Microsoft, your images that insert will initially have solid grab bars and you will want to change that image so that the image will have hollow grab bars.
|
Formatting Picture
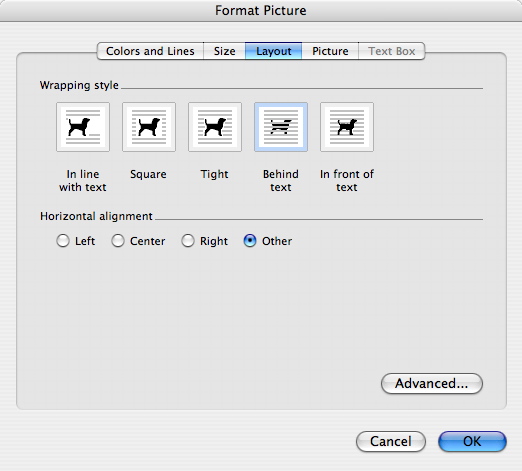
Once the image has been inserted into your document, you will want to double click on the image so that the Format Picture menu appears. Choose Layout from the top and select either Square or Tight to make the grab bars change from solid to hollow. |
solid grab bars
|
hollow grab bars
|
Now that you have the image saved, you will want to place your image onto
your document (once the image is inserted, change the grab bars from solid
to hollow).
|
Step 1
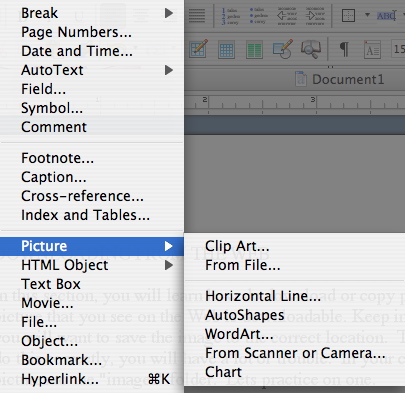
go back to your document and choose Insert from the toolbar then Picture>From File. |
Step 2
Locate the file and select it. In my example, I called the file csun_torch.jpg |
|
Step 1
Choose Format>Borders and Shadin... |
Step 2
Once you do this, a Borders and Shading menu will appear and you will want to choose the Borders tab which is located near the top of the menu |
Step 3
From there, you will see up and down arrows located next to the "Art" section near the bottom of the menu. Choose a design and then click on the "OK." |
6. Place all of your text on your page and once that is complete, you are ready to insert a watermark.
Step 1, insert the image onto your document.
|
Step 2
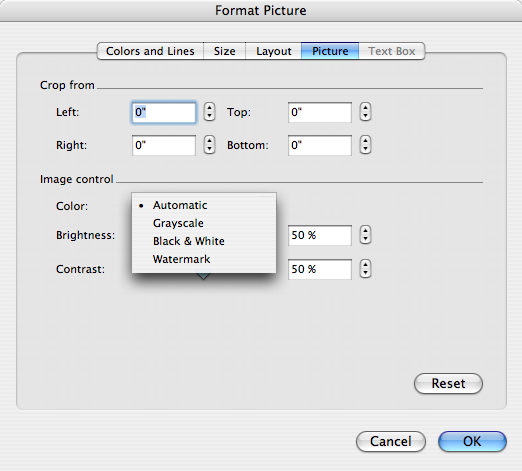
Step 2, once the image has been inserted, double click on the image to get the Format Picture menu to appear and then select the Picture tab near the top. |
Step 3
Step 3, next to Color near the center of the screen where it states Automatic, select it and choose Watermark |
Step 4
Step 4, select the Layout tab and then select Behind text, then OK. |
You have now successfully created a letter. Make sure you have the following for this assignment...
- Minimum of two images from the Internet.
- Watermark (you can watermark one of the two images that you inserted)
- Border (it does not have to be a picture, it can be a line or dashes)
- Your completed work needs to be at least a full page and font needs to be 14 or smaller.
-Tab leaders (at least 10 entries with 3 different indents)
Keep in mind that these are the minimum requirements to get a B, look at the samples to see A work.
Sample


