Making your accelerometer
Materials and Tools
Lightweight poster board (any color)
3 "drilled egg" lead fishing sinkers, 1 ounce size
Masking tape
Rubber band, #19 size
4 small paper clips
Scissors
Straightedge
Ballpoint penProtractor
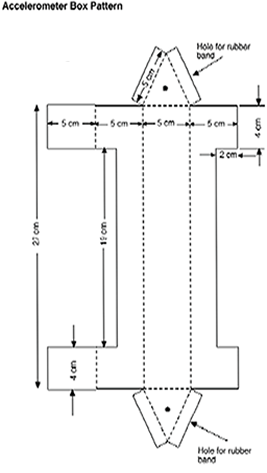
Pattern (upper left image above)
Hot glue (low temperature)
Step 1. Recreate the pattern (see above) for the accelerometer on a piece of poster board. Cut out the pattern.
Step 2. Use a ruler and a ballpoint pen to draw the fold lines on the poster board in the same place they are shown on the pattern.
Step 3. As you draw the lines, apply pressure to the poster board. This will make the poster board easier to fold.
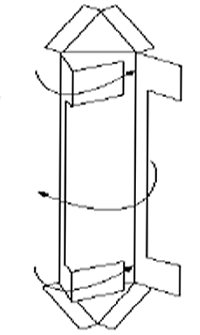
Step 4. Fold the two long sides up as shown in the middle illustration.
Step 5. The left side with the tabs is folded over first. The right side is folded second. This makes a long triangle shape. Use tape to hold the sides together.
Step 6. Punch a small hole in one of the end triangles. Cut the rubber band to make one long elastic band. Tie one end of the band to a small paper clip. Thread the other end through the hole.
Step 7. Slip the lead weight on the band. Punch a hole in the other end.
------------------------------------------------------------------------------------------------------------------------------------
Calibrating the Accelerometer:
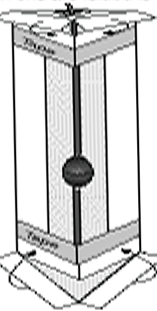
Step1. Stand the accelerometer on one end. Using a pencil, mark one side of the accelerometer next to the middle of the weight.
Step 2. Identify this mark as 1 g.
Step 3. Using a small paper clip as a hook, hang a second weight on the first. Again, mark the middle of the first weight on the accelerometer.
Step 4. Identify this mark as 2 g. Repeat this step with a third weight and identify the mark as 3 g.
Step 5. Remove the two extra weights and stand the accelerometer on its other end. Repeat the marking procedure and identify the marks as -1 g, -2 g, and -3 g.
Step 6. The final step is to mark the midway position between 1 and -1 g. Identify this place as 0 g. The accelerometer is completed.
------------------------------------------------------------------------------------------------------------------------------------
Using a Horizontal Accelerometer
Step 1. Loop the accelerometer to your wrist using the lanyard.
Step 2. Hold the accelerometer so that it is in the same axis as the acceleration you are measuring. In other words, when measuring vertical acceleration, hold the accelerometer vertically. When measuring forward and backward acceleration, hold it in a forward and backward position.
Step 3. The rubber band is non-linear. This means that it stretches more at high g’s than at low g’s. Therefore readings at 1 g are harder to see because of the limited travel of the indicator. Readings at 3 g’s are much easier to see.
A few words of warning :
The use of the horizontal accelerometer requires some caution for the most accurate readings. Make sure that you are always secured to your accelerometer. There is a very good chance that loose accelerometers will accelerate away from their owners.