
PART 5
Document Formatting Features
Formatting features that can affect an entire document are described in this section.
Page Setup
Setting Margins, Page Orientation, and Page Offset
For any new document, the default page orientation is "Portrait" and the default margin settings are as follows (with no page offset).
Top margin 1" Bottom margin 1" Left margin 1.25" Right margin 1.25"
To change the margins do the following.
- Click File on the Menu Bar (see also Page Setup QuickTip, below).
- Click Page Setup on the drop-down menu to display the Page Setup dialog box.
Page Setup QuickTip: A quick way to get to the Page Setup dialog box (replacing Steps 1 & 2) is to double-click any gray portion of the Ruler Bar.
- If margin settings are not showing, click the Margins tab. (See illustration in Figure 1, below).
- In the "Margins" section make the changes desired (in the text boxes provided). You can type in the value (and tap the TAB key to move to the next text box), or you can click the up or down arrow button next to the text box until you reach the desired value for each setting.
-
When finished, do one of the following:
- If you want the changes to affect the entire document, click the OK button.
-
If you want the changes to take effect from insertion point forward:
- Click the arrow to the right of the "Apply to:" text box to display a drop-down menu.
- Click This Point Forward.
- Click the OK button.
FIGURE 1. Page Setup Dialog Box

In addition, the following settings can be made from the Margins tab of the Page Setup dialog box.
- Make Gutter and Gutter position settings to set a page offset — if you want to bind (or hole-punch) your printed document, for example. If you'll be printing or duplicating your document two-sided, you may also want to set "Mirror margins" in the "Pages" section of the dialog box.
- To make a page orientation selection click the appropriate icon in the "Orientation" section of the dialog box.
- A
drop-down menu in the "Pages" section of the dialog box gives
the following options:
- Normal — The default setting.
- Mirror margins — Changes "Left" and "Right" settings to "Inner" and "Outer" and makes any gutter you've set an inner margin offset. Use this setting if you will be duplicating (or printing) your pages double-sided and then binding (or hole-punching) them. You may want to use this option in conjunction with "Gutter" and "Gutter position".
- 2 pages per sheet — Allows you to create half-page layouts and print two half-pages to one sheet of paper.
- Book fold — Use this setting if you're creating a folded booklet and Word will print the pages in the correct order for foldering and stapling.
Changing the Default Page Setup
There is a Default button in the Page Setup dialog box that can be used to change the standard setup used for each document you create. Make all setting modifications desired, then click the Default button. A dialog box will appear asking you to confirm that you want to change the page setup default. If you click Yes, the page formatting you specified will affect the current document and all new documents you create.
You can include information at the top of each page (a header) and/or at the bottom of each page (a footer). This section provides instructions for creating and modifying headers and footers.
How to Add a Header to a Document
Following are the basic steps for adding a header to a document.
- Click View on the Menu Bar.
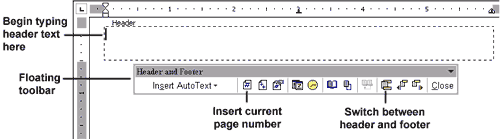
- Click Header and Footer on the drop-down menu to display the Header and Footer floating toolbar (as shown in Figure 2, below).
-
In the space provided (a box with a dashed-line border), type the text
you want to appear at the top of every page.
(Optional) If you want to include a footer as well, you may skip to Step 3 in the next section, "How to Add a Footer to a Document".)
- Click the Close button on the toolbar.
FIGURE 2. "Header
and Footer" Toolbar and Header Typing Space
How to Add a Footer to a Document
Following are the basic steps for adding a footer to a document.
- Click View on the Menu Bar.
- Click Header and Footer on the drop-down menu to display the Header and footer toolbar (as shown in Figure 10, above).
- Click the Switch Between Header and Footer button (refer to Figure 9, above).
- In the space provided (a box with a dashed-line border), type the text you want to appear at the bottom of every page.
- Click the Close button on the toolbar.
Header and Footer Page Numbering Options
Though Word has a separate page numbering feature, page numbers can also be generated automatically using options on the Header and Footer toolbar.
You can include the page number in the header (or footer) by positioning the insertion point where you want the number to appear and clicking the Insert Page Number button (a # sign) on the Header and Footer toolbar (see Figure 9, above).
If you'd like each page to include the notation "Page x of n" (where x is the current page number and n is the number of pages in the document), click Insert Auto Text and choose "Page x of n" from the drop-down menu.
Positioning Headers and Footers
By default, headers and footers will be positioned 1/2 inch from the top (header) or bottom (footer) of the page. If you'd like to specify a different distance for either, modify Page Setup settings as follows:
- Click File on the Menu Bar (see also Page Setup QuickTip, below).
-
Click Page Setup on the drop-down menu to display the Page Setup
dialog box.
Page Setup QuickTip: A quick way to get to the Page Setup dialog box (replacing Steps 1 & 2) is to double-click any gray portion of the Ruler Bar.
- Click the Layout tab. (See illustration in Figure 3, below).
|

- In
the "Headers and footers" section, set the desired "From
edge" distance.
Note that there are also layout options for using different headers and footers on odd- and even-numbered pages and for using a different header and footer on the first page of a document.
- When finished, click the OK button.
Follow the procedure for adding (creating) a header or footer, but instead of typing new text, modify the existing text in the header or footer (see also Header/Footer QuickTip, below).
Header/Footer QuickTip: A quick way to get to existing header or footer text is to double-click the dimmed text in the header or footer area.
Automatic Page Numbering
You can include page numbering as part of a header or footer as described in "Header and Footer Page Numbering Options", above, or you can use the automatic page number feature to add page numbers to a document. Here's how.
- Click Insert on the Menu Bar.
- Click Page Numbers on the drop-down menu list to display the Page Numbers dialog box (as shown in Figure 11, below).
- Default position and alignment selections are already chosen bottom (i.e., within the bottom margin, 1/2" from the bottom edge of the page) and righthand side of the page. You can accept those (see Step 4, below), or you can select the Position (top or bottom of page) and Alignment (left, center, right, inside or outside) for the numbering (i.e., click the arrow to the right of each selection and choose from the drop-down menu that appears).
- When you're satisfied with your selection, click the OK button.
By default, page numbers will be positioned 1/2 inch from the top (header) or bottom (footer) of the page. If you'd like to specify a different distance for either, use the "From edge" Page Setup feature (see "Positioning Headers and Footers", above).
Next: File Management
August 14, 2003
Prepared by Gail Said Johnson, User Support Services
ITR's technology training guides are the property of California State University, Northridge. They are intended for non-profit educational use only. Please do not use this material without citing the source.