PART 3
Text Formatting Features
Word 2000's Formatting Toolbar includes buttons for formatting text (i.e., words) and paragraphs. This section focuses on the text formatting features: bolding, italicizing, and/or underlining a word or section of text and changing font and/or font size.
Bolding, Italicizing or Underlining Text
![]() There
are buttons on the Formatting Toolbar for bolding (a boldface letter B),
italicizing (an italicized letter I), and underlining (an underlined letter
U) text. (See illustration, above left.)
There
are buttons on the Formatting Toolbar for bolding (a boldface letter B),
italicizing (an italicized letter I), and underlining (an underlined letter
U) text. (See illustration, above left.)
How to Bold, Italicize, or Underline Text As You Type
- Click the appropriate button (or buttons) for the effect desired (such as Bold — to make a heading stand out, for example). Notice that the selected feature button (or buttons, if you've clicked more than one) appears depressed when clicked.
- Type your text.
- Click the same button (or buttons) to deselect the feature(s). Notice that the feature button (or buttons) no longer appears depressed when you click on it the second time.
How to Bold, Italicize, or Underline a Single Word
- Click anywhere in the word you want to bold, italicize, or underline (to move the insertion point to that word).
- Click the appropriate button (or buttons) for the effect desired. Only the word where the insertion point is located will be bolded, italicized, or underlined.
How to Bold, Italicize, or Underline Selected Text
- Click and drag the I-beam mouse pointer across the section of text you wish to bold, italicize, or underline.
- Release the mouse button, then click the appropriate button (or buttons) for the effect desired. Only the selected text will be bolded, italicized, or underlined.
- Click anywhere on the editing screen to deselect the highlighted text.
Changing Font Typeface and Size
By default, all text in your document will be displayed and printed using the Times New Roman typeface in 10-point type size.
Using the Font and Font Size Menus on the Formatting Toolbar
![]() You
can use the Font and Font Size menus on the Formatting Toolbar
to make a font typeface and/or size modification (see illustration, left).
You
can use the Font and Font Size menus on the Formatting Toolbar
to make a font typeface and/or size modification (see illustration, left).
When you click the arrow next to either of these toolbar items, a selection menu will drop down. The Font menu will list and display examples of fonts available; the Font Size menu will list a selection of font sizes. You can make changes to a single word, a new paragraph (and subsequent paragraphs), or a section of selected text. Step-by-step instructions for making Font and Font Size changes are provided below. See also "Font Selection Notes" (at the end of this section).
To change the font, follow the steps outlined below.
-
Position the insertion point — or select a section of text — where you
want the font change to occur:
- To change the font for a single word, click somewhere within a word to be changed.
- To change the font for a section of text, select (highlight) the text to be changed. This could be the entire document (see QuickTip, below).
- To change the font for a new paragraph, click at the beginning of a new, blank line (this could be at the beginning of a new document). The new font selection will continue to each new paragraph when you tap the ENTER key. (See "Paragraph Formatting", below, for additional information about paragraph properties.)
- Click the arrow to the right of the Font textbox (see Figure 1, below).
-
Choose (click) a font style from the list. (If necessary, use the scroll
bar to see additional choices before making a choice.)
Selection QuickTip: To select (highlight) an entire document, you can:
- From the File menu, choose (click) Edit then Select All, or
- With the mouse arrow pointer positioned in the margin, triple-click the primary mouse button.
FIGURE 1. Font Menu

To change the font size, follow the steps outlined below.
-
Position the insertion point — or select a section of text — where you
want the font size change to occur:
- To change the font size for a single word, click somewhere within a word to be changed.
- To change the font size for a section of text, select (highlight) the text to be changed. This could be the entire document (see QuickTip, above).
- To change the font size for a new paragraph, click at the beginning of a new, blank line (this could be at the beginning of a new document). The new font selection will continue to each new paragraph when you tap the Enter key. (See "Paragraph Formatting", below, for additional information about paragraph properties.)
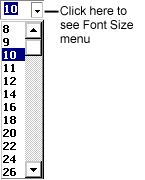
- Click the arrow to the right of the Font Size textbox (see Figure 2, below).
-
Choose (click) a font size from the list. (If necessary, use the scroll
bar to see additional choices before making a choice.) If the size you
want to use isn't there, simply type the desired size in the textbox
above the drop-down menu. You can specify a "whole" point size (such
as 13) or "point-and-a-half" size (such as 12.5).
FIGURE 2. Font Size Menu

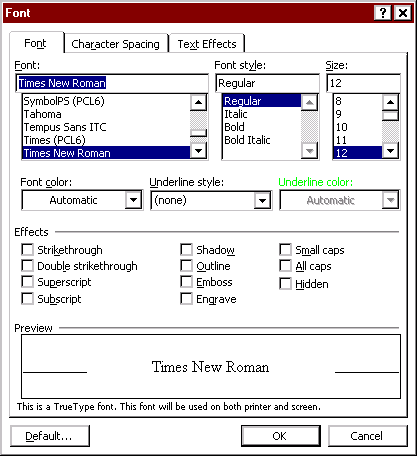
If you choose the Font option from the Format menu, a dialog box will be displayed where, in addition to choosing font and font size, you can select other options for font appearance that are not available from the Formatting Toolbar.
To change font characteristics using the Font dialog box, do the following.
-
Position the insertion point — or select a section of text — where you
want the font change to occur:
- To change the font for a single word, click somewhere within a word to be changed.
- To change the font for a section of text, select (highlight) the text to be changed. This could be the entire document (see QuickTip, above).
- To change the font for a new paragraph, click at the beginning of a new, blank line (this could be at the beginning of a new document). The new font selection will continue to each new paragraph when you tap the ENTER key. (See "Paragraph Formatting", below, for additional information about paragraph properties.)
- Click Format on the Menu Bar.
- Choose (click) Font on the drop-down menu that appears.
- In the Font dialog box (see Figure 3, below), make selections.
- When you've selected the font and font characteristics you want to apply, click the OK button.
FIGURE 3. Font
Dialog Box  |
Font Selection Notes: Some standard text fonts are shown below. Standard font sizes for these fonts are 10-, 11-, or 12-point. The fonts below are displayed in 12-point size.

Following are samples of decorative fonts:

Decorative fonts are normally used for specialized purposes rather than for typing standard text. You will often have to choose a larger font size for a decorative font (such as 18-point, as shown above) to be able to read the text well.
There is a Default button in the Font dialog box that can be used to change the base font used for each document you create. Make all font modifications desired, then click the Default button. A dialog box will appear asking you to confirm that you want to change the font default. If you click Yes, the font settings you specified will take effect for the current document and all new documents you create.
August 14, 2003
Prepared by Gail Said Johnson, User Support Services
ITR's technology training guides are the property of California State University, Northridge. They are intended for non-profit educational use only. Please do not use this material without citing the source.