How to Create Folders and Set Default Locations for Saving Files
These instructions assume you would like to create a folder hierarchy for
organizing your files and set default working folders within programs.
You can approach this task in any number of ways and organize your files
as you see fit. For illlustration here, we'll start by creating a main
folder called MyFiles that will become the default working folder and then
created additional folders within that folder to organize files by topic.
Creating a New Folder
Using the "My Computer" Icon on Your Windows Desktop
If you're going to create your own hierarchy of folders, you'll probably
want to start by creating a main folder on your computer's hard disk (e.g.,
C:). One way to do this is as follows.
-
Double-click the My Computer icon on the Windows NT desktop.
-
Double-click the (C:) icon in the "My Computer" window.
-
Click File on the Menu Bar and select New, then Folder.
-
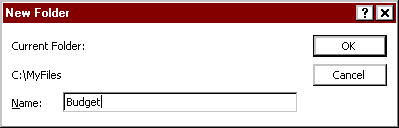
A new folder will appear in the C: window with the folder name (New Folder)
highlighted. Type MyFiles (or Jane's Files or some other name).
| QuickTip: Any time text is highlighted, you can simply start
typing to replace the highlighted text. |
-
Double-click the MyFiles folder icon to open that folder.
-
Click File on the Menu Bar and select New, then Folder.
-
A new folder will appear in the C: window with the folder name (New Folder)
highlighted. Type a new name (e.g., a name that conveys what will be stored
in the folder such as Budget or Curriculum).
When finished, you can exit all open folders by holding down the SHIFT
button and clicking the close button (X)
in the active folder window.
Setting a Default Working
Folder
To set MyFiles as the default working folder in Word, Excel, or PowerPoint,
follow the applicable instructions below.
In Word 2000 (or 97):
-
Click Tools on the Menu Bar and select Options.
-
Click the File Locations tab in the Options dialog box.
-
Click Documents in the File Types list.
-
Click the Modify button.
-
Locate and select the MyFiles folder:
-
In the Modify Location dialog box, click the arrow next to the "Look in:"
selection box.
-
Click (C:) on the drop-down list.
-
In the file and folder listing section of the dialog box, click the MyFiles
folder.
-
Click the OK button in first the "Modify Location" dialog box then
the "Options" dialog box.
In Excel 2000 (or 97):
-
Click Tools on the Menu Bar and select Options.
-
Click the General tab in the Options dialog box.
-
In the "Default file location:" text box, type C:\MyFiles
-
When finished, click the OK button.
In PowerPoint 2000 (or 97):
-
Click Tools on the Menu Bar and select Options.
-
Click the Advanced tab in the Options dialog box.
-
In the "Default file location:" text box, type C:\MyFiles
-
When finished, click the OK button.
Using Help to Find Instructions
A good way to find out how to do anything in an application software program
is to make use of the Help feature. In any Office program, for example,
you can use use the Office Assistant feature. Click the appropriate icon
on the standard toolbar or choose Microsoft [Word, Excel
] Help
from the Help menu.
Figure 1 (below) shows the results of a Word 2000 search for information
about "default file location". In this example, you would next click the
item that says "Set the default working folder that appears in the Open
and Save As dialog boxes" in order to find out how to change the default.
FIGURE 1. Office Assistant
"dialog" for locating information on setting a default working
folder.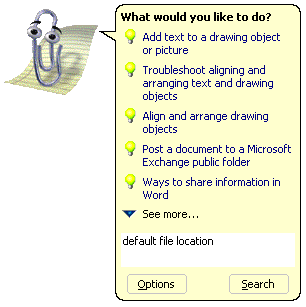 |
| |
|