
Windows 2000
Introduction to Windows 2000 File Management
Organizing Your Files in Folders
Windows 2000 provides a ready-made folder on the desktop called My Documents, which points to the default location where files are stored (e.g., C:\Documents and Settings\username\My Documents). You can use this default location as a starting point for creating a hierarchy of folders or you can create your own main folder and set "My Documents" to point to that location. Whether you use the Windows 2000 default location or specify your own, "My Documents" is the place where files are saved. Once the default has been established, you can also create additional folders within any program you use.
Creating a Hierarchy of Folders Within the Windows 2000 Default "My Documents" Folder
To create a subfolder of the My Documents folder, do the following.
- Double-click the My Documents icon on the Windows 2000 desktop.
- Click File on the Menu Bar and select New, then Folder.
- A new
folder will appear in the My Documents window with the folder name (New
Folder) highlighted. Type the name you want to give the folder.
QuickTip: Any time text is highlighted, you can simply start typing to replace the highlighted text.
- Repeat steps 2 and 3 for each additional folder you'd like to create.
- To create a folder within a folder, double-click the folder within which you want to create a subfolder (to open that folder) before repeating steps 2 and 3.
- When finished click the Close [X] button in the upper right corner of the window.
How to Establish Your Own Default Location
Rather than "bury" your files in the location specified by the Windows 2000 operating system, you might want to create your own top-level folder and point to that location as the "My Documents" default. The instructions below assume you'd like to create a top-level folder called MyFiles on the C: drive.
Creating the Top-Level Folder:
- Double-click the My Computer icon on the Windows NT desktop.
- Double-click the (C:) icon in the "My Computer" window.
- Click File on the Menu Bar and select New, then Folder.
- A new folder will appear in the C: window with the folder name (New Folder) highlighted. Type MyFiles.
- When finished, click the Close [X] button in the active folder window.
Changing the Default "My Documents" Location:
Make sure you've created the top-level folder as described above and then do the following.
- Right-click the My Documents icon and choose Properties from the pop-up menu.
- In the "Target:" text box, replace the current entry with C:\MyFiles (or use the Find Target button to locate and select the folder).
- Click the OK button to finish.
Once you've established the MyFiles folder as the "My Documents" target location you can add folders within that folder by following the instructions given in the "Creating a Hierarchy of Folders Within the Windows 2000 Default 'My Documents' Folder" section above. Alternatively, you can add folders from within any program you use, as described below.
How to Create a New Folder from Within a Program
You can also create folders with the default "My Documents" folder from the "Save As" dialog box in any program.- Click File on the Menu Bar and select Save As.
- If necessary, navigate to the folder within which you want to create a sub-folder (i.e., change the "Save in:" location).
- Click the Create New Folder icon at the top of the "Save As" dialog box.
- In the "New Folder" dialog box that appears, type the desired folder "Name:" in the text box provided.
- When finished, click the OK button.
- Finally, if you're saving a document, make sure you enter a "File name:" in the appropriate text box in the and then click the Save button. If you aren't saving a file, click the Cancel button.
Finding Files
If you can't remember where you saved a file, you can usually search for the file within the program you're using. In Office 97/2000/2002 programs (Word, Excel, etc.) you can use the "Office Assistant" (e.g., Microsoft Word Help) to find instructions. In other programs, you may have to use a different Help feature to locate instructions for finding a file.
You can also use the Windows search feature to locate a file.
- Click the Start button on the Taskbar and choose Search to display the Search/Search Results window (see Figure 1, below)
- Choose For Files or Folders from the cascading menu.
- To locate files in the My Documents folder and its subfolders, use the drop down menu to change the "Look in:" selection in the Search panel to My Documents.
- Make additional
selections in the Search panel at the left side of the window to help
isolate the file you're looking for. For example, to search for a Word
document that has a filename containing the word budget, do the following:
- Type budget in the "Search for files or folders named:" text box.
- Check (click) the box next to Type (under Search Options) to display a dropdown menu selector.
- Choose Microsoft Word Document from the (very long) menu.
- When ready to start the search, click the Search Now button.
The files found will be listed in the Search Results area of the window. Make a note of the location of the file when you find it. Then, if you want to open the file immediately you can double-click the filename. Note that the "Search Results" window will remain on the desktop until you close it (i.e., opening the file you were looking for doesn't close the dialog box).
FIGURE 1. Search/Search
Results Window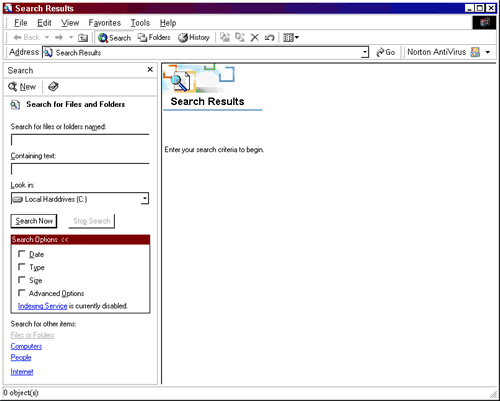 |
How to Copy, Move and Rename Files and Folders
You can copy, move, or rename files and folders from any window or dialog box that contains folder and/or file icons (or lists folders and/or files) to any other window or dialog box that contains folder and/or file icons (or lists folders and/or files). This can be a Microsoft Explorer window or a Word "Open" dialog box, for example.
- In the Microsoft Office program where the file to be moved or copied is located, click the Open button on the Standard Toolbar.
- Locate and click the name of the file (or folder) you want to move or copy.
- Right-click the mouse (i.e., click the secondary button on your mouse).
- One the shortcut, pop-up menu that appears, select Cut (to move the file) or Copy (to copy the file).
- Locate and choose the folder where you want to move or copy the file.
- Move the mouse pointer to the file/folder area of the dialog box and right-click (i.e., click the secondary button on the mouse).
- On the shortcut, pop-up menu that appears, select Paste to place the file in the selected folder.
- To get out of the "Open" dialog box (without opening a file), click the Cancel button.
-
To copy a
file to a floppy disk, follow Steps 1-3 (above), then click Send to
on the pop-up menu and select 3-1/2" floppy (A:) from the cascading
menu that appears.
- In the Microsoft Office program where the file you want to rename is located, click the Open button on the Standard Toolbar.
- Locate and click the name of the file (or folder) you want to rename.
- Right-click the mouse (i.e., click the secondary button on your mouse).
- One the shortcut, pop-up menu that appears, select Rename.
- Type a new file name (replacing the highlighted, boxed file name).
- To get out of the "Open" dialog box (without opening a file), click the Cancel button.
How to Rename a File
Microsoft Office Example:
Please note that the right-click cut/copy-and-paste procedure is the
same no matter what file/folder window you're in.
August 28, 2003
Page maintained by User Support Services
ITR's technology training guides are the property of California State University, Northridge. They are intended for non-profit educational use only. Please do not use this material without citing the source.