Web Publishing at CSUN
Web Publishing to a Group Web Folder with Netscape 4
- How to Find Out the Path to Your Home Directory
- Designating a Default Publishing Location
- How to Transfer (Upload) Your Web Page Files
- Your Web Page Location (or URL — Uniform Resource Locator)
- Questions?
How to Find Out the Path to Your Home Directory
You will need this information in order to configure Netscape Composer for publishing.
- At the command prompt in your personal campus account, type the following commands (replacing webfolder with the name of the group's webfolder):
cd
~webfolder/public_html
pwd
Note: If your access is to a subfolder of public_html (rather than the main folder), include the subfolder name:
cd ~webfolder/public_html/subfolder
- Write down the information that is printed on the screen. It will look like this:
home/usersx/webfolders/foldername/public_html
where:
- usersx is the disk drive where your files are stored (users1, users2, etc.)
- foldername is the name of your web folder (e.g., abcdefg)
Note: If your access is to a subfolder of public_html (rather than the main folder), the subfolder name will also be included.
- Log out and disconnect.
Designating a Default Publishing Location
If you set a default publishing location in Composer, you won't have to type the FTP location every time you publish (i.e., transfer) a Web page document.
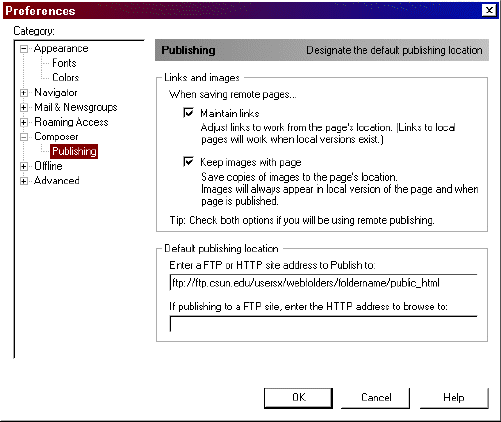
To set the default, choose (click):
Edit | Preferences | Composer | Publishing
Then, in the "Default publishing location" section of the Preferences dialog box, enter the FTP site address as follows:
ftp://ftp.csun.edu/home/usersx/webfolders/foldername/public_html
replacing the "/home/usersx/webfolders/foldername/public_html" portion of the address with the path information for your account.
Note: If your access is to a subfolder of public_html (rather than the main folder), the FTP site address will include the subfolder name:
ftp://ftp.csun.edu/home/usersx/webfolders/foldername/public_html/subfolder
Figure 1 (below) shows the Composer Publishing Preferences dialog box with a sample FTP site address entered.
FIGURE 1. Composer
Publishing Preferences Dialog Box |
|
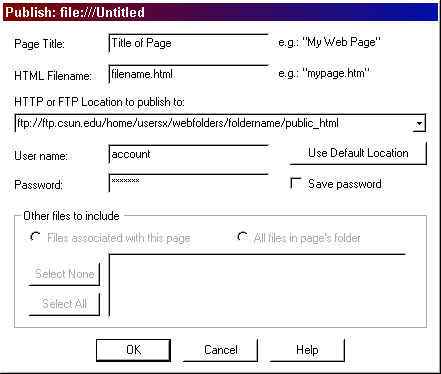
FIGURE 2. Publish Dialog
Box |
|
Your Web Page Location (or URL — Uniform Resource Locator)After you've finished the publishing procedure, you'll probably want to look at your Web site — and tell others where to find it. If your main Web page file is called index.html your Web page address is: http://www.csun.edu/~webfolder where webfolder is the group's web folder. Make sure to include the tilde (~) character.The Web page address for any page other than index.html is of the format: http://www.csun.edu/~webfolder/filename where webfolder is the group's web folder and filename is the name of the Web page file (homepage.html, for example). Again, make sure to include the tilde (~) character. Custom Web AddressesIf a custom web address (URL) has been assigned for your department, organization, or other campus group, replace the "~webfolder" portion of the URL with the assigned alias. If an alias exists for the group and the main web page file is called index.html, the web page address is: http://www.csun.edu/GroupAlias where GroupAlias is a unique name assigned to your group.The web page address for any page other than index.html is of the format: http://www.csun.edu/GroupAlias/filename where filename is the name of your web page file (homepage.html, for example). To request a custom web address, contact the University Help Desk at campus extension 1400. A Note About Multiple URLs: If more than one alias has been assigned for your group, any one of those may be used. Example: Academic departments might have four custom addresses as exemplified by those for the Department of Communication Studies shown below. All four URLs are correct and all go to the same site.
Questions?If have questions about these procedures, please contact the University Help Desk at (818) 677-1400 or via email to helpdesk@csun.edu.
|
August 14, 2003
Prepared by Gail Said Johnson, User Support Services
ITR's technology training guides are the property of California State University, Northridge. They are intended for non-profit educational use only. Please do not use this material without citing the source.