
Using Webmail Direct
Webmail Direct is the campus's web-based electronic mail system. It can be used by any CSUN faculty, staff or student possessing a valid campus account and password from virtually any workstation with an Internet connection and a web browser such as Internet Explorer or Netscape Navigator.
Note to Mac users: There is a limitation in the Mac version of Netscape 4.7 that may cause garbage characters to be inserted into the body text of messages sent using Webmail. You may want to use Internet Explorer instead — or upgrade to Netscape 7.
- The Basics
- Setting Preferences to Customize Webmail Direct
- Using Folders to Organize Messages
- Setting Options
- Using the Address Book
- How to Learn More
The Basics
Logging In
To use Webmail Direct to access your CSUN email, go to the following web location:
Enter login information as follows:
|
User:
|
Account/loginID you use for accessing email (e.g., xyz12345) |
|
Password:
|
The password for that account |
You may also make one of the following view choices:
- Use saved view. This is the default selection. If you make no other selection, pages will be to be displayed in the view you previously selected. If you've never made a selection, the default is the Frames view.
- Change to Frames view. Make this selection to view pages in Frames mode (see Figure 1, below).
- Change to No-Frames view. Make this selection to view pages in No-Frames mode (see Figure 2, below). This view meets Section 508 accessibility requirements.
Then click the Login button to display your email Inbox (see Figures 1 and 2, below).
FIGURE
1. Webmail Direct Window: Frames View
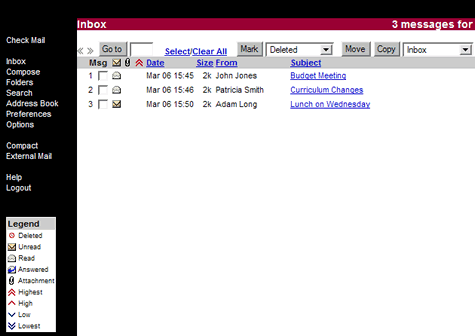
In Frames view, the primary frame contains message options (at the top) and a list of your incoming email messages. The left frame contains a links menu from which you can access various email features.
FIGURE
2. Webmail Direct Window: No Frames View

In No Frames view, the links menu is displayed across the top of the screen with message options and message listing below.
Reading Messages
To read a message click the link in the Subject column of the message list. To get back to the Inbox, you can click the Inbox link at the top of the message frame or choose (click) Inbox from the menu list.
By default, a maximum of twenty messages are listed. Additional messages (if any) can be seen by clicking the forward arrows [»] at the top of the frame. Return to previous pages by clicking the back arrows [«]. You can change the number of messages listed by setting preferences.
Sending Messages
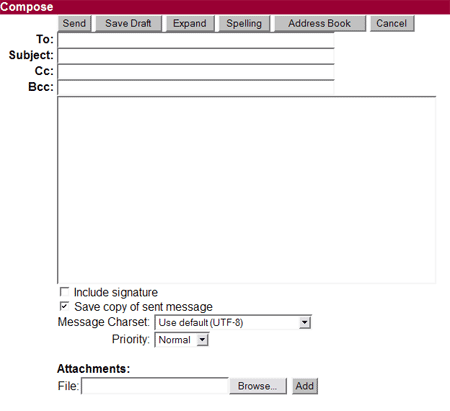
To send a message, choose Compose from the links menu, enter information in the text boxes provided on the message composition (Compose) page (see Figure 3, below), and click the Send button.
FIGURE 3. Message
Composition (Compose) page
Notes:
- You can enter one or more email addresses in the "To:" text box. Separate multiple email addresses by typing a comma between each address.
- Use Cc: to send a courtesy copy to someone who should see the message, but who need not respond.
- Use Bcc: to send a blind courtesy copy. Addresses included in this field will not appear on received messages.
- By default, a copy of each message you send is saved in a folder called Sent. If you don't want to save copies you can uncheck the "Save copy of sent message" option on the Compose page.
To send an attachment along with the message (such as a Word or Excel file), do the following:
- Click the Browse button in the "Attachments" section of the Compose page (see Figure 2, above).
- Locate and select (double-click) the file you want to attach. The full path to the file will be entered into the File: text box.
- Click the Add button to attach the file to the outgoing email message.
- Repeat the process to include additional files.
Deleting Messages
To delete a message, do the following:
- Click the small box next to the message listing (see Figure 1, above).
- In the message options at the top of the window, make sure Deleted is displayed in the text box next to the Mark button (select "Deleted" from the drop-down menu if necessary), and then click the Mark button — or select (click) multiple messages before marking them for deletion. To delete messages that are marked for deletion (and remove them from the message list), click Compact on the links menu.
You can change the way deleted messages are handled by setting preferences for the Trash Folder.
Logging Out
When you want to end an email session, click Logout on the links menu.
Setting Preferences to Customize Webmail Direct
You can personalize Webmail Direct by choosing Preferences from the links menu and then customizing the following settings. When finished, click the OK button at the bottom of the Preferences window.
Note: It is recommended you set Full Name, E-mail Address, and Signature so those who receive your messages will know who sent them.
| Full Name: | Enter your name as you would like it to appear in the "From:" field for outgoing messages. |
| E-mail Address: | Enter your CSUN email address as you would like it to appear in the "From:" field for outgoing messages. You can use your email alias (e.g., jack.b.nimble@csun.edu) or your login ID (e.g., xyz12345@csun.edu). |
| Reply-To: | If you would like replies to go to a different email address, enter that here. |
| Message Count: | If you'd prefer to see more (or fewer) messages than 20 at a time, enter the desired number here. For example, if you have a slow off-campus Internet connection, you may want to lower the number to, say, 10 to decrease system load. For on-campus connections, you may want to increase the count to a higher number, such as 50. |
| Compose Width: | This setting specifies the maximum length of each line in an outgoing email message. The default is 62 characters. |
| Compose Height: | This setting specifies the number of lines displayed when composing a message — NOT the number of lines in the complete message. |
| Sent Folder: | By default, all messages you send are saved to a folder called Sent. You can choose not to save sent messages by clicking the "No" radio button. |
| Draft Folder: | By default, any composed message you save as a draft is saved to a folder called Draft. |
| Trash Folder | The default trash folder is called Trash; however, by default, deleted messages are not sent to the trash folder (see Deleting Messages, above). You can delete messages and move them directly to the Trash folder by selecting (clicking) the Yes radio button. Once this preference is set, a Delete button is added to message options at the top of the Inbox and the Compact menu item is replaced by Trash. |
| Reply: | This setting specifies whether or not to include the original message with the reply and, if included, whether "inline" (as part of the reply) or as an attachment. |
| Signature: |
This is the space where you can enter information that will appear at the bottom of each message you send. The "signature" will not appear on the message composition page, but it will appear in the message the addressee(s) receive. A sample four-line signature is shown below: -- Jack B. Nimble - jack.b.nimble@csun.edu Department of Astrophysics California State University, Northridge |
| Mode: | This preference sets the way the email window is displayed. By default, you see the information in frames (as described in "Getting Started"). |
Using Folders to Organize Messages
Webmail Direct provides four folders where mail is stored. The Inbox folder contains your incoming mail. The Sent folder contains your outgoing mail messages. There are also Draft and Trash folders. You might want to create additional folders so as to further organize your mail — by topic or sender, for example.
Adding and Using Folders
To add a folder, first choose (click) Folders on the menu list to display the Folders page. In the text box to the right of the Add Folder button, enter a name for the folder you want to create and then click the Add Folder button. In Figure 4(below), a new folder called "Budget" will be added/created. The new folder will appear on the list of folders — in alphabetical order below the four program-provided folders.
FIGURE 4. Add Folder
Button and Text Box
![]()
To look at messages in a standard folder or one you've created yourself, choose (click) Folders from the links menu. A list of links to existing folders will appear. Simply click the desired folder to display its contents.
To move a message from one folder to another, do the following:
- Click the check box next to the message(s) you want to move.
- Use the drop-down menu next to the Move and Copy buttons to select the desired folder (as shown in Figure 5, below).
- Click
the Move button. (Clicking the Copy button will place
a copy of the message in the selected folder while retaining a copy
in the current folder.)
FIGURE 5. Move/Copy Buttons and Text Box

Deleting a Folder
To delete a folder, do the following:
- Choose Folders from the links menu.
- Click the check box next to the folder(s) you want delete.
- Click the Delete button at the top of the window.
- You'll be asked to confirm that you want to delete the folder(s) — and all contents. Click the Delete button to do so. Click Cancel if you change your mind about deleting the folder.
Setting Options
Webmail Direct Options provide the ability to
- set an automatic reply to be sent when you're not reading email (when you're on vacation, for example),
- forward incoming email to a different address, and
- filter
messages that meet defined criteria to specified folders.
Note: You can also use the campus account utility to set an automatic email reply or message forwarding. Instructions for using the account utility are available at http://www.csun.edu/itr/guides/autoreply.html
Setting an Automatic Reply
To set an automatic email reply (to be send while you're on vacation, for example), do the following:
- Choose Options from the links menu.
- On the "Options: Automatic Reply" page, enter a "Subject:" and "Message:" in the text boxes provided.
- Click the Start button to activate the automatic reply.
If you would like your mail to be forwarded to another address while you're away, follow the instructions for Forwarding Email.
To stop the automatic reply, choose Options and then, on the "Options: Automatic Reply" page, click the Stop button.
Forwarding Email
To forward your incoming mail to a different address, do the following:
- Choose Options from the links menu.
- On the "Options: Automatic Reply" page click the Forwarding link.
- In the "Forward to:" text box on the "Options: Forwarding" page enter the address to which you want your mail forwarded.
- Click
the Start button to activate forwarding.
Note: There is a check box for retaining copies of forwarded email, but the feature does not work properly. If you set forwarding only (with no automatic email reply), a copy of each message is retained whether or not this box is checked. If you also set an automatic email reply and this box is left unchecked, copies of messages will not be retained.
To stop forwarding your mail, choose Options and Forwarding (as described above) and then, on the "Options: Forwarding" page, click the Stop button.
Filtering Messages
You can have incoming messages automatically stored in particular folders by creating a message mail filter. A filter is a "rule" for routing a message.
For example, to store all messages from a mailing list ("listserv") called "mathwhiz" that you've subscribed to, begin by creating a new folder. Pick an appropriate name, such as "Math Whiz".
Next, choose Options from the links menu. Then, on the "Options: Automatic Reply" page click the Message Filters link.
On the "Options: Message Filters" page, specify filter conditions and filter actions in the boxes provided. When finished, click the OK button.
Example:
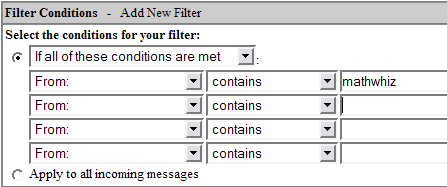
To filter all messages from the mailing list "mathwhiz" to a folder called "Math Whiz", you could do the following:
- In the
Filter Conditions section of the Message Filters page, specify "If
all of these contitions are met: From: contains mathwhiz" (as shown
in Figure 6, below).
FIGURE 6. Sample Filter Conditions
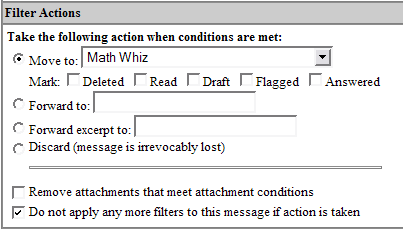
- In the
Filter Actions section, specify, "Move to: [the folder called]
Math Whiz" (as shown in Figure 7, below).
FIGURE 7. Sample Filter Actions
Many other filtering options are available. To check out the possibilities, explore the drop-down menus on the Message Filters page or view Help topics (see How to Learn More, below).
You can also use the filtering capability to delete unwanted mail from identifiable sources or to isolate potential junk mail in its own folder. See "Using Webmail Direct to Filter/Delete Unwanted Messages" for additional information about setting your own filters.
To edit a filter, go to the Message Filters page (Options | Message Filters). From the Edit column of list of message filters you've defined, select the pencil icon next to the filter you want to modify. Make the desired changes to filter conditions (Editing Filter) and filter actions and then click the OK button.
To delete a filter go to the Message Filters page (Options | Message Filters). In the Delete column of list of message filters you've defined, click the X-mark next to the filter you want to delete.
Helpful Hint for Faculty and Staff: If you also use IMAP to access your mail on an email client such as Netscape Mail or Microsoft Outlook, you can use Webmail Direct's filtering capability to move incoming mail to folders, thus eliminating the need to define IMAP filters in the email client on every computer you use. To move mail to local folders, you'll still have to define filters on the client.
Using the Address Book
Webmail Direct's Address Book feature allows you to maintain a personal list of email addresses — for both individuals and groups.
Adding Individual Addresses
To enter contact information for an individual, do the following:
- Open your address book to the Contacts page by clicking the Address Book option on the main links menu or at the top of the Compose page.
- Click the Add Contact button to display the "Add/Edit Contact" page.
- Enter
contact information:
- In the email section of the page (see Figure 8, below), enter contact information — nickname, first and last names, display name, and email address.
FIGURE 8. Top Portion of the Add/Edit Contact page

- To file the entry in a particular category (e.g., Commerical, Personal or Professional), make the desired selection from the drop-down menu.
Note: You can edit the list of categories using the Edit Categories link at the top of the page.
- Other personal and professional information about the individual can be entered in other sections of the "Add/Edit Contact" page.
- When finished
click the Done button.
Note to Windows XP Users: You may be asked if you want to remember the values you filled in. This is not a Webmail Direct dialog box, but rather a browser dialog box. If you choose "Never for this site" you won't see the message again. Your answer has no effect on your address book.
QuickTip: You can easily add the sender's address from an incoming email message by clicking the Add to Address Book link (located next to the "From:" field in the message window). The "Add/Edit Contact" page will be displayed with information from the "From:" field entered in appropriate text boxes. This information can be edited as desired (and more information added) before you save the entry by clicking the Done button.
Creating Group Lists
You can create mailing lists consisting of multiple addresses from your Contacts list.
- Open your address book to the Contacts page by clicking the Address Book option on the main links menu or at the top of the Compose page.
- Click the Groups link at the top of the Contacts page.
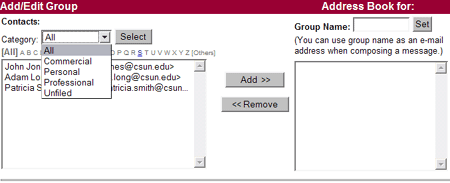
- Click
the Add Group button to display the "Add/Edit Group"
page (as shown in Figure 9, below).
FIGURE 9. Add/Edit Group page
- Make desired selections:
- Enter a "Group Name:" in the box provided and then click the Set button.
- Select a "Category:" from the dropdown menu (if desired) and then click the Select button.
- In the Contacts list highlight the names desired and click the Add button to add them to the Group.
- When finished
click the Done button.
Note to Windows XP Users: You may be asked if you want to remember the values you filled in. This is not a Webmail Direct dialog box, but rather a browser dialog box. If you choose "Never for this site" you won't see the message again. Your answer has no effect on your address book.
Sending Mail to Contacts/Groups in Your Address Book
To send a message to an individual or group, you can simply enter the nickname for the address book entry in the "To:" field of the Compose page.
Finding University Addresses Using the Find People Feature
You can locate the email addresses of CSUN faculty, staff, and students using the Find People feature.
- Open your address book by clicking the Address Book option on the main links menu or at the top of the Compose page.
- Click the Find People button.
- From the "Find in" drop-down menu select University Directory (as shown in Figure 10, below).
- Click the Select button.
- Enter a name or email address in the appropriate text box.
- Click
the Find Now button.
FIGURE 10. Find People Page

To send a message to the person you've found, just click the address in the E-mail Address column of the results listing.
How to Learn More
For more about these and other features use Webmail Direct Help. Select Help from the links menu. The following categories of assistance are accessible from buttons at the top of the page. For each, a topics list will appear in a frame on the lefthand side of the screen. When you make a choice from the list, the topic information will be displayed in the main frame on the righthand side of the screen.
| Webmail: | Provides information on sending and receiving email, creating subfolders to your Inbox so you can organize your email, searching for messages, accessing mail from other POP clients, and setting a display that is best for you. |
| Address Book: | Provides information on creating, maintaining, and using a customized database of contact information. |
| Options: |
Provides information on message filtering, forwarding, and automatic reply. |
| Index: | Brings up an index of all the help topics available for your user login privileges. |
April 16, 2004
Prepared by Gail Said Johnson, User Support Services
ITR's technology training guides are the property of California State University, Northridge. They are intended for non-profit educational use only. Please do not use this material without citing the source.