
Mailing Lists
Faculty
& Staff Only:
Creating
& Managing Majordomo Mailing Lists
This document is intended for faculty/staff list administrators only. For general information about Majordomo and how to access it as a user, see the publication Using the Majordomo Mailing List Server.
- Introduction
- Getting Started
- Creating a Majordomo Mailing List
- Editing an Existing Distribution List
- Approving Mail on Moderated Lists
- Creating an "Info" File
Introduction
Majordomo is a Unix-based mailing list program, similar to a "Listserv." This document was written for list administrators people who wish to create and possibly control mailing lists. The program was originally written as an email text-based Unix application. However a user-friendly graphical World Wide Web interface was created to help make list administration easier.
There are three kinds of lists that are supported:
- CSUN class lists (for students in a particular class, or for several sections of the same course). These list names end with "-C", as in "ENGL150-C".
- Departmental lists (for CSUN departments). These list names end with "-L", as in "FACSEN-L".
- Student groups organizations (requires a faculty sponsor). These list names end with "-G", as in "BUSMAJRS-G".
Names are not case-sensitive, so "facsen-l" and "FACSEN-L" are interchangeable but be careful not to confuse the letter "l" (el) with the number "1" (one)!
Getting Started
Faculty and staff can create and administer Majordomo mailing lists by logging in to the following website:
When prompted for User Name and Password enter your personal campus account and password.
Creating a Majordomo Mailing List
On the Majordomo web page, click Make a new distribution list to display the "Create Email Distribution List" screen (as shown in Figure 1, below). You'll enter the list name and password on this screen and select from various list options. In addition, you can enter an initial subscriber list. When finished click the Create button at the very bottom of the page to complete the process. The list will be ready to use by the next morning.
The various list options are described below.
Options Note: Choose your options carefully as you will not be able to modify your selections once you have completed the list creation process.
FIGURE 1. New List Options
Screen
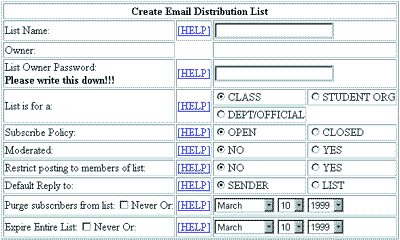
List Name: Enter a name for your list containing a maximum of nine characters and NO special characters (such as punctuation marks, $, %, or &).
List Owner Password: Enter a password for the list you are creating. Please note that the password is case sensitive (e.g., abc123 and ABC123 are different passwords).
List is for a: Choose (click) the appropriate category. The appropriate list suffix will automatically be appended to the list name as described in the table below.
| List Category | List Suffix | Sample List Name |
|---|---|---|
| Class | -C | phys123-c |
| Student Org | -G | astronomyclub-g |
| Dept/Official | -L | astrophysics-l |
Subscribe Policy: Choosing Open will allow anyone to subscribe to the list (without your approval). With a Closed list you (the administrator) must approve each subscription request.
Moderated: If you want to approve all mail before it is sent to the distribution list, choose Yes. Instructions for approving messages for sending to moderated lists is provided in the section entitled "Approving Mail on Moderated Lists" (below).
Restrict posting to members of list: If you choose Yes, only list subscribers will be able to send mail sent to the list.
Default Reply to: It is normally preferable to keep the default setting of Sender (so that only the individual who sent the message receives the reply). Choosing List will cause all replies to go to every person on the mailing list. Note that if the list is moderated, you will have to approve and forward every reply.
Purge subscribers from list: You may preset a date on which the subscribers' names will be removed. This is a good idea for class accounts, where you want to continue the list itself but change the subscribers to the list. For campus department or committee lists, for example, you will probably want to set the expiration date as Never.
Expire Entire List: You may set a date for expiration of a list. This is recommended for any temporary lists, or classes that will not be offered again soon. For campus department or committee lists, for example, you will probably want to set the expiration date as Never.
Initial Subscriber List: After filling in the list information and making option choices you may optionally enter the initial subscriber list in the space allotted for this purpose at the bottom of the screen. Names for CSUN subscribers are of the form:
emailID@csun.edu
where "emailID" can include either the user's email alias (as in jack.b.nimble@csun.edu) or campus account (as in xyz12345@csun.edu). If subscribers are from other institutions then their complete Internet email addresses should be entered.
Editing an Existing Distribution List
You can edit a previously created list to add or delete names, or change the address for someone on the list. Just click Editing an existing distribution list on the Majordomo Web page. Supply the list name and list password in the appropriate dialog boxes and click Edit. When the list appears, make your changes, and click Update when you're finished.
You cannot change the list name, password, or chosen options for a mailing list. Should you want to change a list from unmoderated to moderated, for example, you'll have to delete the list and recreate it with the appropriate option(s) selected.
Helpful Hint: If it becomes necessary to "modify" the options for a list, you might do the following:
- Copy and paste the subscriber list to a Word document (for example).
- Delete the Majordomo list.
- Create a new list.
- Copy and paste the subscriber list (from Word) to the "Initial Subscriber List" area of the "Create Email Distribution List" screen.
Approving Mail on Moderated Lists
Whenever someone sends a message to a moderated list, the message will go the the list moderator. Example 1 (below) shows such a message. Note the "BOUNCE" subject line and extensive header information that precedes the body of the message itself.
EXAMPLE 1. Message Received for Approval
Subject:
BOUNCE mylist-l@email.csun.edu: Approval required:
Date: Wed, 20 Feb 2002 14:00:32 -0800 (PST)
From: owner-mylist-l@csun.edu
To: mylist-l-approval@csun.edu
From xyz12345@email.csun.edu Wed Feb 20 14:00:28 2002
     Received: from csun.edu (s166n119.csun.edu
          [130.166.166.119])
          by krusty.csun.edu (8.11.6/8.11.6)
          with ESMTP id g1KM0SV21638830
          for <mylist-l@csun.edu>;          Wed, 20 Feb 2002
          14:00:28 -0800 (PST)
Message-ID: <3C741D3D.F5F4A09D@csun.edu>
Date: Wed, 20 Feb 2002 14:03:41 -0800
From: John Jones <john.jones@csun.edu>
X-Mailer: Mozilla 4.78 [en] (Windows NT 5.0; U)
X-Accept-Language: en
MIME-Version: 1.0
To: mylist-l@csun.edu
Subject: Meeting Announcement
Content-Type: text/plain; charset=us-ascii
Content-Transfer-Encoding: 7bit
The next meeting of this committee will be held ...
The agenda is as follows ... etc.
To approve and forward the message to the mailing list, do the following:
- Make sure your email formatting preference is set to send messages as plain text (not HTML).
- Highlight the message to be forwarded and select the Forward feature of your email software.
- Replace the "BOUNCE" subject line with the sender's subject (located in the header information displayed in the message area of the email window; in the example shown above, the subject is "Meeting Announcement").
- Delete the header information displayed in the message portion of the email window EXCEPT the second "From" line. (In the message displayed in Example 1, above, this line reads "From: John Jones <john.jones@csun.edu>.) If you don't leave this information in the body of the message, the recipients won't know who the message is from. When you forward the message to the list, it is your name and email address that will be displayed in the "From:" portion of the message header.
- On the very first line of the message area type:
- Include one blank line between the Approved line and the message text.
- Send the message.
Approved: password
where "password" is the list owner password you entered when creating the list. Those receiving the message will see only the message WITHOUT the approval line.
EXAMPLE 2. Approved Message
Approved: abc123
From: John Jones <john.jones@csun.edu>
The next meeting of this committee will be held ...
The agenda is asfollows ... etc.
If
you, the list administrator/moderator, want to send a message to the list,
you can simply enter the "Approved" line (as described Step 5 above) at
the beginning of your message and then send as usual.
Creating an "Info" File
You can create an information file (called an "info" file) that contains general information about your mailing list. This information is returned to subscribers if they send a message to majordomo@csun.eduwith the keyword "info" followed by the name of the list as in:
INFO MATH150-C
Setting up such an information file is optional, but recommended mainly for open lists of an enduring nature. To create the info file send a message to majordomo@csun.edu with the first line reading:
NEWINFO listname password
replacing "listname" with the name of your list and "password" with the password you gave the list. Follow this (beginning on the next line) with the text that you would like to have displayed in response to requests for information.
Note: "NEWINFO" can be used to replace an existing information file as well as for creating a new one.
Create/Manage
a Majordomo List Now
May 6, 2002
Page maintained by User Support Services
ITR's technology training guides are the property of California State University, Northridge. They are intended for non-profit educational use only. Please do not use this material without citing the source.