Add a Background Color or Texture/Image to a Web Page
| Note: The screen images included in this document are taken
from the Windows version of Netscape Composer. Macintosh screens may differ
slightly. |
Use Composer's Page (Colors and) Properties feature to add a
background color or texture/image to your Web page.
Specifying
a Background Color
To specify a background color for your page, you can do the
following.
-
From the Format menu choose (i.e., click) Page
Colors and Properties (Windows) or Page Properties (Macintosh).
-
In the "Page Properties" dialog box click the Colors and
Background tab.
-
In the "Page Colors" area of the dialog box, click Use
Custom Colors and then make your selection(s) (see Figure 1, below).
The preview area in the dialog box shows how your selection(s) will look
on your Web page.
-
You can choose a predefined color scheme from the Color
Schemes menu. This changes the color of the background and also all
text Normal Text, Link Text, Active Link Text, Followed Link Text.
-
You can also select a background color separately. Click
the Background button and make your color choice from the dialog
box that appears. On a Windows computer this will be a grid (click the
Other
button to see more choices). On a Macintosh, first (at the lefthand side
of the dialog box) choose one of the color selection methods available,
then make your color selection.
-
Note that you may also need to change text color selections
to complement the background color chosen.
-
If you would like to use the same color scheme for all your
Web pages, click to place an X
in the box next to "Save these settings for new pages".
-
When finished, click the OK button.
FIGURE 1. Page Properties:
Choosing a Background Color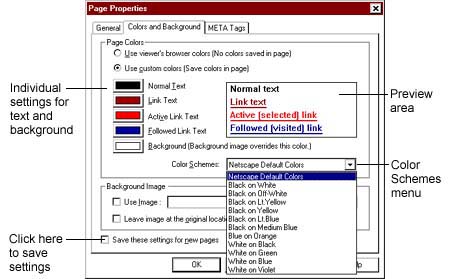 |
| |
If you do not specify colors yourself, the colors
displayed when someone views your Web page will be the colors selected
by that person. If the person has made no selections, the browser's default
display colors will be used.
Adding
a Background Texture
(or Other Background Image)
When you see a textured background on a Web page, you are looking at a
repeated image that happens to be a texture rather than a picture or symbol
(such as a logo). To use something other than a solid background color,
you must specify an image source file. This document includes instructions
for downloading a free background image from a website. It does not include
instructions for creating your own images (using a graphics program like
PhotoShop, for example).
Background Image Files
The two file formats commonly used (and recognized!) on the Web are GIF
(.gif) and JPEG (.jpg). Generally speaking, GIF files are most suitable
for black & white images or line drawings or other images containing
a maximum of 256 colors. JPEG files are best for photographs (the file
size is smaller and there is full-color support i.e., 16.7 million colors).
There is a background sampler page on Netscape's website from which
you can download background textures free of charge. Alternatively, you
can use the Search feature to find other "free backgrounds". Once
you find a background you want to use, it is a good idea to copy (download)
it, and then publish the background along with the page itself to your
account on CSUN's Web server. Netscape allows you to use its backgrounds
directly from the Netscape server, but other sites will tell you to download
what you want to use.
To download a background image file from Netscape (or some other site),
do the following.
- Go to the site from which you wish to download an image file, such
as http://wp.netscape.com/assist/net_sites/bg/backgrounds.html
(see Figure 2, below).
FIGURE 2. Some Textures
Available from Netscape's Background Sampler Page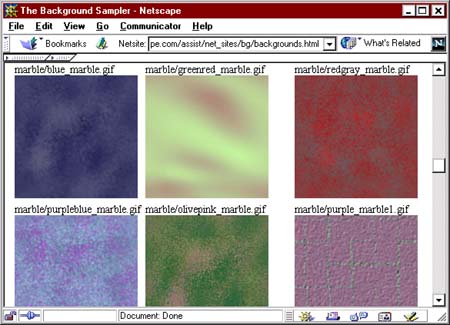 |
| |
-
Position the mouse pointer over the image you want to copy.
-
Access the context-sensitive pop-up menu as follows:
-
On a Windows computer, click the right mouse button.
-
On a Macintosh, hold down the mouse button until the menu appears (about
one second).
-
Choose Save Image As... (Windows) or Save this image as...
(Macintosh).
-
In the "Save As" dialog box, choose the folder where you want to save the
file. For the purposes of these instructions, this should be the same folder
where you save your Web page (HTML) files.
-
Click the Save button to save the file.
Specifying a Background Texture/Image
To specify a background texture/image for your page, do the
following.
-
From the Format menu choose (i.e., click) Page
Colors and Properties (Windows) or Page Properties (Macintosh).
-
In the "Page Properties" dialog box click the Colors and
Background tab.
-
In the "Background Image" (Windows) or "Page Background"
(Macintosh) section toward the bottom of the dialog box, click the Choose
File button.
-
Locate and double-click the desired file (or highlight the
filename and click the Open button).
-
You may need to change text color selections to complement
the background chosen (see Figure 1, above). It is a good idea to select
a background color that is "similar" to your texture. That way, if the
background doesn't display for some reason, the overall "look" will still
be okay (text and links visible, etc.).
-
If you would like to use the background and color scheme
for all your Web pages, click to place an X
in the box next to "Save these settings for new pages".
-
When finished, click the OK button.
Publishing Notes:
-
If your Web page file and your background image file are
saved in the same folder (as suggested above), the background image file
will be transferred (uploaded) automatically when you publish your page.
-
There is a box that can be checked if you want to "Leave
image at the original location" (i.e., somewhere out there on the Web).
However, as stated above, it is generally preferable to save your own copy
of a background image to publish with your Web page(s).
|
|